
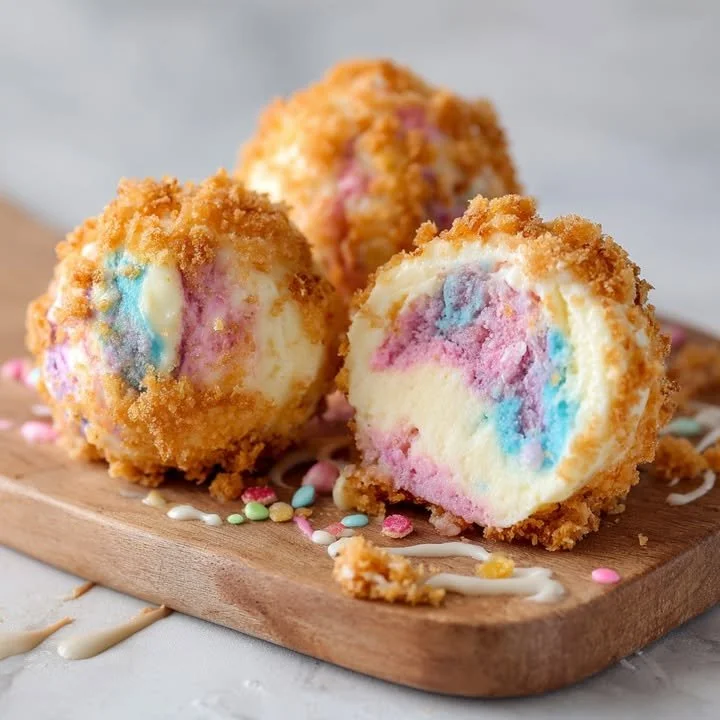
Next, prepare your dipping stations! Set up three separate bowls: one for flour, one for the beaten eggs, and one for the panko breadcrumbs mixed with crushed graham crackers. Once your cheesecake balls are firm, take them out of the freezer. Roll each ball in flour first, then dip it in the egg, and finally coat it with the panko mixture. Make sure they’re nice and evenly coated for that crispy texture.
In a frying pan or deep fryer, heat the oil to about 350°F (175°C). Gently place a few cheesecake bombs in the hot oil, making sure not to overcrowd the pan. Fry them for about 2–3 minutes on each side until they turn a beautiful golden brown. As they fry, your kitchen will fill with the delicious aroma of a deep-fried treat—it’s simply irresistible! Once fried, use a slotted spoon to transfer them to a plate lined with paper towels to absorb any excess oil.
While the bombs cool slightly, pull apart your cotton candy to give it that fluffy texture. I like to add a small tuft on top of each cheesecake bomb before serving for that playful touch. These little crispy delights are best served warm, and if you have any leftover cotton candy, it’s a fun garnish that adds to the presentation!
Pro Tips for Best Results
I tested this recipe three ways, and the best result came from using a sweeter variety of cotton candy—trust me, it makes a difference! The classic pink or blue cotton candy not only adds flavor but also a nostalgic pop of color that’s so visually appealing. I also found that allowing the cheesecake filling to chill completely is crucial; if it’s too warm, it can be hard to work with and won’t hold its shape during frying. Additionally, I discovered that frying in small batches ensures each bomb gets enough heat to cook evenly without becoming overly greasy.
Make sure to keep an eye on the temperature of your oil. If it’s too low, the cheesecake bombs will absorb too much oil and become soggy; too high and they’ll burn too quickly. I like to use a thermometer to ensure perfect frying every time. And don’t forget to let your cooked bombs drain on paper towels to rid them of excess oil for that perfect crunch!
Lastly, while it can be tempting to skip the freezing step, I highly recommend it! I found that freezing the bombs not only helps them hold their form while frying but also enhances the creamy texture of the cheesecake by keeping it nice and chilled inside while the exterior is crispy.
Common Mistakes to Avoid
One common mistake I made the first time was not sealing the cheesecake filling well enough when shaping the bombs. I had a few that burst in the oil, which was a mess! Make sure you fully encase the cheesecake in the outer coating and press it together firmly. It ensures that all that delicious filling stays inside where it belongs. (See the next page below to continue…)