
Cool Whip Candy is a ridiculously simple, no-bake treat that tastes just like a homemade 3 Musketeers bar—light, fluffy chocolate mousse on the inside with a smooth, snappy chocolate shell on the outside. With just a few ingredients and a microwave, you can whip up a pan of bite-size candies that look and feel totally “candy shop” without any thermometers, stovetop drama, or fancy equipment.
These are perfect for holidays, gifting, party trays, or whenever you get a craving for something soft, chocolatey, and dangerously poppable.
Why You’ll Love This Recipe
This recipe hits that sweet spot between “embarrassingly easy” and “everyone thinks you’re a candy genius.” The filling has that exact 3 Musketeers texture—airy, creamy, and melt-in-your-mouth, thanks to the combination of melted chocolate and Cool Whip. The process is almost foolproof: melt, fold, freeze, cut, and coat. There’s no baking, no tempering, and no special tools needed besides a bowl, spatula, and a pan.
It’s also highly scalable and budget-friendly. One batch makes a lot of bite-sized pieces, which is ideal if you’re filling gift boxes, cookie tins, or dessert platters. You can stick to the classic “milk chocolate center + milk or dark chocolate shell” for the truest candy bar vibe, or swap in white or dark chocolate for your own signature spin. Once these hit the table, they disappear fast—so plan to stash a few in the freezer just for you.
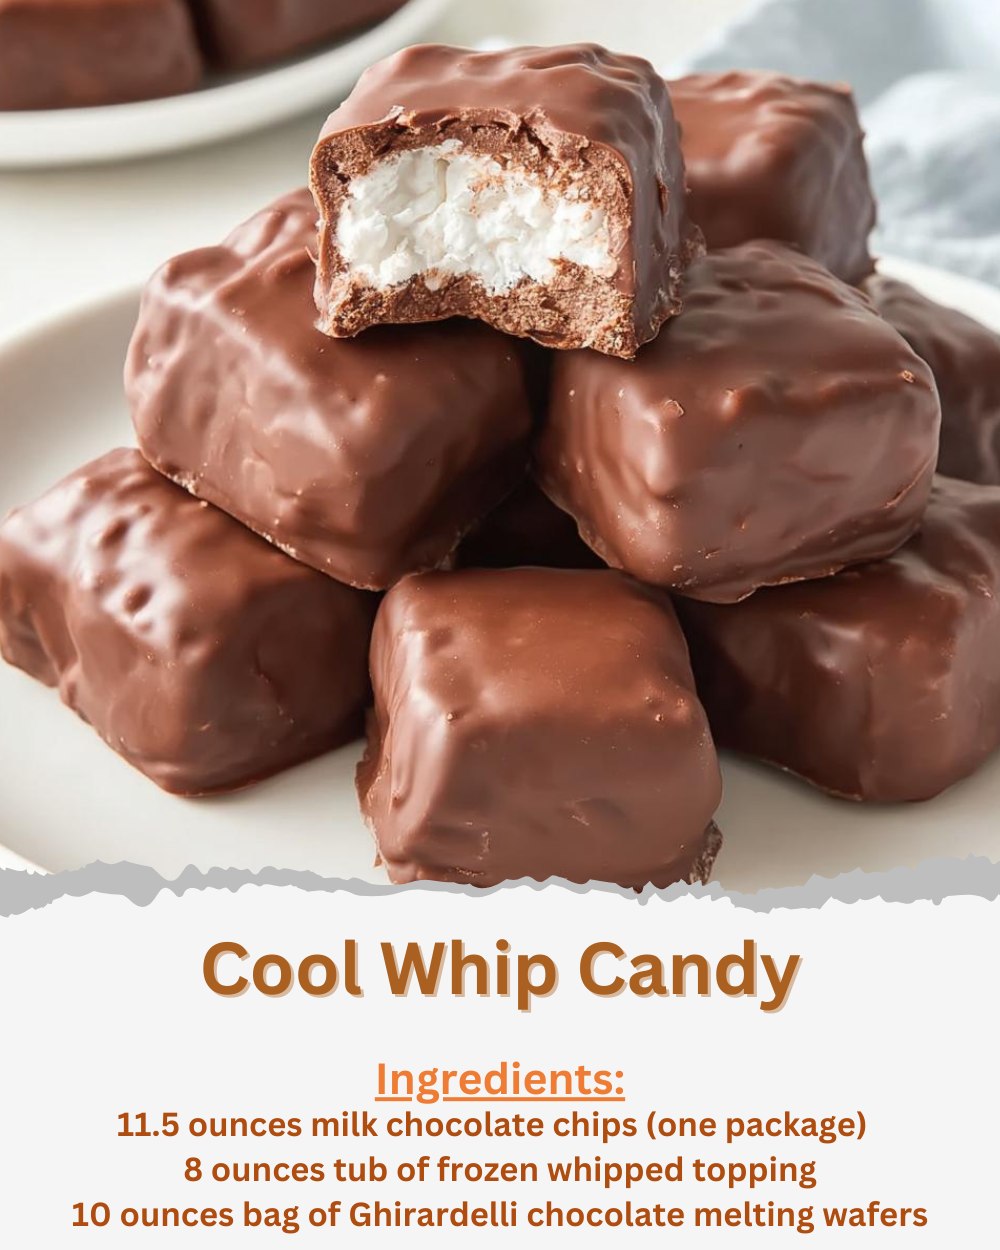
Ingredients
For the fluffy chocolate center:
- 3 cups milk chocolate chips (or high-quality milk chocolate, chopped), divided
- 8 ounces Cool Whip (frozen whipped topping), fully thawed
For the chocolate coating:
- 10–12 ounces chocolate melting wafers, almond bark, or couverture chocolate (milk or dark)
- 1–2 teaspoons neutral oil (vegetable or coconut), if needed for thinning
Optional for topping:
- Flaky sea salt
- Holiday sprinkles
- Crushed candy canes
How the Ingredients Work
The magic of this candy is all about texture. Cool Whip brings a light, stabilized fluffiness that holds up when mixed with chocolate and frozen. Using it thawed means it folds easily and creates a mousse-like center once it sets. Milk chocolate chips or chopped bars form the base flavor of the filling; they melt smooth, sweet, and familiar, giving you that classic 3 Musketeers taste.
For the coating, melting wafers or almond bark are a dream because they’re designed to melt and set glossy without tempering. If you’re using regular chocolate chips or chopped chocolate for coating, a teaspoon of oil helps keep the shell smooth, easier to dip, and less prone to thick, clumpy coverage. A sprinkling of salt, sprinkles, or crushed candy adds visual appeal and a little flavor contrast.
Step-by-Step: Making the Fluffy Center
Line an 8×8- or 9×9-inch baking dish with parchment paper, leaving some overhang on two sides to lift the candy out later. Lightly spray or butter the parchment if your chocolate tends to stick. Set aside.
In a microwave-safe bowl, add 2 cups of the milk chocolate chips (reserving the remaining 1 cup). Microwave in 20–30 second bursts, stirring well after each, until the chocolate is completely melted and smooth. Let it cool just a minute or two—still fluid but not piping hot—so it doesn’t shock the Cool Whip.
Scoop the thawed Cool Whip into a large mixing bowl. Pour the melted chocolate over it and gently begin folding together with a spatula. At first, it might look streaky or even slightly grainy—keep folding, scraping the bottom and sides, until it turns into a uniform, fluffy mixture. Work relatively quickly, as the chocolate will start to firm as it cools, but don’t beat aggressively; folding preserves the airy texture.
When fully combined, transfer the mixture into the prepared pan. Use the spatula to spread and press it evenly into the corners, smoothing the top as much as possible. Aim for an even thickness so your candies are uniform. Cover the pan and freeze for at least 1–2 hours, or until very firm.
Cutting and Preparing for Dipping
Once the chocolate-Cool Whip center is solid, lift it out of the pan by the parchment overhang and place it on a cutting board. Use a sharp knife (you can lightly grease the blade or warm it under hot water, then dry it) to trim any ragged edges if you want a cleaner look.
Cut the slab into bite-size squares or small rectangles—anywhere from 1 to 2 inches, depending on how big you want the candies. As you cut, place the pieces on a parchment-lined baking sheet, spacing them slightly apart so they don’t fuse back together.
Return the cut pieces to the freezer for at least 30 minutes. Very cold centers are essential for easy dipping; they help keep the filling from melting into the coating and help the shell set quickly and cleanly.
Melting and Handling the Coating Chocolate
For the coating, place your melting wafers, almond bark, or chopped chocolate (plus oil, if using) in a clean microwave-safe bowl. Heat in 20–30 second bursts, stirring between each, until completely melted and silky. Avoid overheating, which can cause the chocolate to scorch or seize; stop heating as soon as the last lumps have melted in the residual heat.
If the chocolate seems too thick, add an extra teaspoon of oil and stir until it loosens slightly. You want it fluid enough to coat smoothly but not so thin it runs right off. Keep the melted chocolate warm but not hot—if it starts to cool and thicken as you work, give it a brief burst in the microwave.
Dipping, Decorating, and Setting
Working with a few frozen centers at a time (leaving the rest in the freezer so they stay firm), drop one square into the melted chocolate. Use a fork or dipping tool to turn it, coating all sides. Lift it out, tap the fork gently on the edge of the bowl to shake off excess chocolate, then slide the candy onto a parchment-lined baking sheet using a toothpick or another fork.
While the coating is still wet, sprinkle the top with a pinch of flaky sea salt, holiday sprinkles, crushed candy canes, or leave it plain for a true 3 Musketeers look. Repeat with remaining pieces, working in batches so the centers stay as cold as possible.
When all candies are dipped, place the tray in the fridge or freezer until the chocolate is fully set and snaps when bitten. Once firm, you can trim any pooled chocolate edges with a knife if you want an ultra-clean finish, or leave them rustic and homey.
Tips, Tricks, and Texture Fixes
If your filling mixture turns grainy or seems to seize when you add Cool Whip, it usually means the chocolate was too hot. Next time, let the melted chocolate cool slightly before folding. A little graininess won’t ruin the taste, but for the smoothest interior, temperature control matters and gentle folding helps.
If dipping is leaving you with thick, goopy shells, thin the chocolate with a bit more oil and make sure your centers are very cold. Quick, confident dipping and tapping off the excess gives the most even coverage. Work over parchment to catch drips; it keeps cleanup easy.
If you prefer a softer shell, use milk chocolate or almond bark. For a crisper “snap,” go with dark chocolate or higher-cacao couverture and let the candies chill fully before eating. Want extra “fluff” inside? Fold in just a touch more Cool Whip—but don’t overdo it or the centers may be too soft to cut and dip.
Flavor Variations and Fun Twists
Once you’ve mastered the classic version, there’s a lot of room to play. Try using dark chocolate for the filling and milk chocolate for the shell for a more grown-up, less sweet candy. Swap milk chocolate chips for white chocolate in the center for a “white chocolate truffle” effect, then coat in dark chocolate for contrast.
You can stir in a few drops of peppermint extract to the filling for a chocolate mint version, or a touch of orange extract for a chocolate orange twist. Fold in finely crushed Oreos, toffee bits, or finely chopped nuts into the center mixture for little bursts of texture. Just keep add-ins minimal so you don’t lose the signature fluffy mouthfeel.
For holiday candies, tint white chocolate coating with oil-based candy coloring and drizzle over the set candies in red and green stripes. For a s’mores-inspired spin, roll freshly dipped candies in finely crushed graham crackers before the chocolate sets.
Make-Ahead, Storage, and Gifting
Cool Whip Candy is an ideal make-ahead treat. Once dipped and fully set, transfer the pieces to an airtight container, layering them with parchment or wax paper to prevent sticking. Store them in the fridge for up to a week or in the freezer for 1–2 months.
Straight from the freezer, the centers will be a bit firmer and more nougat-like; from the fridge, they’ll be softer and more mousse-like. They also hold up surprisingly well at cool room temperature for a couple of hours on dessert tables, though if your kitchen is very warm, keep them chilled until closer to serving time.
For gifting, tuck a mix of plain and decorated candies into small candy boxes or tins lined with tissue. Add a little card describing them as “homemade 3 Musketeers-inspired Cool Whip Candy” and watch people light up. Because they’re rich, small portions go a long way, making them perfect to share.
Serving Ideas and When to Make Them
Serve these candies alongside cookies, fudge, bark, and truffles on a holiday dessert board for a nice mix of textures and flavors. They’re also great perched next to a coffee bar or hot cocoa station, since the airy centers pair beautifully with warm drinks.
They’re ideal for Christmas, Valentine’s Day, party favors, bake sales, or anytime you need a fast, impressive homemade candy. Cut them smaller for “bonbon” style bites or larger for full bar-style pieces you can wrap individually.
Conclusion
Cool Whip Candy (3 Musketeers Candy Bar style) takes three humble ingredients and turns them into something that feels downright magical—fluffy, chocolatey centers wrapped in a crisp, glossy shell. It’s the kind of recipe you’ll turn to whenever you need an easy win: no-bake, big payoff, endlessly customizable, and loved by absolutely everyone who tries it.