
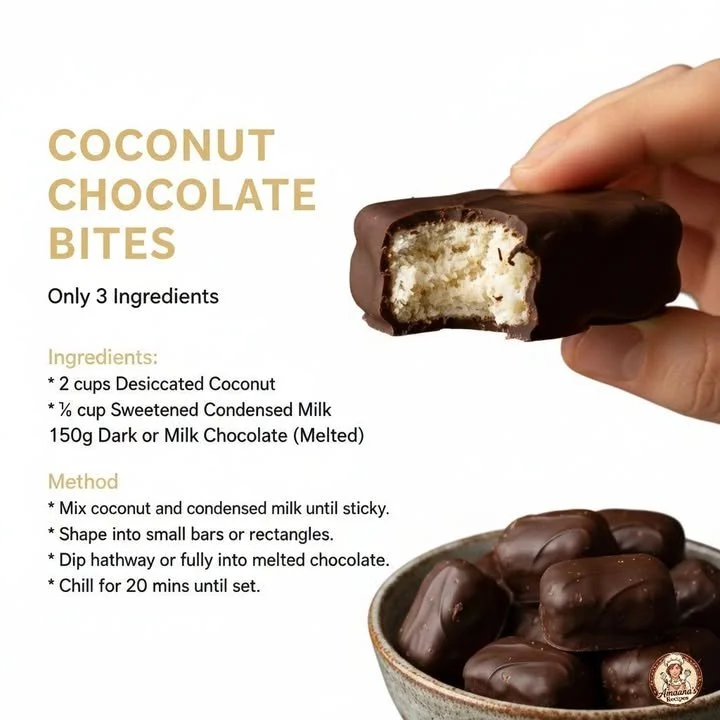
Welcome to my cozy kitchen! Today, I’m excited to share with you one of my go-to recipes that never fails to put a smile on my face: Coconut Choco Bites. These delightful little treats combine the tropical flavor of coconut with rich chocolate, making them the perfect snack or dessert. Whether I’m craving something sweet or need a quick energy boost, these bites have me covered!
Why You’ll Love This Recipe
I absolutely love this recipe because it’s incredibly simple and requires minimal ingredients. The best part? You can whip them up in no time, and they’re perfect for any occasion, from snack time to dessert after dinner. Plus, the combination of creamy coconut and luscious chocolate creates a melt-in-your-mouth experience that’s hard to resist! (See the ingredients in the next page below…)
Ingredients
– 1 cup unsweetened shredded coconut
– 1 cup dark chocolate chips or chocolate melts
– 1/4 cup sweetened condensed milk
– 1 tsp vanilla extract
– A pinch of salt
Equipment Needed
– Mixing bowl
– Microwave-safe bowl or double boiler
– Baking sheet
– Parchment paper
– Small cookie scoop or tablespoon
Step-by-Step Instructions
First, I start by combining the shredded coconut, sweetened condensed milk, vanilla extract, and salt in a mixing bowl. The texture of the coconut against the creamy condensed milk is simply divine. I mix it until it’s well incorporated. Then, I let the mixture sit for a few minutes, so the coconut absorbs the moisture and gets a bit gooey—trust me, this really enhances the flavor! (See the next page below to continue steps…)
Next, I line a baking sheet with parchment paper for easy cleanup. Using a small cookie scoop, I carefully scoop out handfuls of the coconut mixture and shape them into bite-sized balls. As I form these little delights, I can’t help but smile at the thought of how delicious they’ll be once they’re all rolled up! Once I’ve shaped them all, I pop the baking sheet into the fridge for about 30 minutes to help them firm up.
While the coconut bites are chilling, it’s time to melt the chocolate. I usually use the microwave for this, heating the chocolate chips in 30-second intervals, stirring in between to ensure it’s perfectly smooth and glossy. The aroma that wafts through my kitchen is heavenly! Once melted, I take the coconut bites out of the fridge and dip each one into the chocolate, using a fork to help coat them generously before placing them back on the baking sheet.
Finally, after coating each bite, I like to sprinkle some extra shredded coconut on top for added texture and visual appeal. Then I let them sit until the chocolate hardens, which typically takes about an hour in the fridge. The suspense is always worth it, as the final result is a stunning treat that I can’t wait to devour!
Pro Tips for Best Results
One critical tip I learned the hard way is to let the chocolate cool slightly before dipping the coconut bites. If the chocolate is too hot, it can cause the coconut mixture to melt, turning your beautiful bites into a gooey mess. So, make sure it’s warm but not scorching!
Another thing I’ve tried is using different types of chocolate. Dark chocolate is my favorite, but I find that milk chocolate gives a sweeter bite, while white chocolate adds a unique twist to the flavor. If you’re feeling adventurous, I recommend experimenting with your favorite chocolate varieties to see what you prefer.
Lastly, I highly suggest letting the coconut bites sit in the fridge longer than an hour after dipping to really set the chocolate. It may be hard to wait, but I promise the longer they chill, the better they taste. The texture becomes more cohesive, and you’ll have an irresistible treat that’s perfect for sharing—or keeping all to yourself!
Common Mistakes to Avoid
One common mistake I see people make is not chilling the coconut mixture long enough before shaping. If it’s too sticky, it’ll be challenging to form the bites. Trust me, letting it firm up a bit in the fridge works wonders for shape and ease! (See the next page below to continue…)
Another pitfall is not using parchment paper on the baking sheet. I forgot once, and believe me, it’s a nightmare trying to remove the chocolate-covered bites from the pan. Parchment paper saves so much hassle and ensures that your treats will come off cleanly!
Also, be mindful of your chocolate melting technique. It’s easy to scorch it, so keep a close eye while using the microwave or even a double boiler. If you see any little lumps, don’t panic—just keep stirring, and it will eventually melt into a smooth pool of deliciousness! However, if you overheat it, it can become grainy, which isn’t ideal for dipping.
Lastly, don’t skip the extra sprinkle of coconut on top after dipping! It not only adds a lovely finish but also enhances that wonderful coconut flavor. It’s these little details that can elevate your Coconut Choco Bites from good to absolutely fabulous!
Serving Suggestions
When it comes to serving, I love presenting my Coconut Choco Bites on a beautiful platter, perhaps alongside some fresh fruits like strawberries or mango slices. The vibrant colors really make the setup pop, creating a feast for the eyes as well as the taste buds. They can even double as a centerpiece during casual gatherings with friends and family!
For more intimate occasions, I enjoy pairing these bites with a warm cup of coffee or tea. The rich, chocolatey goodness complements the hot beverage perfectly, creating a comforting moment. My favorite is a dark roast coffee—it just brings out the coconut flavor so beautifully!
If you’re hosting a party, consider serving them as part of a dessert bar! You can include an assortment of sweets alongside your Coconut Choco Bites, like brownies, cookies, and colorful candies. It adds a fun element to your gathering and lets everyone satisfy their sweet tooth all at once!
Variations & Customizations
One way I’ve enjoyed switching up my Coconut Choco Bites is by adding nuts! Chopped almonds or pecans mixed into the coconut mixture gives it a delightful crunch and extra nutrition, which keeps me feeling satisfied. It really elevates the texture, making each bite even more interesting to enjoy.
Another fun customization is adding a hint of flavoring to the chocolate. Sometimes, I’ll mix in a few drops of peppermint or orange extract into the melted chocolate for a festive twist. Just make sure not to overdo it—start with a little and taste as you go! You’ll be amazed at how a small change can lead to a delightful new flavor experience.
Lastly, if you’re in the mood for a little flair, try rolling the dipped bites in crushed nuts, sprinkles, or shredded coconut before they set. This adds not only to the visual appeal but gives added flavor and texture with every bite. The possibilities are endless, and I love getting creative with these little goodies!
How to Store, Freeze & Reheat
These Coconut Choco Bites can be easily stored in an airtight container in the fridge for about a week, though they usually don’t last that long in my house! The cool temperature helps keep the chocolate and coconut firm, maintaining their scrumptious texture. They also make for perfect grab-and-go snacks!
If you want to keep them for a longer period, popping them in the freezer is an excellent option. Just make sure they’re in a well-sealed container; you can freeze them for up to three months. They’re perfect for when I have unexpected guests or want a sweet treat on a rainy day. Just take them out and let them thaw for a few minutes before enjoying!
Reheating isn’t necessary since they’re best enjoyed cold or at room temperature. However, if you ever have leftover bites that have hardened too much in the fridge, a quick 10-second zap in the microwave can bring them back to that gooey, delightful texture without melting the chocolate. Just be cautious not to overdo it!
Conclusion
And there you have it—my delicious and easy recipe for Coconut Choco Bites! I hope you enjoyed coming along with me on this culinary adventure. These little bites are perfect for any occasion, and I can’t wait for you to try them out in your own kitchen. Don’t forget to share them with friends and family (if you want to!) because they are truly a treat worth sharing! Happy cooking!