
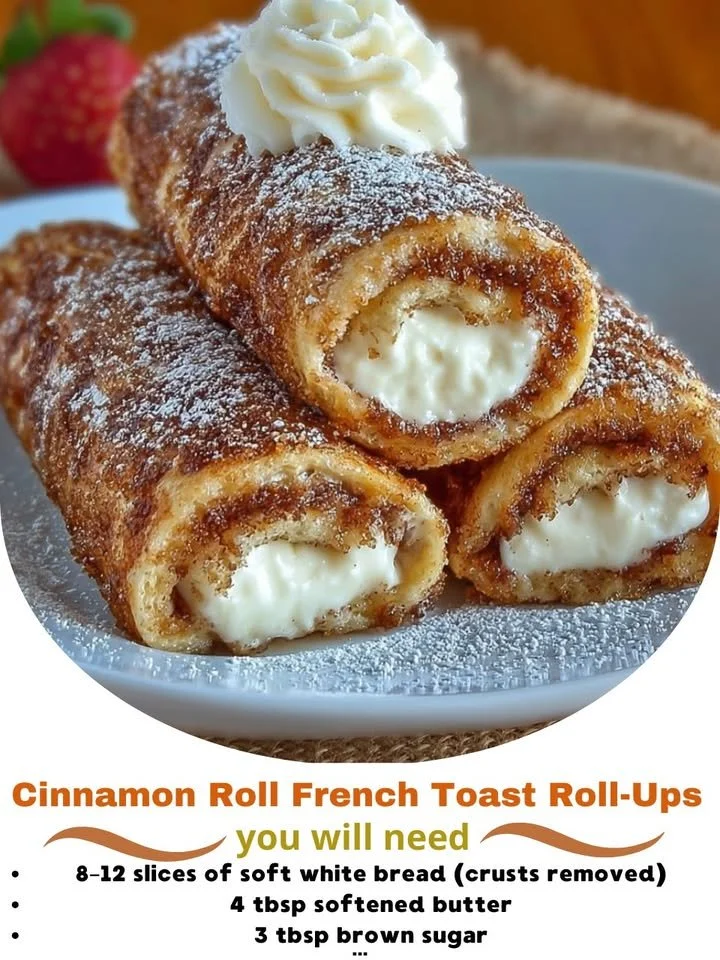
Welcome to my kitchen! Today, I’m excited to share one of my absolute favorite breakfast treats: Cinnamon Roll French Toast Roll-Ups. Picture this: warm, gooey cinnamon rolls morphed into delightful little roll-ups, drizzled with a sweet glaze and begging to be devoured. They’re perfect for lazy Sunday mornings or special occasions when you want to impress your family and friends. After just one bite, you’ll wonder why you didn’t try these sooner!
Why You’ll Love This Recipe
There’s something truly magical about the combination of cinnamon and sweetness wrapped in soft bread, and these roll-ups take that experience to a whole new level. They are easy to make, incredibly delicious, and perfect for both kids and adults. Plus, you can prepare them in advance and cook them up on a cozy morning. Trust me, the aroma wafting through your kitchen will have everyone begging for more! (See the ingredients in the next page below…)
Ingredients
– 8 slices of bread (white or whole wheat works great)
– 4 oz cream cheese, softened
– 1/4 cup sugar
– 2 tsp ground cinnamon
– 1/4 cup butter, melted
– 2 eggs
– 1/2 cup milk
– 1 tsp vanilla extract
– Powdered sugar for dusting
– Maple syrup for serving
Equipment Needed
– Rolling pin
– Mixing bowls
– Whisk
– Baking sheet
– Parchment paper
– Non-stick spray or butter for greasing
– Measuring cups and spoons
Step-by-Step Instructions
Let’s dive into the fun part – making these delightful roll-ups! First, start by flattening each slice of bread with a rolling pin. This will help you roll them up easily later on. Once they’re nice and flat, spread a generous layer of softened cream cheese on each slice. Then, in a small bowl, mix together sugar and cinnamon – the aroma will start to fill your kitchen, and you’ll be so excited to dig in! Sprinkle the cinnamon-sugar mixture over the cream cheese layer, ensuring even coverage. (See the next page below to continue steps…)
Next, grab one edge of the bread slice and carefully roll it up, tucking in the sides as you go to keep all that gooey goodness inside. Repeat this for each slice. Now, in a shallow bowl, whisk together the eggs, milk, vanilla extract, and a pinch of salt. Dip each roll-up into the egg mixture, allowing them to soak for just a moment. We’re looking for that perfect custardy texture on the outside.
Preheat your oven to 375°F (190°C) and line a baking sheet with parchment paper. Place the roll-ups seam side down on the sheet, making sure they’re spaced out just a bit. Drizzle melted butter over the top – you know it’s going to get golden and crispy! Bake them for about 20 minutes, or until they’re beautifully golden brown and your kitchen smells heavenly.
While those are baking, you can whip up a simple glaze by mixing powdered sugar with a splash of milk and a drop of vanilla. Trust me, you’ll want to drizzle it over the roll-ups when they’re fresh out of the oven. Once they’re cool enough to handle, drizzle with that irresistible glaze, serve warm, and watch them disappear!
Pro Tips for Best Results
I tested this recipe three ways to find the perfect balance of flavor and texture. I discovered that using slightly stale bread helps create that delightful chewiness. So if you have a loaf that’s a few days old, it’s perfect for this! I also recommend experimenting with different types of bread; brioche or challah can elevate these roll-ups even further with their rich flavors.
Another tip? Don’t skimp on the cinnamon-sugar mixture! The more flavor you pack into the roll-up, the more delicious it will be. When I used a bit more sugar, it created a lovely caramelized crust on the outside – a total game-changer! And if you have any leftover filling, feel free to dollop a bit more cream cheese or cinnamon sugar on top before baking.
Finally, be careful not to over-soak the roll-ups in the egg mixture. This can cause them to become mushy when baked. A quick dip will do just fine to give you that rich, custardy flavor without losing the delightful texture.
Common Mistakes to Avoid
One of the biggest mistakes I’ve made in the past is not flattening the bread enough! If the slices are too thick, they can be tricky to roll and may burst open while baking. Trust me, taking that extra moment with the rolling pin is well worth it for evenly cooked, pretty roll-ups. (See the next page below to continue…)
Another pitfall I’ve encountered is baking them at too high of a temperature. I once cranked the oven up thinking they’d cook faster, only to end up with burnt outsides and a raw middle. Cooking them at 375°F ensures they bake evenly and develop that lovely golden color.
Don’t forget to keep an eye on the baking time! Every oven is different, so start checking at around 15 minutes if you’re not sure. You want them golden and crispy, not overdone. And for those who feel they might lose roll-ups out from their seams, you can secure them with a toothpick before baking. Just remember to remove it before serving!
Serving Suggestions
These Cinnamon Roll French Toast Roll-Ups are delightful served fresh out of the oven, but they’re also versatile in how you present them. I love serving them on a big plate dusted with powdered sugar alongside a small pitcher of warm maple syrup for everyone to drizzle on as they please. It adds that personal touch that everyone enjoys!
For a fruity twist, consider adding fresh berries or sliced bananas alongside. The tartness of the berries cuts through the sweetness perfectly, and the colors make the plate pop. Trust me, a little burst of freshness elevates the whole experience!
Lastly, you can pair these roll-ups with crispy bacon or sausage for a savory contrast. The combination of sweet and salty is always a hit in our household. It’s the perfect brunch showcase that makes everyone feel loved and satisfied!
Variations & Customizations
Feel free to get creative with these roll-ups! One of my favorites is to add a layer of Nutella along with the cream cheese for a chocolatey twist. I’m telling you, the chocolate and cinnamon blend together in the most delightful way! Or how about trying a peanut butter and banana filling? Spread peanut butter on the bread, sprinkle with cinnamon sugar, and slice a banana on top – your taste buds will thank you!
If you’re in the mood for something a little less sweet, why not make a savory version? You can fill the roll-ups with scrambled eggs and cheese. Just whisk eggs with a little salt and pepper, pour them right in, and roll up as usual. Bake until cooked through, and you have a fantastic brunch dish that everyone will devour.
Lastly, consider drenching these roll-ups in a rich cream cheese frosting instead of the glaze. Just mix cream cheese with powdered sugar and milk to create a thicker sauce that you can slather on top for an even more indulgent treat!
How to Store, Freeze & Reheat
If you happen to have leftovers, which is a rarity in my house, you can store the roll-ups in an airtight container in the fridge for up to three days. Just reheat them in the oven or microwave, and they’ll be almost as delightful as when they were fresh.
For longer storage, these roll-ups freeze beautifully! I like to freeze them in a single layer on a baking sheet before transferring them to a freezer bag. This way, they won’t stick together, and you can grab one (or several!) whenever the craving hits. Just make sure to wrap them well to avoid freezer burn.
When you’re ready to enjoy a roll-up from the freezer, simply pop them in the oven at 350°F (175°C) until warmed through, or microwave for a quick treat, though I prefer the oven for that crisper edge. Just drizzle with a little icing once they’re warm, and you’re back in breakfast heaven!
Conclusion
And there you have it – my delightful recipe for Cinnamon Roll French Toast Roll-Ups! I hope this has inspired you to whip up a batch in your own kitchen. They are a guaranteed crowd-pleaser, and I promise the smiles on your family’s faces will make the effort worthwhile. So go ahead, gather your ingredients, and get ready to savor every sweet bite! Happy cooking!