
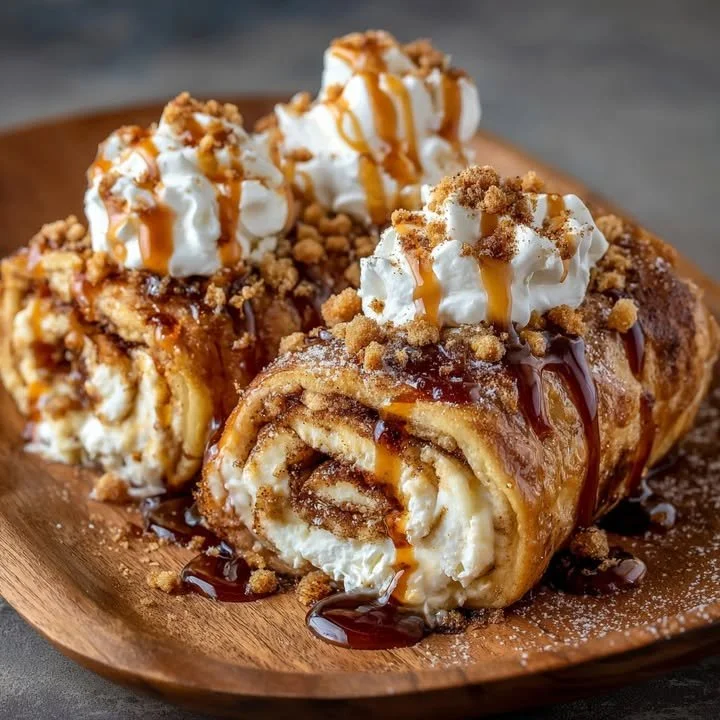
I recently found myself craving something sweet and indulgent, something that would wrap up a long day with a warm hug. After some creative experimentation in my kitchen, I came up with the delightful idea of Cinnamon Roll Cheesecake Chimichangas. These crispy, golden delights are filled with the creamy richness of cheesecake and the warm spiciness of cinnamon rolls, making them the perfect treat. Trust me; once you take your first bite, you’ll be transported to dessert heaven!
Why You’ll Love This Recipe
If you adore all things sweet and crispy, you’re in for a treat with this recipe. The combination of the creamy cheesecake filling punctuated by the glorious notes of cinnamon and sugar, all wrapped in a crispy tortilla, is simply unbeatable. Plus, they’re a fun twist on traditional desserts, and your friends and family will be in awe when you serve these up. Prepare for compliments! (See the ingredients in the next page below…)
Ingredients
– 6 large flour tortillas
– 8 oz cream cheese, softened
– 1 cup powdered sugar
– 2 teaspoons vanilla extract
– 1 teaspoon ground cinnamon
– 1 cup granulated sugar
– 1/2 cup butter, melted
– Cooking oil for frying
– Cinnamon sugar mixture (1/4 cup granulated sugar mixed with 2 teaspoons ground cinnamon) for coating
Equipment Needed
– Mixing bowl
– Hand mixer or stand mixer
– Pastry brush
– Frying pan or deep fryer
– Paper towels for draining
– Serving plate
Step-by-Step Instructions
First, start by making the cheesecake filling. In a mixing bowl, I blended the softened cream cheese, powdered sugar, vanilla extract, and ground cinnamon using my hand mixer until it was smooth and fluffy. The aroma of cinnamon filling the kitchen was just divine! Once smooth, I set this mixture aside to let the flavors meld together. It’s super important to get the cream cheese really soft, so it blends well. (See the next page below to continue steps…)
Next, it’s time for the fun part—assembling the chimichangas! Take a tortilla and spoon a generous amount of the cheesecake mixture onto the center, then fold the sides in and roll it up tightly. I always recommend securing it with a toothpick or light pressing to ensure it doesn’t open while frying. Repeat this process for all six tortillas. My kitchen was filled with excitement as I crafted each one, envisioning the crispy goodness to come!
After you’ve rolled up each chimichanga, heat your oil in a frying pan over medium heat. I usually test if the oil is ready by dropping a small piece of tortilla in; if it sizzles, I know I’m good to go! Fry each chimichanga for about 2-3 minutes on each side until they’re golden and crispy. The sound of them sizzling away was music to my ears! Once they reached that perfect golden color, I placed them on paper towels to drain the excess oil.
Finally, here comes the pièce de résistance! While the chimichangas are still warm, I brush them with melted butter and roll them in the cinnamon sugar mixture. The transformation from plain tortillas to gorgeous cinnamon roll-esque treats happens right before your eyes, and oh, the smell is heavenly!
Pro Tips for Best Results
1. For the filling, I tested various ratios of sugar and cinnamon, and I found that balancing the sweetness with the spice really enhances the flavors. Make sure your cream cheese is at room temperature for the best consistency; nothing’s worse than chunky filling!
-
When frying, don’t overcrowd the pan. I usually fry two at a time to ensure they get an even, beautiful golden color without lower the oil’s temperature too much. Patience is key to that perfect crunch!
-
If you don’t want to fry them, you can bake these chimichangas! A quick brush with melted butter and about 15-20 minutes in the oven at 375°F gives you a healthier, yet deliciously crispy version.
Common Mistakes to Avoid
One mistake I made early on was not properly sealing the chimichangas. I learned the hard way that they can burst open while frying, resulting in less filling inside. Making sure to fold in the sides and roll tightly can save you from a messy disaster! (See the next page below to continue…)
Another mistake to avoid is using cold tortilla. If they’re not pliable enough, they can crack while rolling. I recommend warming them slightly in the microwave, wrapped in a clean kitchen towel for about 15 seconds to make them more flexible.
Also, keep an eye on the frying temperature. Too hot, and they’ll burn; too cool, and they’ll become greasy. Finding that sweet spot can take a little trial and error. You’ll know it’s just right when they turn beautifully golden brown!
Finally, don’t skip the cinnamon sugar coating! This final touch is what takes these delicious chimichangas over the top, giving them that authentic cinnamon roll flavor.
Serving Suggestions
These Cinnamon Roll Cheesecake Chimichangas are perfect served warm, dusted with extra cinnamon sugar and drizzled with cream cheese icing for an extra indulgent treat. I love pairing them with a scoop of vanilla ice cream on the side for a delightful contrast of temperatures.
For a fun gathering, I often set up a little dessert bar with various toppings, like chocolate sauce, whipped cream, or fresh berries. Everyone can customize their chimichangas just how they like, which adds to the fun!
And if you have leftovers (if you can believe it!), they are equally delicious served the next day. Just pop them in the microwave for a few seconds to warm them up, and you’ll be transported back to dessert heaven all over again.
Variations & Customizations
Feel free to get creative with the cheesecake filling! You can add different flavor extracts like almond or lemon to give it unique flair. I’ve even experimented with adding mini chocolate chips, which was a big hit in my house!
If you want to make these a bit healthier, try using whole wheat tortillas. They still fry up nicely and offer a more wholesome alternative without losing the delicious texture we all crave.
For the adventurous, consider incorporating a savory twist! Add in bits of bacon or sausage into the cheesecake mix with the cinnamon for a breakfast-style chimichanga. Trust me; this was an absolute hit during brunch with friends.
How to Store, Freeze & Reheat
To store any leftovers, simply place them in an airtight container and keep them in the fridge for up to three days. In my kitchen, I usually find they never last that long, but just in case, this method works great.
If you want to freeze them, make sure they are fully cooled before placing them in a freezer-safe bag. They can last up to three months in the freezer. Whenever I need a quick sweet fix, I just pull one out, pop it in the microwave for a few seconds, and voilà!
Reheating is easy; either microwave them for about 20 seconds or for that crispy texture, put them in the oven at 375°F for around 10 minutes. It’s like having fresh chimichangas all over again!
Conclusion
Cinnamon Roll Cheesecake Chimichangas truly are a delightful combination of flavors and textures, and making them felt like a hug from my kitchen! I hope you’ll give this recipe a try and create sweet memories of your own. Remember, the joy of cooking is all about experimenting and making it your own. Happy cooking!