
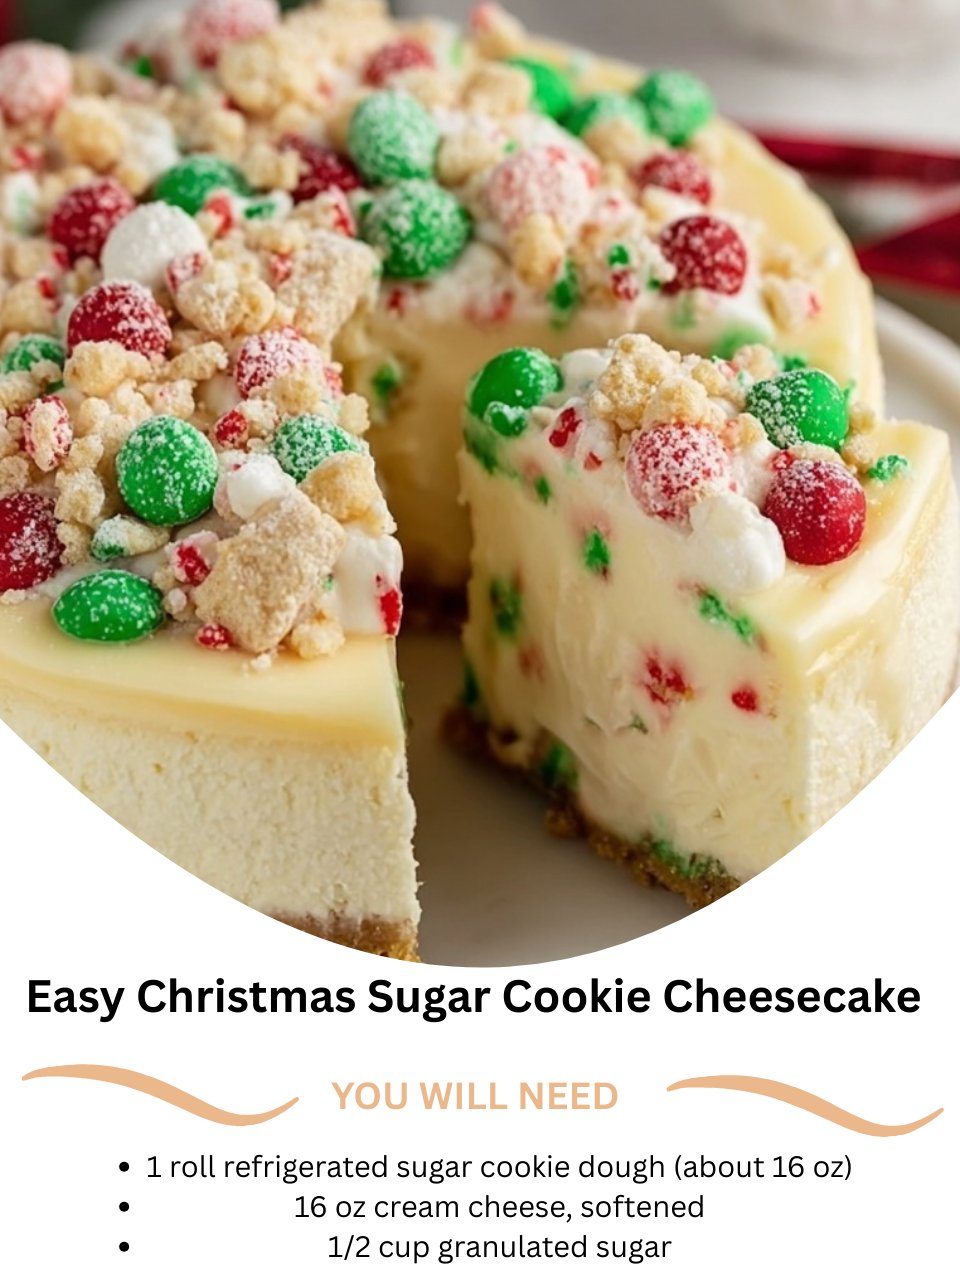
Let me tell you about the moment this Christmas Sugar Cookie Cheesecake transformed from a mere idea into a holiday miracle in my kitchen. Last December, overwhelmed by a pile of separate cookie and cheesecake recipes, I had a frantic, flour-dusted thought: What if they were one? I took a chance, and as it baked, my entire house filled with the warm, buttery perfume of sugar cookies melting seamlessly into the rich, tangy scent of cream cheese. The first slice was pure magic—a creamy, dreamy center hugged by a chewy, cookie-crust hug. It’s now the dessert I daydream about all year, and it brings such a joyful, nostalgic warmth to the table that feels like the very essence of the season in a single pan.
Why You’ll Love This Recipe
You are going to adore this recipe because it takes all the festive fun of baking sugar cookies and marries it to the luxurious, no-fuss elegance of a cheesecake. It’s the ultimate shortcut that feels incredibly special. You get that iconic sugar cookie flavor in every single bite without the hassle of rolling out dough or decorating dozens of individual cookies. It’s impressively easy, shockingly delicious, and it will absolutely become the show-stopping centerpiece of your holiday dessert spread that everyone asks you to make again and again.
Ingredients
- 1 roll (about 16 oz) refrigerated sugar cookie dough
- 16 oz (two 8-oz blocks) full-fat cream cheese, softened to room temperature
- 1/2 cup granulated sugar
- 2 large eggs, at room temperature
- 1 teaspoon pure vanilla extract
- 1/2 cup sour cream, at room temperature
- A pinch of fine sea salt
- Optional for garnish: holiday sprinkles, a drizzle of melted white chocolate, or a dusting of powdered sugar (See the next page below to continue…)
Equipment Needed
- 9-inch springform pan (this is non-negotiable for clean slices!)
- Stand mixer or hand mixer
- Rubber spatula
- Measuring cups and spoons
- Parchment paper
- Cooling rack
Step-by-Step Instructions
First, you’ll want to preheat your oven to 350°F (175°C). Take your springform pan and lightly grease the bottom and sides. I like to cut a round of parchment paper for the bottom—it guarantees your crust won’t stick, and it’s a tip I learned after a few too many frustrating battles with crumbly bottoms. Now, for the fun part: take that roll of sugar cookie dough. Press it directly into the bottom of your prepared pan, starting from the center and working your way out, trying to get it as even as possible. Don’t worry about perfect edges; it will spread as it bakes. I par-bake this for about 15 minutes, just until it’s puffed and lightly golden at the edges. This step sets the stage and prevents a soggy crust.
While the crust is getting a head start, let’s make the filling. This is where patience pays off. I cannot stress enough how important it is that your cream cheese, eggs, and sour cream are genuinely at room temperature. I’ve rushed this before, and you end up with a lumpy filling no matter how long you mix. In your mixer bowl, beat the softened cream cheese on medium speed until it’s completely smooth and creamy, scraping down the bowl once. This takes a good minute or two. Then, with the mixer on low, slowly stream in the sugar and beat until just combined.
Now, add the eggs one at a time, beating on low after each addition until the yolk just disappears. Over-beating the eggs incorporates too much air, which can lead to cracks. Once the eggs are in, beat in the vanilla, sour cream, and that tiny pinch of salt. The salt is my secret weapon—it balances all the sweetness and makes the vanilla and cream cheese flavors truly pop. The final filling should be silky, smooth, and luxuriously thick. Pour it over your slightly cooled cookie crust and gently tap the pan on the counter a few times to release any big air bubbles. (See the next page below to continue…)
Baking is the quiet, anticipatory part. Place the pan in the center of your preheated oven. I’ve found the sweet spot for my oven is about 45-50 minutes. You’re looking for the edges to be fully set, but the center should still have a slight, gentle jiggle—like set Jell-O—when you nudge the pan. The center will firm up as it cools. Do NOT open the oven door before the 40-minute mark! I made that mistake once, and the sudden temperature drop caused a major crack. Let it cool completely in the turned-off oven with the door slightly ajar, then transfer it to the counter before chilling it in the fridge for at least 4 hours, though overnight is truly best. The waiting is the hardest part, but it’s essential for that perfect, sliceable texture.
Pro Tips for Best Results
My number one pro tip is all about temperature. I take my cream cheese and eggs out of the fridge a full two hours before I plan to bake. If I’m in a pinch, I’ll place the sealed blocks of cream cheese in a bowl of warm (not hot) water for 15 minutes. Cold ingredients simply will not blend into that dreamy, smooth consistency we’re after, no matter how long you mix. Trust me, I’ve tried to shortcut this more times than I’d like to admit, and it always shows in the final texture.
The second tip is about mixing. After years of baking cheesecakes, I’ve learned to be gentle. Once you add the eggs, keep the mixer on low speed. High speed whips in too much air, which expands in the oven and then collapses, creating cracks and a less dense, creamy texture. I mix just until each ingredient is incorporated, scraping the bowl frequently. Think of it as folding the ingredients together with the help of the mixer, not beating them into submission.
Finally, embrace the slow cool-down. The dramatic shift from a hot oven to a cool kitchen is a prime culprit for cracks. Letting the cheesecake cool gradually in the turned-off oven mimics a professional pastry chef’s water bath method, but without the fuss of wrapping your pan in foil and worrying about water leaks. This slow cooldown allows the cheesecake to set gently and evenly, giving you that flawless, bakery-quality surface. I promise this extra bit of patience makes a world of difference.
Common Mistakes to Avoid
The first big mistake is using cold ingredients. I remember my first attempt at any cheesecake years ago; I was impatient and used cream cheese straight from the fridge. I mixed and mixed, but little lumps remained. I baked it anyway, thinking they’d melt away. They didn’t. The finished cake had tiny, unpleasant bits of unmixed cream cheese throughout. It was edible, but it wasn’t the smooth, luxurious experience I wanted. Now, I plan ahead—room temperature ingredients are non-negotiable. (See the next page below to continue…)
Another common pitfall is over-baking. It’s so easy to do because we’re trained to bake cakes until a toothpick comes out clean. With cheesecake, that’s a recipe for a dry, cracked, and rubbery dessert. That slight jiggle in the center is your best friend. It will set up as it cools. I set a timer for the minimum baking time and then watch it like a hawk for those last few minutes. If the edges are puffed and the center is that perfect wobbly circle, it’s done.
Don’t skip the chill time. I learned this the hard way after a last-minute dessert emergency. I thought four hours would be enough, but when I sliced into it, the filling was still a bit too soft and oozed on the plate. It tasted amazing, but it looked messy. A full overnight chill in the refrigerator allows the structure to firm up completely, giving you those pristine, clean slices that hold their shape beautifully on a serving plate.
Finally, be careful with your crust. When you’re pressing the cookie dough into the pan, it’s tempting to push some up the sides to form a tall wall. I’ve done this, and it always leads to trouble. The thick sides bake much slower than the thin bottom, and the filling can seep underneath, creating a weird layer. It also makes the crust dense and doughy instead of crisp and cookie-like. Focus on a nice, even layer on the bottom, and let the cheesecake be the star.
Serving Suggestions
I love serving this cheesecake with a simple, elegant garnish that nods to its sugar cookie origins. A light dusting of powdered sugar right before serving looks like a fresh snowfall, which is just so festive. Sometimes, I’ll melt a little white chocolate and drizzle it over the top in a zigzag pattern, then immediately add a scattering of red and green sprinkles or crushed candy canes for a bit of crunch and color. It makes the whole thing look professionally decorated with almost zero effort.
For a truly decadent experience, I’ll offer toppings on the side. A bowl of warm, homemade salted caramel sauce or a rich chocolate ganache lets guests customize their slice. A dollop of lightly sweetened whipped cream or a scoop of vanilla bean ice cream alongside is also heavenly. The cool creaminess alongside the dense cheesecake is a classic, perfect pairing that I never get tired of.
Presentation matters, especially during the holidays. I always use a sharp, thin-bladed knife to slice, dipping it in hot water and wiping it clean between each cut. This gives you those stunning, clean slices. I then transfer each slice to a festive plate, maybe with a sprig of mint or a few fresh raspberries for a pop of color. It’s these little touches that make serving dessert feel like a true celebration.
Variations & Customizations
One of my favorite ways to mix this up is by adding flavor to the cookie dough crust. Before pressing it into the pan, I’ll knead in a teaspoon of orange zest or a half teaspoon of almond extract right into the store-bought dough. It infuses the whole dessert with a subtle, wonderful fragrance. I’ve even mixed in a handful of finely chopped toasted pecans for a bit of nutty texture that plays so nicely with the creamy filling.
For the cheesecake filling itself, the possibilities are endless. I’ve swirled in a half cup of homemade cranberry sauce for a gorgeous pink marbled effect and a tangy burst of flavor. Another huge hit was folding a half cup of mini chocolate chips into the batter before baking. They sink a little, creating pockets of melted chocolate that taste like Christmas magic. You could also add a tablespoon of lemon zest for a brighter, zingier profile.
If you’re a fan of the classic cookie-and-milk combo, try this: replace the vanilla extract in the filling with ½ teaspoon of butter extract. It sounds simple, but it amplifies that buttery, baked-good flavor in the most incredible way. A friend of mine made a “gingersnap” version by using a spiced cookie dough and adding a teaspoon of ground ginger to the cheesecake filling. It was absolutely divine and felt even more wintry.
How to Store, Freeze & Reheat
Once assembled and chilled, this cheesecake keeps beautifully. I cover the springform pan tightly with plastic wrap, or if I’ve already removed the outer ring, I place the whole cake (still on the pan bottom) under a large, inverted bowl. It will stay fresh and delicious in the refrigerator for up to 5 days. The flavor actually deepens and improves after a day or two, making it a fantastic make-ahead dessert for holiday entertaining. Just add any powdered sugar or fresh garnishes right before serving.
Yes, you can freeze this! And I do, almost every year. After the cheesecake has chilled completely, I wrap the entire pan (or individual slices) tightly in a layer of plastic wrap, followed by a layer of heavy-duty aluminum foil. Frozen solid like this, it will keep for up to 2 months. I once forgot a few slices in the back of my freezer for three months, and they were still fantastic—a happy surprise in January!
To thaw, I’ve found the best method is patience. Transfer the wrapped cheesecake from the freezer to the refrigerator and let it thaw slowly overnight. This prevents condensation from forming on the surface and making it soggy. Do not try to speed-thaw it on the counter or, heaven forbid, in the microwave, as it will compromise the texture. Once thawed, it will taste just as fresh and creamy as the day you made it. I do not recommend reheating cheesecake, as it’s meant to be served cold.
Conclusion
This Christmas Sugar Cookie Cheesecake is more than just a recipe to me; it’s a happy, delicious shortcut to holiday joy. It captures every cozy, sweet feeling of the season in one unforgettable dessert. I hope it brings as much warmth and delight to your kitchen and your loved ones as it has to mine. Give it a try, and get ready for the compliments to roll in. Happy baking, and Merry Christmas