
The very first time I made this Christmas Poke Cake, my whole kitchen smelled like a bakery getting ready for a holiday festival. The warm vanilla cake came out of the oven golden and soft, and as I poured the red and green gelatin into the tiny holes I’d poked all over the top, I felt that little spark of Christmas excitement that I usually only get when I’m decorating the tree. Watching the colors seep into the cake was oddly magical, and I instantly knew this recipe would become one of my yearly traditions.
Why You’ll Love This Recipe
You’ll love this recipe because it’s one of those show-stopping desserts that looks incredibly festive and complicated, yet takes almost no effort—and from my experience, it never fails to impress anyone who takes a bite.
Ingredients
- 1 box white cake mix (plus the ingredients on the box—usually eggs, oil, and water)
- 1 (3 oz) box red gelatin (cherry or strawberry)
- 1 (3 oz) box green gelatin (lime)
- 2 cups boiling water, divided
- 2 cups cold water, divided
- 1 tub (8 oz) whipped topping, thawed
- Holiday sprinkles for topping
I’ve tried this recipe using different cake mixes, but white cake always works best because it absorbs the colors beautifully and gives you those bright, vibrant holiday stripes. You can swap the flavors of gelatin if you prefer a different red or green; just avoid anything with pineapple because it won’t set properly. And while homemade whipped cream is lovely, store-bought whipped topping holds its shape longer—especially if you’re traveling with the cake.
Equipment Needed
- 9×13 baking pan
- Mixing bowls
- Hand mixer or stand mixer
- Wooden spoon or skewer
- Measuring cup
- Spatula
A wooden spoon or skewer works perfectly for poking the holes in the cake, but I’ve also used the handle of a clean chopstick when I wanted slightly larger holes. A hand mixer is plenty strong for the cake batter, though a stand mixer makes the process effortless. A glass baking dish is my favorite because you can see the layers and colors from the side, and it always looks extra festive on the table.
Step-by-Step Instructions
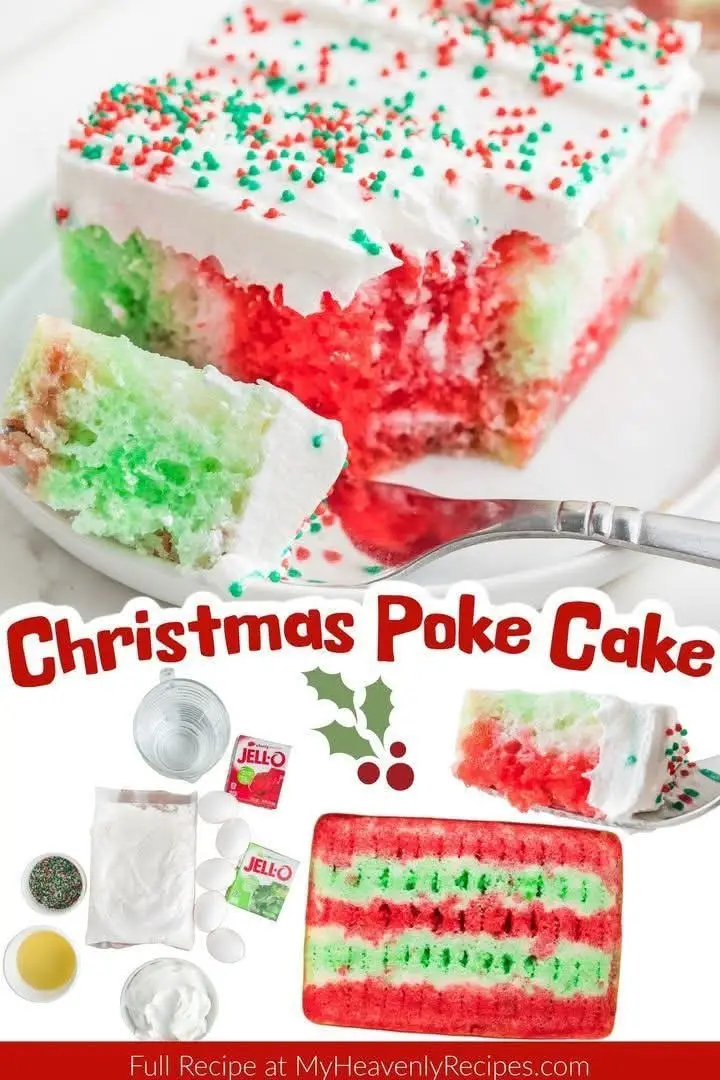
When I begin making this cake, I always start by preheating the oven and mixing the white cake batter according to the box instructions. The smell of vanilla filling the kitchen is already enough to put me in a holiday mood. Once the batter is smooth and silky, I pour it into a greased 9×13 pan and bake it until it’s fluffy and lightly golden. I’ve learned to let it cool for at least 10–15 minutes before poking the holes; if you poke too early, the cake sticks to everything and tears instead of forming neat little tunnels.
After the cake cools slightly, I use the end of a wooden spoon to poke holes about an inch apart. I go all the way to the bottom of the pan because it helps the gelatin soak in evenly. This part is surprisingly fun—there’s something deeply satisfying about making those little rows of holes. While the cake rests, I mix the red gelatin with one cup of boiling water and one cup of cold water, stirring until the crystals dissolve completely. Then I carefully pour the red gelatin into every other row of holes, watching as it disappears into the cake.(See the next page below to continue…)