
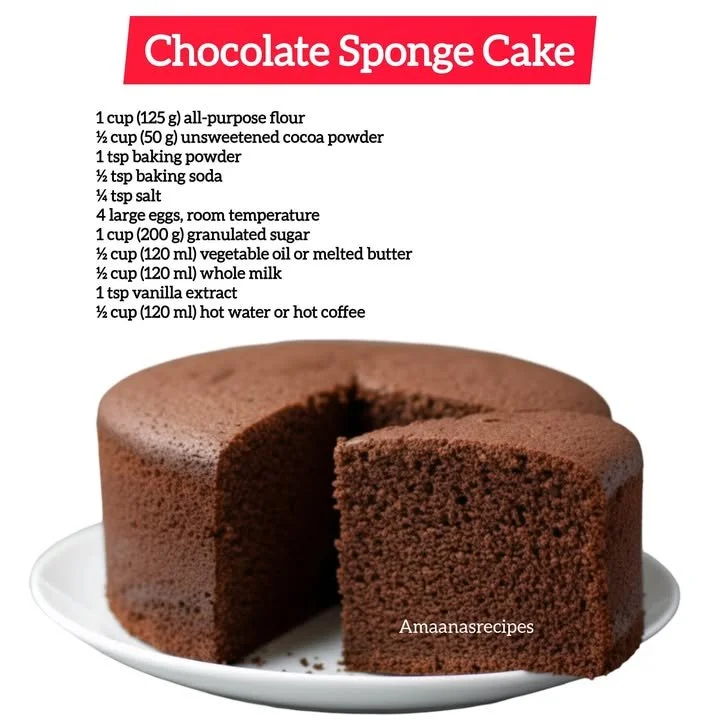
There’s something undeniably comforting about a freshly baked chocolate sponge cake wafting through my kitchen. The rich, decadent smell envelops me like a warm hug, reminding me of cozy afternoons spent indulging in sweet treats. This cake is a go-to for birthdays, celebrations, or simply when a chocolate craving strikes! It’s light yet rich, and the perfect base for all sorts of toppings. I can’t wait to share this beloved recipe with you.
Why You’ll Love This Recipe
I absolutely adore making this chocolate sponge cake because it strikes the perfect balance between ease and elegance. The fluffy texture is simply irresistible, and it pairs wonderfully with everything from fresh fruits to creamy frostings. Whether you’re a beginner or a seasoned baker, this recipe will become a cherished favorite in your kitchen. Trust me, once you try this cake, you’ll be hooked! (See the ingredients in the next page below…)
Ingredients
– 1 cup all-purpose flour
– 1 cup granulated sugar
– ½ cup unsweetened cocoa powder
– 1 teaspoon baking powder
– ½ teaspoon baking soda
– ½ teaspoon salt
– 4 large eggs
– ½ cup buttermilk
– ½ cup vegetable oil
– 2 teaspoons vanilla extract
– ½ cup boiling water
Equipment Needed
– Mixing bowls
– Whisk or electric mixer
– Measuring cups and spoons
– 9-inch round cake pans
– Parchment paper
– Toothpick or cake tester
– Cooling rack
Step-by-Step Instructions
First, preheat your oven to 350°F (175°C). I always find that a well-preheated oven makes a world of difference when it comes to baking. Next, I prepare my cake pans by greasing them and lining the bottoms with parchment paper to ensure that the cakes release easily upon baking. In a large mixing bowl, I combine the flour, sugar, cocoa powder, baking powder, baking soda, and salt, whisking everything together until it’s nicely blended. It’s a fabulous feeling to see the ingredients come together, creating that beautiful chocolatey aroma in my kitchen! (See the next page below to continue steps…)
Now, in another bowl, I whisk together the eggs, buttermilk, vegetable oil, and vanilla extract until well combined. This is where things start to get exciting! I gently pour this mixture into the flour and cocoa mix, stirring until just combined. And here’s a little secret—I always add the boiling water at the end. It helps to intensify the flavor and creates a wonderfully smooth batter. Make sure the batter is free of lumps, but don’t overbeat it!
Next, I divide the batter evenly between my prepared cake pans. I like to tap the pans lightly on the counter to release any air bubbles before sliding them into the oven. Bake for about 30-35 minutes, or until a toothpick inserted in the center comes out clean. The delightful smell of baking chocolate is intoxicating, and you’ll want to resist the urge to open the oven door too early! Once they’re done baking, let them cool in the pans for about 10 minutes before transferring them to a wire rack to cool completely.
While my cakes are cooling, I can’t help but feel a wave of excitement about all the different ways I can decorate them! Once they’re completely cool, I’m ready to frost, layer, or serve them plain—whatever tickles my fancy that day!
Pro Tips for Best Results
One of my favorite tricks I’ve learned over the years is sifting the dry ingredients together before mixing them with the wet ones. I tested this three ways, and I can definitely say that sifting produces a lighter, fluffier cake. Plus, it feels nice to incorporate a little extra care into the baking process! Another tip is to use room temperature eggs and buttermilk. This helps to create a smooth batter and ensures that the cake rises beautifully, giving that light, airy texture we all adore.
I also recommend not skipping the boiling water step. I used to think it was just an extra step, but it actually enhances the chocolate flavor in an incredible way! It creates a rich, moist cake that will have everyone asking for the recipe. Trust me, you won’t regret it—your taste buds will thank you!
Lastly, keep an eye on your cakes while they bake. Oven temperatures can vary, so start checking a few minutes early. If you slightly overbake, the cake can become dry. I learned this the hard way, missing out on that melt-in-your-mouth experience that makes chocolate sponge cake so special. Just remember—better a little underdone than too dry!
Common Mistakes to Avoid
I’ve made my fair share of mistakes in the kitchen, and one of the biggest ones is forgetting to properly measure ingredients. It might seem trivial, but accurate measurements are crucial for baking. I once added an extra cup of flour thinking it wouldn’t make much difference, but my cake turned out dense and tough—not what I was going for! Be sure to use the correct measuring tools, especially for dry ingredients.(See the next page below to continue…)
Another common faux pas is not properly preparing the cake pans. I learned this the hard way when I had half of my beautiful cake left stubbornly stuck to the bottoms of the pans! Greasing and lining your pans is essential for ensuring that your cakes come out cleanly. A little bit of patience here goes a long way in preserving the integrity of your cake.
Don’t rush the cooling process either. I used to be impatient, trying to frost my cake while it was still warm. This resulted in a melting frosting mess that I had to clean up. Allow your cakes to cool completely, and you’ll enjoy a stunning presentation instead of a frosty puddle!
Serving Suggestions
There are so many delightful ways to serve a chocolate sponge cake! One of my favorites is to layer the cake with a luscious chocolate ganache. The richness of the ganache perfectly complements the light cake, creating an indulgent treat that’s hard to resist. You can also sprinkle some confectioners’ sugar on top for a pretty finish, or go all out and top it with fresh berries for a gorgeous, vibrant contrast.
Another lovely option is to serve the cake with a scoop of vanilla ice cream—a classic combo! The smoothness of the ice cream balances the fluffiness of the cake and creates a wonderful melting experience when you take a bite. My friends love assembling their own slices this way, combining cake and ice cream for that perfect bite every time.
If you’re feeling adventurous, why not try adding a drizzle of salted caramel sauce over the top? It adds an exciting layer of flavor and a slight crunch that takes this simple chocolate sponge cake to the next level. You truly can’t go wrong with festive toppings that highlight the beautiful chocolatey goodness of the cake beneath!
Variations & Customizations
One thing I love about chocolate sponge cake is its versatility. If you want to lighten it up a bit, you can substitute half of the all-purpose flour with almond flour—it gives a unique flavor and texture that I think is delightful. You could also try adding a touch of espresso or coffee to amplify the chocolate flavor. Trust me, those chocolate notes come alive in a delightful way!
If you’re in the mood for something extra special, consider adding a swirl of raspberry or cherry jam right before baking. This not only adds an exciting flavor burst but also creates a beautiful marbling effect when the cake is sliced. It’s like a little surprise hidden within the deliciousness!
You can also experiment with different extracts instead of vanilla. Almond extract adds a lovely twist, bringing out the chocolate flavors in a unique way. I found that it gives a subtle depth, making the cake even more memorable. So don’t be shy—get creative with customizations that suit your taste!
How to Store, Freeze & Reheat
Storing your cake properly can help keep it fresh and delicious for longer. I usually wrap my cooled chocolate sponge cake tightly in plastic wrap and then store it in an airtight container at room temperature. It can last for about 3-4 days, but I bet it won’t stick around that long in your household! If you want to extend its life, a well-wrapped cake can last up to 2 months in the freezer.
When it comes to freezing, I recommend slicing the cake before wrapping. This way, you can enjoy a piece whenever you like, without having to thaw the whole thing each time! Just let the cake slices cool entirely, wrap them securely in plastic wrap, and pop them into a freezer-safe bag or container.
To reheat, simply take a slice out and let it come to room temperature if it’s been frozen. You can warm it in the microwave for a few seconds or enjoy it cold. I also love serving it as is, with all those delicious toppings you can customize each time!
Conclusion
Baking a chocolate sponge cake is such a rewarding experience, one that fills my kitchen with warmth and joy. I truly hope this recipe becomes a favorite in your home too, along with all the delightful memories you’ll create while baking. Remember, it’s not just about the cake—it’s about the love and laughter you share while making it. Happy baking!