
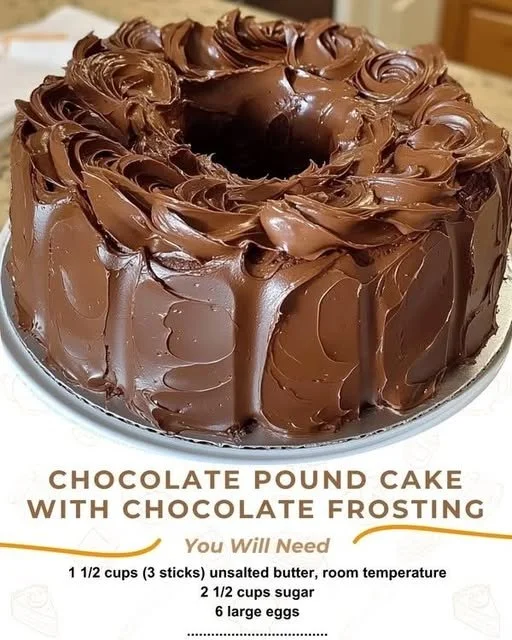
Ah, the joy of baking! There’s something magical about the smell of chocolate wafting through my kitchen, and when it comes to comfort food, nothing beats a rich and decadent Chocolate Pound Cake. It’s one of those timeless recipes that never fails to bring a smile to my face—and to everyone else’s who gets a slice, too! This cake is dense yet tender, perfectly sweet, and loaded with that dark, chocolatey goodness that can turn any day into a special occasion.
Why You’ll Love This Recipe
I’ve made this Chocolate Pound Cake countless times for birthdays, holidays, and just because, and it has always been a hit! The deep chocolate flavor and moist texture create a cake that is both elegant and comforting, making it perfect for any gathering or a cozy night in. Plus, it’s straightforward to whip up, combining simple ingredients that most of us already have on hand. You’ll find this recipe is as rewarding to make as it is to eat. (See the ingredients in the next page below…)
Ingredients
– 1 ½ cups unsalted butter, softened
– 2 cups granulated sugar
– 4 large eggs
– 1 teaspoon vanilla extract
– 2 ½ cups all-purpose flour
– 1 cup unsweetened cocoa powder
– 1 teaspoon baking powder
– 1 teaspoon baking soda
– ½ teaspoon salt
– 1 cup buttermilk
Equipment Needed
– 9×5-inch loaf pan
– Mixing bowls
– Hand mixer or stand mixer
– Rubber spatula
– Wire rack for cooling
– Measuring cups and spoons
Step-by-Step Instructions
To start, preheat your oven to 350°F (175°C) and grease your loaf pan with a bit of butter or non-stick spray. Be generous; trust me, you don’t want your beautiful cake to stick! Next, in a bowl, cream together the softened butter and sugar until it is light and fluffy. This step is crucial; it helps to incorporate air into the batter, which is what makes our cake fluffy and delicious. Once your mixture looks like a light cloud, add in the eggs one at a time, mixing well after each addition. Stir in the vanilla extract until everything is well combined. (See the next page below to continue steps…)
Now that your base is ready, let’s tackle the dry ingredients. In a separate bowl, whisk together the flour, cocoa powder, baking powder, baking soda, and salt. It’s important to mix these dry ingredients beforehand to ensure an even distribution of the baking elements and cocoa. Gradually add the dry mixture to the creamed butter and sugar, alternating with the buttermilk. Start and end with the dry ingredients—this method helps to keep the cake tender. Mix until just combined; be careful not to over-mix, as this can lead to a dense cake.
Pour the batter into your greased loaf pan, smoothing the top with a spatula. Bake in the preheated oven for about 60-70 minutes, or until a toothpick inserted into the center comes out clean. The aroma of chocolate will fill your kitchen as it bakes, and I promise it will be torturously delicious! Once baked, remove the cake from the oven and let it cool in its pan for about 15 minutes before transferring it to a wire rack to cool completely.
Pro Tips for Best Results
One thing I tested several ways is the butter temperature. Make sure your butter is softened, but not overly warm! If it melts, your cake will end up too greasy. I recommend letting it sit out for about an hour before starting, especially if it’s been cold in your kitchen. Also, using room temperature eggs can significantly improve the batter; they blend better with the other ingredients.
I’ve also found that using high-quality cocoa powder really makes a difference in the depth of flavor. The brand I love best isn’t the most expensive, but it brings out that deep chocolate taste that makes every bite memorable. And don’t hesitate to use a scale to weigh your flour; this ensures accuracy and consistency in your baking results.
Lastly, to add a touch of extravagance, you can fold in some chocolate chips into the batter right before you pour it into the pan. It elevates the treat beautifully, creating gooey pockets of chocolate that are truly irresistible!
Common Mistakes to Avoid
One common mistake that I experienced early on was not properly preparing the pan. If you don’t grease it enough, the cake will stubbornly cling to the sides, and you’ll end up with a crumbled mess instead of a beautiful loaf. I recommend using both butter and a light dusting of flour, or even parchment paper for easy removal. (See the next page below to continue…)
Another issue to watch for is over-mixing the batter. It’s tempting to keep stirring until everything looks perfectly combined, but you’ll want to stop as soon as you don’t see any dry flour. Over-mixing activates the gluten in the flour, which can turn your cake tough instead of tender.
Lastly, don’t forget to test the cake for doneness as baking times can vary based on your oven and the material of your loaf pan. An inserted toothpick should come out clean, but if it’s still gooey after an hour, you may need to give it an extra few minutes—just be sure to keep an eye on it to prevent over-baking!
Serving Suggestions
One of my favorite ways to serve this Chocolate Pound Cake is with a simple dusting of powdered sugar on top. It’s quick, elegant, and lets the rich flavor of the cake shine through. Pairing it with a scoop of vanilla ice cream creates a delightful contrast of warm and cold, making for a decadent dessert that’s hard to resist.
If I’m feeling a bit fancy, I might drizzle some homemade chocolate ganache over the cake or serve it with fresh berries for a touch of tartness. The added color and flavor really uplift the experience! For those cozy evenings at home, a cup of coffee or hot cocoa alongside a slice of this cake is like a warm hug—perfect for curling up with a good book.
And let’s not forget about breakfast! Yes, this cake makes a delightful treat for brunch, enjoyed plain or toasted, perhaps with a bit of butter melting on top. It’s a lovely way to start the day.
Variations & Customizations
I love experimenting with this recipe! For those who want to add a little twist, how about adding a teaspoon of espresso powder to intensify that chocolate flavor? It’s subtle but packs a real punch! Alternatively, you can switch up the cocoa powder for a darker Dutch-processed cocoa to make the cake even richer.
If you’re a fan of textures, consider adding chopped nuts or even a swirl of caramel sauce into the batter. This creates delightful surprises with every bite! I’ve also tried incorporating chocolate-covered espresso beans for a fun kick, turning the cake into a caffeinated delight.
For a lighter version, you might replace half of the all-purpose flour with whole wheat flour or even almond flour. It might alter the texture slightly, but it opens up a whole new flavor profile that is just as satisfying!
How to Store, Freeze & Reheat
After making any cake, I always wonder the best way to store it to keep it fresh. I usually wrap the cooled cake tightly in plastic wrap and store it at room temperature for up to three days. If you want to keep it longer, you can freeze it. Just wrap it in plastic wrap followed by aluminum foil, and it’ll last for about 3 months in the freezer.
When I’m ready to enjoy a slice from the freezer, I simply let it thaw overnight in the fridge and warm it up gently in the microwave for a few seconds. Alternatively, you can slice and toast pieces in a toaster oven for a few minutes until they’re warm and a bit crispy on the outside.
Regardless of which way you choose to reheat it, you could always serve it again with some vanilla ice cream or a drizzle of chocolate sauce—it just elevates the experience every time!
Conclusion
So there you have it—a warm and welcoming Chocolate Pound Cake recipe that’s bound to become a favorite in your kitchen, just like it has in mine! Whether enjoyed at a celebration or a quiet evening at home, this cake is sure to delight. I encourage you to give it a try, indulge in the chocolatey aroma, and share the love by serving it to friends and family. Happy baking!