
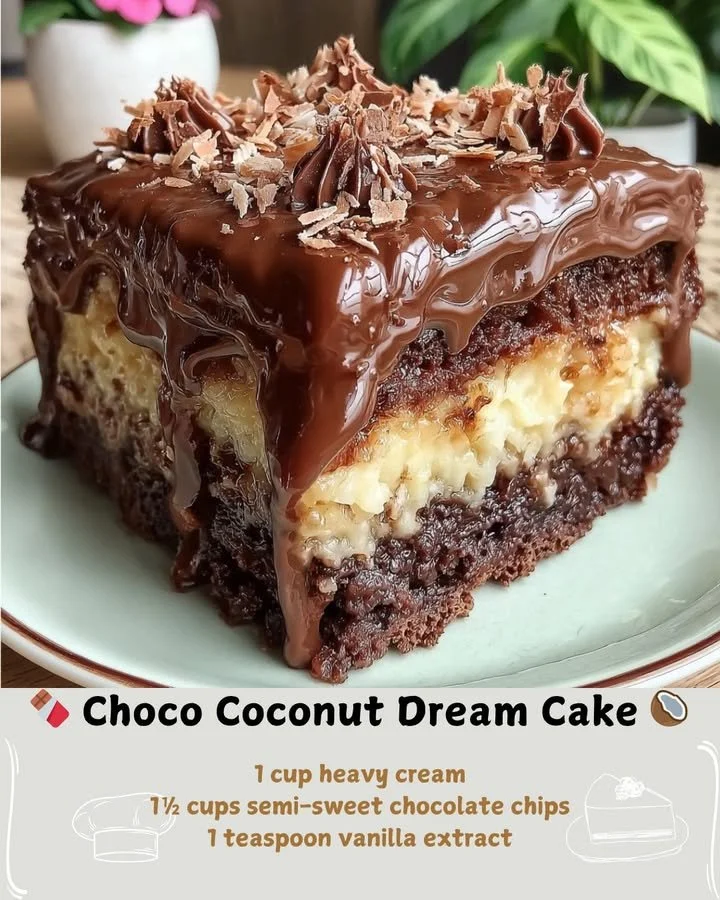
Choco Coconut Dream Cake. This cake is like a tropical vacation for your taste buds, with rich chocolate layers that mingle beautifully with the lightly sweet, fluffy coconut frosting. Every time I bake this cake, it’s an instant mood booster, and I’m excited for you to experience the same joy!
Why You’ll Love This Recipe
This Choco Coconut Dream Cake isn’t just any dessert; it’s a delightful blend of flavors and textures that makes it perfect for any occasion, from cozy family gatherings to festive celebrations. The combination of chocolate and coconut is simply divine, and it always leaves my guests swooning for more. Plus, it’s surprisingly easy to make! I promise you’ll be the star of your next event. (See the ingredients in the next page below…)
Ingredients
– 1 ½ cups all-purpose flour
– 1 cup unsweetened cocoa powder
– 1 ½ cups granulated sugar
– 1 teaspoon baking soda
– ½ teaspoon baking powder
– ½ teaspoon salt
– 2 large eggs
– 1 cup buttermilk
– ½ cup vegetable oil
– 2 teaspoons vanilla extract
– 1 cup hot water
– 1 ½ cups shredded coconut (sweetened or unsweetened, your choice)
– 1 cup heavy cream (for frosting)
– 2 cups powdered sugar (for frosting)
– 1 teaspoon coconut extract (for frosting)
Equipment Needed
– Mixing bowls
– Whisk
– Measuring cups and spoons
– 9-inch round cake pans
– Parchment paper
– Electric mixer (for frosting)
– Spatula
– Cooling rack
Step-by-Step Instructions
Let’s dive into this delicious adventure! First, preheat your oven to 350°F (175°C). While that’s warming up, I like to prepare my cake pans by greasing them and adding a circle of parchment paper at the bottom—this ensures that my cakes slide out effortlessly after baking! In a large mixing bowl, whisk together the flour, cocoa powder, granulated sugar, baking soda, baking powder, and salt until well combined. In another bowl, mix the eggs, buttermilk, vegetable oil, and vanilla extract. Combine the wet and dry ingredients, and then slowly mix in the hot water. This combination will make your batter incredibly smooth and liquidy, which is perfect for a moist cake. (See the next page below to continue steps…)
Next, divide the batter evenly between your two prepared cake pans. I often tap the pans gently on the counter to release any air bubbles. Bake in the preheated oven for about 30-35 minutes or until a toothpick inserted in the center comes out clean. The aroma of chocolate baking will fill your kitchen, and it’s heavenly! Allow the cakes to cool in the pans for about 10 minutes before turning them out onto a wire rack to cool completely.
While your cakes cool, let’s whip up that dreamy coconut frosting! I grab my electric mixer and beat the heavy cream in a bowl until it forms soft peaks. Then, I gradually add in the powdered sugar and coconut extract, continuing to beat until I achieve a thick and fluffy frosting. The smell of coconut wafting through my kitchen is absolutely irresistible!
To assemble the cake, place one layer of chocolate cake on a serving platter or cake stand. Spread a layer of frosting on top, then sprinkle a generous amount of shredded coconut over it. Top with the second layer of cake and frost the top and sides generously. Feel free to be artistic with your coconut decoration—sometimes I even make little coconut “waves” for fun!
Pro Tips for Best Results
One of the first things I learned while perfecting this recipe is the importance of room temperature ingredients. When your eggs and buttermilk are at room temperature, they mix better into the batter, ensuring a light and fluffy texture. I actually set my eggs out on the counter about an hour before I start baking, and it makes a noticeable difference!
Additionally, I tested the frosting with different levels of sweetness. If you prefer a less sweet frosting, try reducing the powdered sugar slightly; the balance with the rich cake is delightful. I personally love adjusting the coconut extract based on my mood—sometimes, a little extra goes a long way!
Lastly, be cautious about not overmixing the batter once you add the wet ingredients. Overmixing can make the cake dense instead of luscious and airy. I like to mix just until everything is combined, and then I stop, which leads to those beautifully soft cake layers.
Common Mistakes to Avoid
One common mistake I made when I first tried this recipe was not greasing the cake pans thoroughly. I learned the hard way when one of my cakes stuck, leaving me with a bit of a mess. Now, I generously grease my pans and line them with parchment paper—trust me, it’s a game changer! (See the next page below to continue…)
Another blunder I often see is taking the cakes out of the oven too early. It’s tempting to want that warm chocolate treat, but underbaked cakes can be gooey in the middle. Make sure to stick that toothpick in until it comes out clean, and be patient during the cooling process.
Don’t forget to taste your frosting as you go! I skipped this step once and ended up with an overly sweet concoction. Adjusting flavors is crucial, and tasting helps ensure your cake will be the perfect balance of flavors.
Lastly, remember to decorate the cake with coconut after frosting it! I’ve made the mistake of forgetting this step before serving, only to feel disappointed that my cake lacked that tropical vibe. A sprinkle of coconut on top really elevates the presentation and flavor.
Serving Suggestions
When it comes to serving, I like to pair this Choco Coconut Dream Cake with a scoop of vanilla ice cream. The combination of warm chocolate and cold ice cream brings a perfect harmony to your dessert experience. You can also serve it with a drizzle of chocolate sauce on the side for an extra indulgence!
For gatherings, I often cut the cake into small squares, especially if it’s a big crowd. This way, everyone can have a taste without feeling too guilty. I always receive compliments about how decadent yet light it feels—there’s something about coconut that makes it feel airy!
And if you’re feeling adventurous, you can even add fresh berries like raspberries or strawberries on the side. The tartness of the berries balances the sweetness of the chocolate cake beautifully—trust me, your taste buds will thank you!
Variations & Customizations
One of my favorite variations is to add a splash of coffee to the batter. It enhances the chocolate flavor incredibly without leaving a coffee taste behind. Just substitute half of the hot water with brewed espresso, and you won’t regret it!
If you’re a fan of nuts, consider adding chopped walnuts or pecans to the batter for added crunch. Just a half cup will do, and it gives a delightful texture that complements the soft cake layers wonderfully. I find that toasted coconut sprinkled on top also adds an extra layer of flavor and a delightful crunch.
For a healthier version, you can substitute half of the all-purpose flour with whole wheat flour and use coconut oil instead of vegetable oil. The result is still rich and decadent, but with a little more wholesome goodness—a perfect compromise!
How to Store, Freeze & Reheat
Storing this cake is simple! I usually keep any leftovers in an airtight container at room temperature for up to three days. It rarely lasts that long in my house, but if it does, it’s still delicious, maintaining its moistness and cocoa goodness.
If you plan on making it ahead of time, you can freeze the baked cake layers. Just make sure they are completely cooled before wrapping them tightly in plastic wrap and then foil. They can be frozen for up to three months. When you’re ready to enjoy, let them thaw in the refrigerator overnight before frosting.
Reheating slices of cake isn’t a problem either! I simply microwave a slice for about 15 seconds to warm it up, and when I’m feeling fancy, I top it with a scoop of ice cream for a delightful treat. There’s nothing quite like a warm slice of chocolate cake, is there?
Conclusion
I hope you’re excited to try this Choco Coconut Dream Cake recipe! It’s been a cherished creation in my kitchen, and I know it will become a favorite in yours too. Whether it’s for a special occasion or just a sweet mid-week treat, I can’t wait to hear how it turns out for you. Happy baking, my friends!