
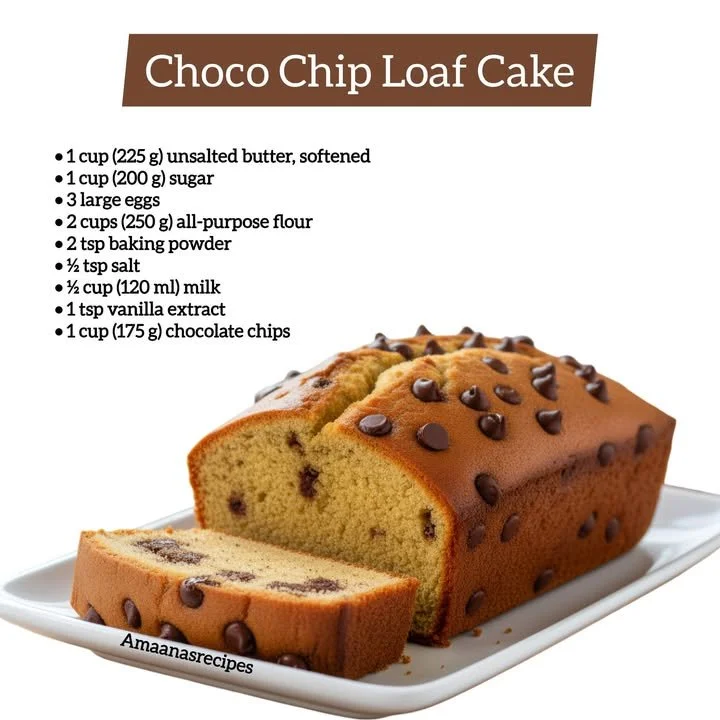
There’s something truly special about a loaf cake. It combines the comforting qualities of homemade bread with the indulgent sweetness of cake, making it an ideal companion for a cozy afternoon or a delightful breakfast treat. Today, I’m excited to share my favorite recipe: Choco Chip Loaf Cake. With its tender crumb and pockets of gooey chocolate, this cake never fails to bring a smile to my face. Let me take you on a journey to my kitchen, where this delectable cake comes to life!
Why You’ll Love This Recipe
What I absolutely adore about this recipe is its simplicity and the joy it brings. It’s the kind of cake that invites you to share it with family and friends, sparking warm conversations over tea or coffee. The combination of rich chocolate chips and a soft, buttery base creates a delightful balance of flavors, making each slice a little piece of happiness. It’s perfect for any occasion, from casual brunches to celebratory gatherings. You truly can’t go wrong! (See the ingredients in the next page below…)
Ingredients
- 1 ½ cups all-purpose flour
- 1 teaspoon baking powder
- ½ teaspoon baking soda
- ¼ teaspoon salt
- ½ cup unsalted butter, softened
- 1 cup granulated sugar
- 2 large eggs
- 1 teaspoon vanilla extract
- ½ cup buttermilk
- 1 cup semi-sweet chocolate chips
Equipment Needed
- 9×5 inch loaf pan
- Mixing bowls
- Electric mixer or whisk
- Rubber spatula
- Measuring cups and spoons
- Parchment paper (optional)
Step-by-Step Instructions
Let’s dive into the fun part—making the Choco Chip Loaf Cake! First, preheat your oven to 350°F (175°C). As the oven warms up, I love to prepare my loaf pan by greasing it lightly or lining it with parchment paper. This way, I don’t have to worry about it sticking later. In a mixing bowl, whisk together the flour, baking powder, baking soda, and salt, creating a dry mixture that will help give the cake just the right rise. (See the next page below to continue steps…)
Next, in a separate bowl, use an electric mixer (or a good old whisk if you prefer) to cream the softened butter and sugar together until it’s light and fluffy. The texture should be lovely and airy—this is when the magic starts to happen! Add the eggs one at a time, ensuring they’re fully incorporated before adding the next. Stir in the vanilla extract; oh, the aroma is just heavenly! Now, alternately add the dry mix and buttermilk to the butter-sugar mixture, starting and ending with the flour mixture. Just a quick note: be careful not to overmix; we want to keep that soft texture.
Once the batter is well combined, fold in the chocolate chips. I always sneak in a few extra chips because, let’s be honest, who can resist more chocolate? Pour the batter into your prepared loaf pan, smoothing the top with a spatula. Bake it in the preheated oven for about 55-65 minutes, or until a toothpick inserted into the center comes out clean. As it bakes, you’ll be treated to a marvelous smell that will fill your kitchen with warmth and sweetness!
When the time is up, remove the loaf from the oven and let it cool in the pan for about 10 minutes. Then, transfer it to a wire rack to cool completely. I often struggle to wait because the smell is so inviting! Slicing into that perfect loaf is the ultimate reward after the wait. Enjoy your cake warm or at room temperature—either way, it’s going to be a treat!
Pro Tips for Best Results
One of my best tips for achieving a moist loaf cake is to use room temperature ingredients, especially the butter and eggs. I learned the hard way that cold ingredients can lead to a dense cake, which isn’t what we’re after! Also, make sure not to overmix the batter once you’ve incorporated the dry ingredients. I tested this three ways and found that the fluffiest cake came from mixing just until everything was combined.
Another little secret? If you want that gorgeous crack on top, don’t skip the step of letting the batter sit for a few minutes before popping it into the oven. This allows the leavening agents to activate fully, giving your cake that desirable rise. Lastly, when folding in the chocolate chips, I like to sprinkle in a few on the top just before baking. It makes for a lovely visual when the loaf is sliced!
Common Mistakes to Avoid
One of the biggest mistakes I’ve seen—both in my kitchen and with friends—is not measuring ingredients properly. Baking is a science, and too much flour can turn your loaf into a dense brick! I recommend using a kitchen scale for accurate measurements or fluffing up the flour before scooping, which helps you avoid packing it in too tightly.
Another pitfall is trying to rush the cooling process. I understand the temptation, especially when it’s warming your home with such an inviting aroma. But letting it cool too quickly can lead to a soggy center or a loaf that doesn’t hold its shape well. Patience is key! (See the next page below to continue…)
Also, be wary of the baking time. Every oven is different, and the beauty of a Choco Chip Loaf Cake is that you’ll know it’s done when a toothpick comes out clean or with just a few moist crumbs. Checking on it a few minutes early can save you from a dry cake!
Serving Suggestions
When it comes to serving my Choco Chip Loaf Cake, I find that simplicity is often the best approach. Slicing it fresh from the oven and enjoying it plain is a delight, but if I want to elevate the experience, I’ll add a dollop of whipped cream or a scoop of vanilla ice cream on the side. Those chocolate chips just beg for a creamy companion!
For a morning treat, I love to toast a slice and spread a little butter over it. The warmth of the cake meets the melted butter, creating a comforting breakfast or snack that feels indulgent without being overly sweet. My family often gathers around for this, and I wouldn’t have it any other way.
If I’m hosting a gathering, I like to serve it with a side of fresh berries and a sprinkle of powdered sugar. It adds a pop of color and freshness, complementing the richness of the chocolate. It’s a simple way to make my homemade cake feel extra special!
Variations & Customizations
While my Choco Chip Loaf Cake recipe is a classic, I love to mix things up from time to time. One variation I enjoy is adding a tablespoon of espresso powder to the batter. It enhances the chocolate flavor beautifully and gives it a nice depth. Just a little goes a long way!
I’ve also experimented with different chocolate types. Dark chocolate chips give the cake a more intense flavor, while white chocolate chips add a creamy sweetness that changes the whole vibe. If you’re feeling adventurous, try swapping half the chocolate chips for nuts like walnuts or pecans for an added crunch!
For a healthier alternative, I’ve substituted half the all-purpose flour with whole wheat flour. It adds a wholesome touch without compromising that tender crumb we all love. Plus, I’ve played around with using Greek yogurt instead of buttermilk for an extra protein boost—delicious!
How to Store, Freeze & Reheat
Storing the Choco Chip Loaf Cake is simple. Once it’s completely cooled, I wrap it tightly in plastic wrap or store it in an airtight container. It can last at room temperature for up to three days, but let’s be real; it’s usually gone much sooner than that!
If you want to keep it longer, freezing is a great option. I cut the loaf into slices and wrap each slice individually in plastic wrap before placing them in a freezer bag. This way, I can pull out just what I need without thawing the entire loaf. It stays fresh for up to three months in the freezer!
When I’m ready to enjoy a slice, I either let it thaw at room temperature for a bit or pop it in the toaster for a few minutes. That toasty goodness brings back all the memories of when I first baked it. Add a little butter on top, and it’s like tasting it all over again!
Conclusion
Baking a Choco Chip Loaf Cake is a joyful experience that not only fills your home with warmth but also brings smiles to everyone who tries it. With each slice, you create memories that will linger long after the last bite. I hope you find as much joy in making and sharing this cake as I do! Happy baking, my friends!