
The first time I made CHERRY KISS COOKIES, my entire kitchen filled with the sweetest aroma of cherries and almond extract, and it honestly felt like I had stepped straight into a holiday bakery. I remember standing at the counter, shaping the soft pink dough with my hands, feeling its buttery texture, and thinking how cheerful and nostalgic these cookies already looked even before I baked them. When I pressed those glossy chocolate Hershey’s Kisses into each warm cookie, the chocolate softened ever so slightly, sinking gently into the cherry-infused surface, and it made the whole experience feel magical. One bite of that buttery cookie with its maraschino cherry pieces and melty chocolate top—and I was immediately hooked. These cookies are beautiful, whimsical, and packed with flavor, and every time I make them, they remind me exactly why I fell in love with holiday baking in the first place.
Why You’ll Love This Recipe
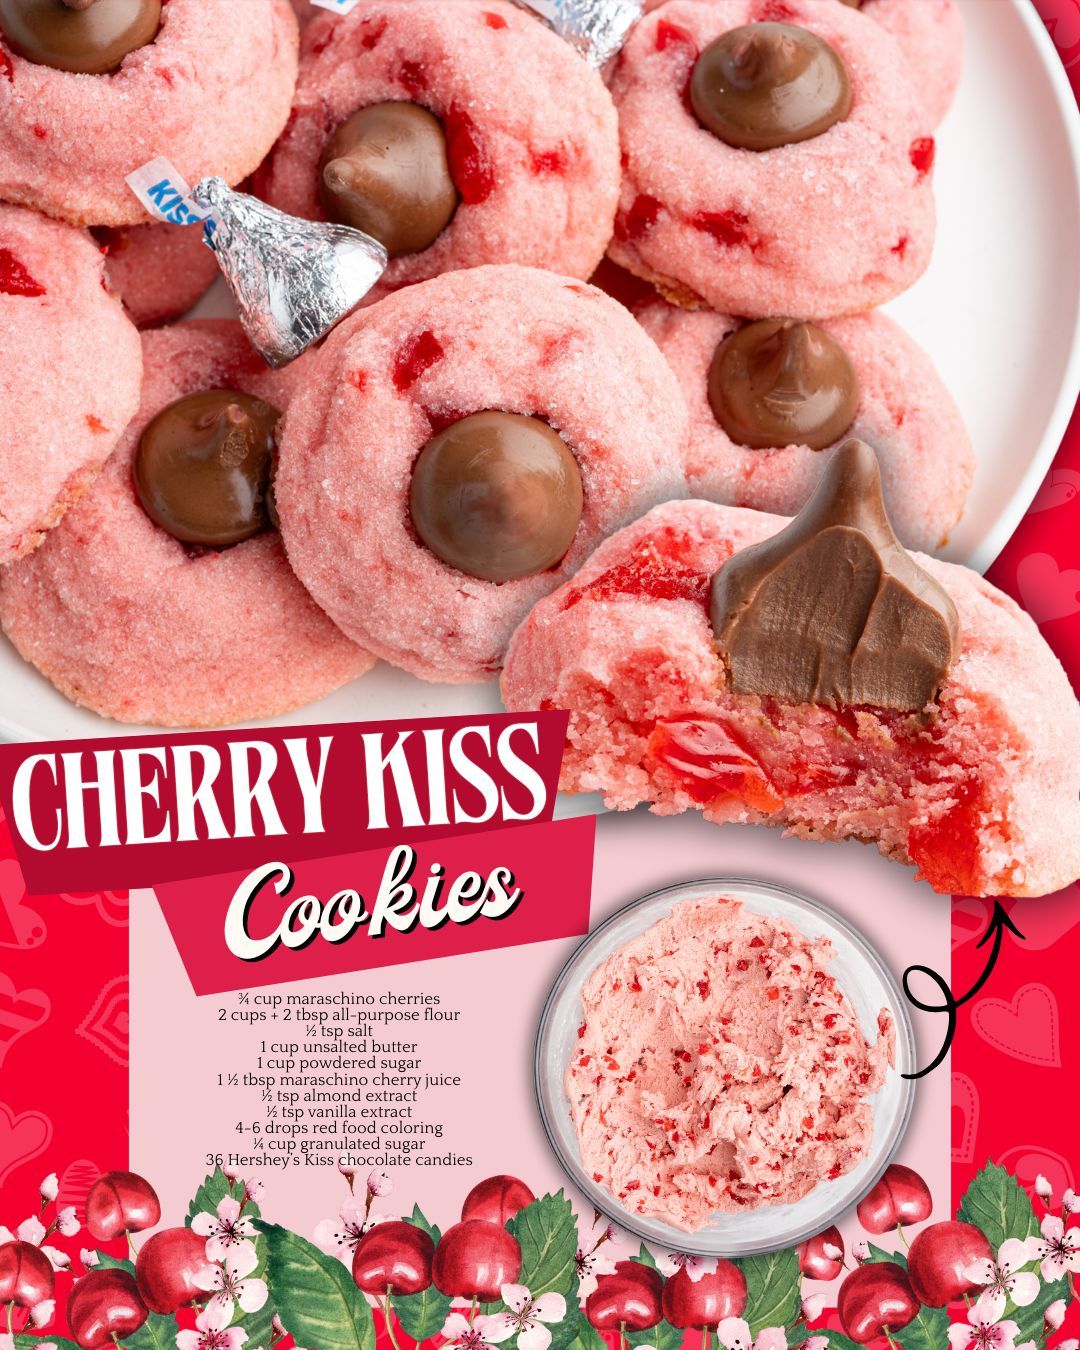
You’ll love this recipe because it’s the perfect combination of festive flavors, gorgeous presentation, and incredibly simple preparation—and after making these cookies so many times, I can tell you that everyone who tries them falls in love instantly with their soft texture, cherry sweetness, and that iconic chocolate kiss on top.
Ingredients
- 1 cup unsalted butter, softened
- 1 cup powdered sugar
- 1 teaspoon almond extract
- ½ teaspoon vanilla extract
- 2 tablespoons maraschino cherry juice
- 2 ¼ cups all-purpose flour
- ½ teaspoon salt
- ½ cup finely chopped maraschino cherries
- 30–36 Hershey’s Kisses (unwrapped)
- Optional: red food coloring (1–2 drops) for a brighter pink
One thing I’ve learned is that almond extract is absolutely essential in these cookies—it enhances the cherry flavor so beautifully that I never skip it. Softened butter makes the dough creamier and easier to mix; cold butter will make the dough too crumbly. The cherry juice not only adds flavor but also gives the dough that signature pink color (though if you want a vibrant pink, a drop or two of food coloring works wonders). And while some people skip the chopped cherries, I find they add little pockets of sweetness and texture that make the cookies extra special.
Equipment Needed
- Mixing bowl
- Hand mixer or stand mixer
- Rubber spatula
- Baking sheets
- Parchment paper
- Cooling rack
- Measuring cups and spoons
- Small bowl for cherries
- Knife for chopping cherries
A stand mixer makes the creaming process easier, but a hand mixer works beautifully if you’re baking in a smaller kitchen—I’ve used both. Parchment paper is incredibly helpful because it keeps the cookies from sticking and prevents the bottoms from browning too quickly. A cooling rack ensures the cookies cool evenly without becoming too soft on the bottom. And chopping the cherries requires a sharp knife; I’ve tried using a food processor, but it over-chops them and makes them mushy. Hand chopping gives the perfect texture.
Step-by-Step Instructions
When I start making CHERRY KISS COOKIES, the very first thing I do is drain the maraschino cherries and finely chop them. I always pat them dry with a paper towel before chopping—excess liquid will make the dough too soft. Once the cherries are ready, I measure out two tablespoons of their juice for the dough and set them aside. The juice smells so strongly of candy cherries that it instantly makes me feel like I’m making something whimsical and fun.
Next, I cream the softened butter and powdered sugar together in a large mixing bowl. This part is crucial—cream until the texture becomes fluffy and pale. I’ve rushed this step before, and the cookies ended up dense instead of soft and tender. Once the butter and sugar are well mixed, I add the almond extract, vanilla extract, and cherry juice. The moment the juice hits the bowl, the dough turns the prettiest shade of pink, and the smell becomes completely irresistible.
In a separate bowl, I whisk together the flour and salt before folding the dry ingredients into the wet mixture. This dough can feel slightly crumbly at first, but as I continue to mix (and sometimes finish with my hands), it comes together beautifully. The chopped cherries go in last, and folding them in gently prevents the dough from turning too wet or streaky. Once everything is combined, I roll the dough into small balls and place them on parchment-lined baking sheets.
I bake the cookies until the bottoms are just set—about 8–10 minutes. The key is to press the chocolate Kisses into the cookies immediately after they come out of the oven. The first time I made these cookies, I waited too long and the Kisses didn’t stick well. Now I press each Kiss right into the warm cookie, letting that slight softness happen so it adheres perfectly. As the cookies cool, the chocolate sets again, creating that perfect, iconic center.
Pro Tips for Best Results
One of the biggest lessons I learned is to thoroughly dry the maraschino cherries before chopping them. If they hold too much liquid, the dough becomes sticky and difficult to shape. I now blot them with paper towels until nearly dry, and it makes a massive difference in texture.
Another tip is to freeze your Hershey’s Kisses before pressing them into the warm cookies. I started doing this after noticing the Kisses melted too much on one particularly hot day. Chilled Kisses keep their shape beautifully, even when pressed into steaming cookies fresh from the oven.
I’ve also discovered that letting the dough chill for about 10–15 minutes before forming the balls helps keep everything firm. The cherry juice softens the butter slightly, so a quick chill makes rolling easier and prevents the cookies from spreading too much during baking.
Finally, don’t overbake these cookies. They don’t brown like typical cookies, so it’s easy to think they need more time. But if you bake them too long, they lose their soft, buttery texture. I pull them out as soon as the tops are set and the bottoms are lightly golden.(See the next page below to continue…)