
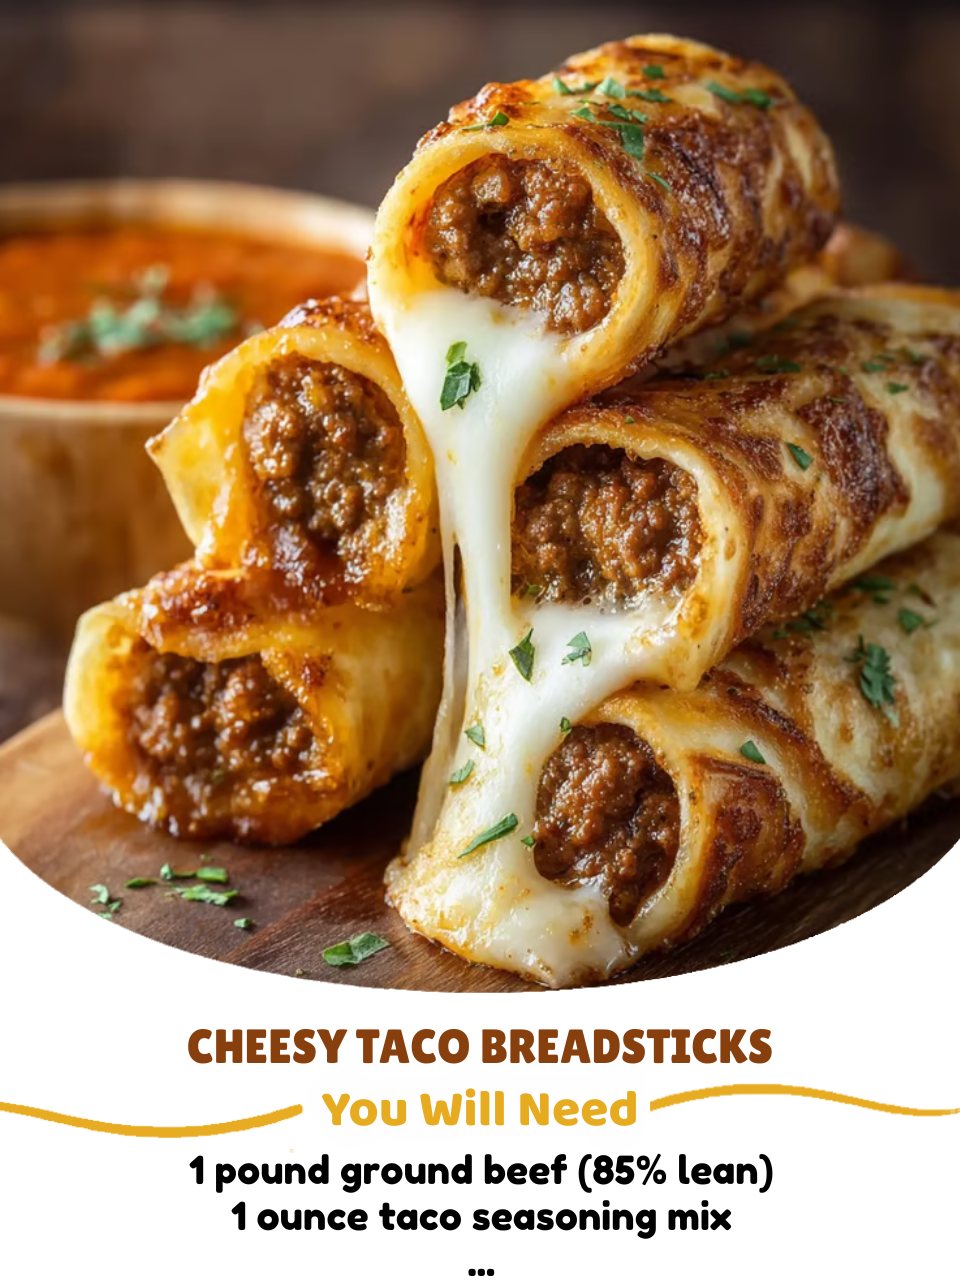
Cheesy Taco Breadsticks are the ultimate fusion of comfort food and taco night, delivering bold flavors and gooey goodness in every single bite. These irresistible handheld treats are packed with seasoned ground beef, melted mozzarella, and warm spices all wrapped inside golden, buttery breadsticks.
They’re crispy on the outside, stretchy and cheesy in the center, and bursting with rich taco filling that makes them perfect for dipping, snacking, or serving as a fun appetizer. Whether you’re feeding a hungry family, entertaining guests, or craving something deliciously different, these breadsticks bring all the satisfaction of tacos in a playful, finger-friendly form. With their melty cheese pull and punchy taco seasoning, they’re guaranteed to be the star of any meal or party platter.
Equipment You Will Need
- Large skillet
- Mixing bowl
- Baking sheet
- Parchment paper
- Wooden spoon or spatula
- Knife
- Cutting board
- Measuring spoons
- Pastry brush
- Oven mitts
Ingredients List
- Taco Beef Filling
- 1 pound ground beef (85% lean)
- 1 ounce taco seasoning mix
- ⅓ cup water
- ¼ cup diced onion (optional)
- Breadstick Assembly
- 1 tube refrigerated pizza dough or breadstick dough
- 2 cups shredded mozzarella cheese
- 1 tablespoon melted butter
- ½ teaspoon garlic powder
- ½ teaspoon paprika
- 1 tablespoon chopped fresh parsley for garnish
- Optional Dipping Sauces
- Salsa or taco sauce
- Queso dip
- Sour cream
Step-by-Step Instructions
Start by preparing the taco filling. Heat a large skillet over medium-high heat and add the ground beef, breaking it apart as it cooks.
Allow the beef to brown evenly, letting some edges crisp slightly to build flavor. If using onions, stir them in once the beef begins to brown, cooking until softened.
Drain excess grease if necessary. Sprinkle the taco seasoning over the meat and pour in the water, stirring until the seasoning fully coats the beef. Let the mixture simmer until thickened and fragrant, then remove from heat to cool slightly as you prepare the dough.
Preheat your oven to 375°F (190°C) and line a baking sheet with parchment paper. Roll out the pizza or breadstick dough into a rectangle. Slice the dough into strips, each wide enough to hold filling and cheese when rolled.
Sprinkle mozzarella along the center of each strip, piling on generous amounts to ensure a gooey cheese pull. Spoon a line of taco beef down each strip, keeping it centered so the dough wraps easily.
Carefully fold the dough over the filling and pinch the edges firmly to seal. Roll each piece gently with your hands to create smooth, uniform breadsticks.
Place the filled breadsticks seam-side down on the prepared baking sheet. Mix the melted butter with garlic powder and paprika, then brush it over the tops of the breadsticks for flavor and golden color.
Bake for 14–18 minutes, or until the breadsticks are puffed, golden brown, and lightly crisped along the edges. The cheese may bubble slightly from the ends, creating irresistible caramelized spots. Remove from the oven and immediately sprinkle with chopped parsley.
Let the breadsticks rest for a few minutes before serving to allow the cheese to set slightly while remaining stretchy and melty inside. Serve warm with salsa, taco sauce, queso, or sour cream for dipping.
These breadsticks are best enjoyed fresh from the oven but reheat beautifully in an air fryer or warm oven. Cut into halves or thirds for party platters or leave whole for a satisfying handheld meal.
Expert Tips for Success
Seal the edges tightly to prevent the cheese from leaking during baking. If any filling spills out, placing the breadsticks seam-side down helps maintain shape. Don’t overfill; a balance of cheese and taco beef ensures cleaner rolls and even baking.
Let the taco filling cool slightly before assembling—hot seasoned beef can soften the dough too quickly and make rolling more difficult.
Using freshly shredded mozzarella adds extra meltiness and enhances the cheese pull effect. Brushing the tops with butter and spices adds a beautiful golden finish and extra flavor. If your dough stretches too much, refrigerate it briefly to firm it up before rolling.
For crispier breadsticks, bake directly on a preheated baking sheet or pizza stone. To keep them soft and pillowy, remove from the baking sheet shortly after baking to prevent over-browning.
Variations and Substitutions
Swap ground beef for ground turkey or chicken for a lighter version without losing the taco flavor. Use pepper jack or cheddar cheese instead of mozzarella for a spicier or sharper twist.
Add diced jalapeños, black beans, or corn to the filling for extra texture and flavor. A breakfast version can be made by mixing scrambled eggs into the taco filling with cheese.
Vegetarian versions work beautifully using seasoned black beans or plant-based crumble meat. Replace the taco seasoning with fajita seasoning for a smoky, pepper-forward flavor profile.
For supreme taco breadsticks, include chopped tomatoes, olives, or green onions on the inside before rolling. Transform them into spicy fiesta sticks by brushing the tops with chipotle butter before baking.
Serving Suggestions and Pairings
Serve these breadsticks with classic dips like salsa, guacamole, queso, or sour cream. Pair them with a simple green salad topped with cilantro and lime dressing for a lighter balance.
Make them part of a taco night spread alongside Mexican rice, refried beans, and street corn. They are also perfect party appetizers arranged with small dipping bowls for easy sharing.
Turn them into a meal by serving alongside tortilla soup or a big bowl of chili. For game day gatherings, pair the breadsticks with nachos, sliders, or chicken wings.
Their bold flavors also match beautifully with fresh drinks like limeade, iced tea, or margaritas. Because they reheat well, they make great leftovers for lunch or late-night snacks.
Storage, Freezing, and Reheating
Store leftover breadsticks in an airtight container in the refrigerator for up to four days. Reheat in a 350°F oven or air fryer to restore crispiness and melt the cheese evenly.
Avoid microwaving too long, as it can make the dough chewy instead of soft and tender. For best texture, slice the breadsticks in half before reheating.
To freeze, wrap each cooled breadstick individually in foil or plastic wrap. Place in a freezer-safe bag and store for up to two months. Thaw overnight in the refrigerator or reheat from frozen by baking at 350°F until warm. Add a light brush of butter when reheating to refresh flavor. Frozen breadsticks remain cheesy and delicious with proper storage.
Frequently Asked Questions
Can I use homemade dough?
Yes—pizza or breadstick dough works great.
Can I make these ahead of time?
Assemble and refrigerate, then bake fresh when needed.
Do they work with flour tortillas instead?
Yes, but they won’t be as puffy or bread-like—more like crispy taco rolls.
Why did my cheese leak out?
Edges may not have been sealed tightly; pinch firmly and roll with care.