
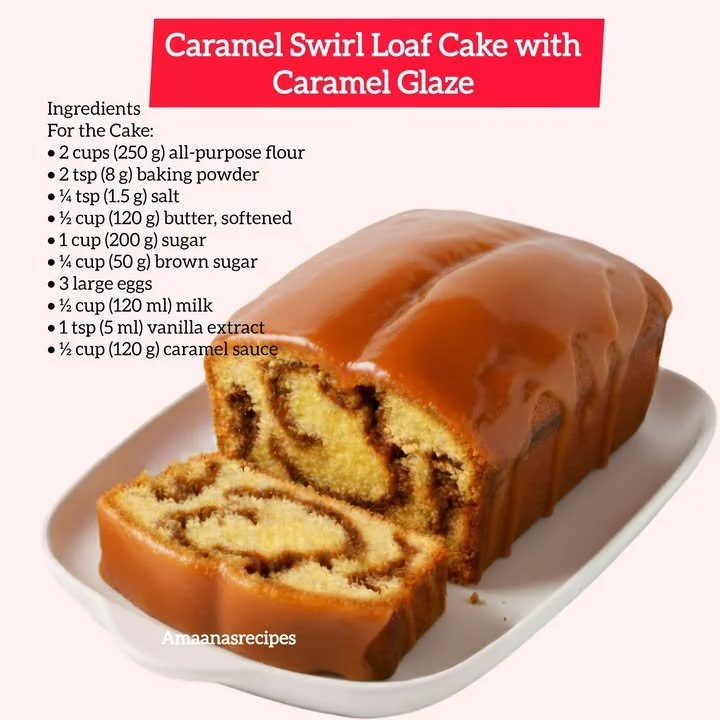
Welcome to my cozy kitchen, where I love to whip up sweet treats that bring smiles all around! Today, I’m excited to share my recipe for Caramel Swirl Loaf Cake with Caramel Glaze. This cake has become a beloved favorite in my home—perfect for those chilly evenings with a steaming cup of tea or coffee. The blend of buttery cake swirled with luscious caramel makes every slice a delightful surprise, and trust me, once you try it, you’ll want to make it over and over again!
Why You’ll Love This Recipe
What I adore most about this Caramel Swirl Loaf Cake is how incredibly moist and flavorful it is. The subtle hints of caramel throughout offer a decadent experience, while the glaze adds the perfect finishing touch. It’s the kind of dessert that impresses guests yet feels just as lovely enjoyed on a quiet afternoon. Whether you’re baking for a special occasion or simply to treat yourself, this cake is sure to hit the spot! (See the ingredients in the next page below…)
Ingredients
– 1 ½ cups all-purpose flour
– 1 teaspoon baking powder
– ½ teaspoon baking soda
– ¼ teaspoon salt
– ½ cup unsalted butter, softened
– 1 cup granulated sugar
– 2 large eggs
– 1 teaspoon vanilla extract
– ½ cup buttermilk
– ½ cup caramel sauce (store-bought or homemade)
– 1 cup powdered sugar (for the glaze)
– 2 tablespoons milk (for the glaze)
– Extra caramel sauce for drizzling
Equipment Needed
– Loaf pan (9×5 inches)
– Mixing bowls
– Hand mixer or stand mixer
– Measuring cups and spoons
– Rubber spatula
– Parchment paper
– Cooling rack
Step-by-Step Instructions
Let’s get started on this delicious creation! First, I preheat my oven to 350°F (175°C) and prepare the loaf pan by greasing it and lining the bottom with parchment paper. This helps to ensure my cake comes out perfectly without any sticking. In a mixing bowl, I whisk together the flour, baking powder, baking soda, and salt until combined. Then, in another bowl, I cream the softened butter and sugar together until light and fluffy—this is where the magic begins as the sweet aroma fills my kitchen! (See the next page below to continue steps…)
To the butter and sugar mixture, I beat in the eggs one at a time, followed by the vanilla extract. It’s such a beautiful mix! Next, I gradually add in the flour mixture and buttermilk, alternating between them. Just be careful not to over-mix—what we want is a fluffy batter! Now for the fun part, I gently fold in half of the caramel sauce to create those lovely swirls. Pour half of the batter into the prepared pan before drizzling in some more of that caramel sauce and topping it off with the remaining batter. I like to use a knife to swirl the caramel around a bit, creating that delightful marbled effect.
Once I pop the cake into the oven, I set a timer for about 50-60 minutes. It always feels like a small eternal wait, but that smell wafting through my home is beyond worth it! When a toothpick inserted into the center comes out clean, I know it’s time to remove the cake from the oven and let it cool in the pan for about 10 minutes. After that, I gently transfer it onto a cooling rack to cool completely before glazing.
While my cake cools down, I prepare the caramel glaze by mixing the powdered sugar and milk until smooth and drizzly. Once the loaf has cooled, I pour the glaze on top, letting it drip down the sides while I stand back and admire my creation. A final drizzle of caramel completes the look. Oh, I wish you could smell this right now!
Pro Tips for Best Results
One thing I learned through trial and error is to always use room temperature ingredients. This really helps the batter come together better and results in a fluffier loaf. I’ve experimented with using cold butter and eggs, and trust me, it’s just not the same! Additionally, if you’re feeling adventurous, consider toasting the flour lightly in the oven for a few minutes before mixing it in. This can add depth to the flavor of the cake.
I also recommend not skipping the resting time for the cake after it comes out of the oven. Letting it rest for those 10 minutes in the pan allows the cake to firm up a little, making it easier to transfer without crumbling. On multiple attempts, I rushed this step, and those were the times I faced small disasters!
Lastly, remember to save some of that caramel sauce for drizzling on individual slices when serving. It adds an extra touch of elegance, and when guests see that gooey caramel, their eyes light up, and so do mine!
Common Mistakes to Avoid
One common mistake I made was overmixing the batter. I was so eager to achieve the perfect consistency that I didn’t realize the danger of creating a dense loaf. Letting your mixer do the heavy lifting while you mix can sometimes cause this. I now make sure to gently fold until just combined—the fluffy texture is infinitely more satisfying! (See the next page below to continue…)
Another pitfall is not measuring ingredients accurately. I found that scooping flour directly from the bag can lead to overpacking it, resulting in a dry or crumbly cake. I always use a spoon to scoop flour into the measuring cup and level it off—precision pays off!
Lastly, make sure to store your cake correctly. I once left a loaf sitting out in an uncovered dish, and it got dried out quickly. Wrapping it tightly in plastic wrap or foil keeps it moist for longer. Trust me, your taste buds will thank you for avoiding these hiccups!
Serving Suggestions
This Caramel Swirl Loaf Cake is best served warm or at room temperature, but you can elevate your presentation with a few simple steps. I love to pair it with a dollop of freshly whipped cream or a scoop of vanilla ice cream. The cool creaminess contrasts beautifully with the warm, gooey caramel.
For an afternoon tea party, I slice the loaf into equal servings and arrange them on a pretty platter alongside fresh berries. The colors and flavors work so well together, offering a refreshing contrast to the sweetness of the cake.
Another fun serving option I often utilize is to toast slices lightly. It adds a lovely crispiness and brings out all those rich caramel flavors. A sprinkle of sea salt on top is the finishing touch that takes it over the edge!
Variations & Customizations
If you’re keen on experimenting, I have a few tasty variations to suggest! One of my favorites is adding chopped nuts to the batter for an added crunch. Walnuts or pecans work beautifully alongside that creamy caramel and fluffy cake. It gives every bite a delightful texture surprise.
Another idea is to swap out the vanilla extract for a bit of almond extract. I tried this once on a whim, and the nutty flavor married wonderfully with the caramel, creating a whole new depth of flavor that I couldn’t get enough of.
If you love a twist of citrus, incorporating some orange or lemon zest into your batter adds a refreshing brightness to this cake. It balances out the sweetness and elevates the flavor profile to an entirely different level!
How to Store, Freeze & Reheat
To store your Caramel Swirl Loaf Cake, I recommend wrapping it in plastic wrap and keeping it at room temperature for up to three days. If you want it to last longer, you can freeze it for up to three months. Just make sure to slice it before freezing for easy thawing!
When freezing, I find that placing parchment paper between the slices helps maintain freshness and makes it easy to pull out just a piece or two as desired. Just remember to wrap the entire loaf in foil or freezer-safe bags to avoid freezer burn.
When you’re ready to enjoy a slice from the freezer, simply let it thaw overnight in the fridge or pop the slices into the microwave for about 20-30 seconds to bring back that just-baked warmth. Deliciousness awaits!
Conclusion
I genuinely hope you enjoy making this Caramel Swirl Loaf Cake as much as I do! The combination of rich caramel and fluffy cake is truly irresistible, and it’s perfect for any occasion—or no occasion at all! So, grab your ingredients, roll up your sleeves, and let’s create some sweet memories in the kitchen together. Happy baking!