
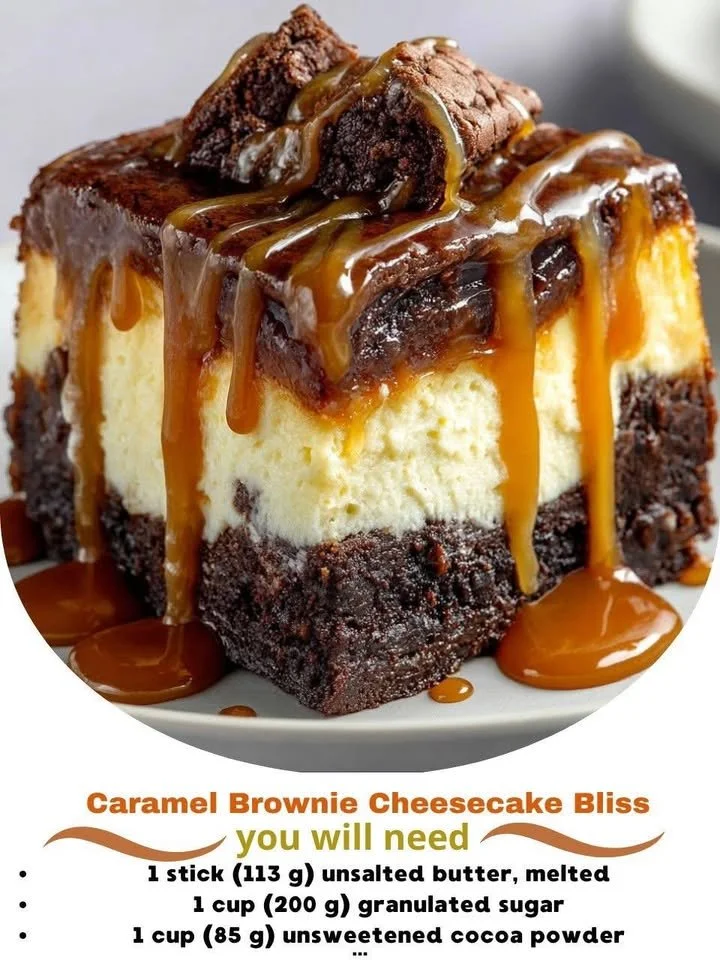
Welcome to my kitchen, where the magic happens! Today, I’m excited to share my recipe for Caramel Brownie Cheesecake Bliss. This dessert is a delightful combination of rich brownies, creamy cheesecake, and luscious caramel, creating an indulgent treat that any sweet tooth will adore. As someone who finds joy in experimenting with flavors and textures, this recipe brings pure bliss with every bite.
Why You’ll Love This Recipe
There’s just something about the way chocolate, cream cheese, and caramel come together in this recipe that elevates it to another level of deliciousness. You’ll love how each layer adds depth, from the fudgy brownie base to the smooth cheesecake and the decadent caramel drizzle on top. This dessert is perfect for gatherings, special occasions, or just a cozy night in when you want to treat yourself. Trust me; your taste buds will thank you! (See the ingredients in the next page below…)
Ingredients
- 1 box of brownie mix (plus ingredients required for mixing)
- 16 oz cream cheese, softened
- 1 cup granulated sugar
- 1 tsp vanilla extract
- 3 large eggs
- 1/2 cup sour cream
- 1 cup caramel sauce (store-bought or homemade)
- 1/4 cup all-purpose flour
- 1/4 tsp salt
- Optional: chocolate chips or nuts for added texture
Equipment Needed
- 9-inch springform pan
- Mixing bowls
- Electric mixer (or a good whisk if you’re feeling strong!)
- Rubber spatula
- Measuring cups and spoons
- Baking sheet
- Parchment paper
Step-by-Step Instructions
To start, I preheat my oven to 350°F (175°C). While it’s heating up, I prepare the brownie mix according to the package instructions, using a large bowl. Once mixed, I pour half of the batter into a greased and lined 9-inch springform pan. The smell of chocolate wafting through my kitchen at this stage is just heavenly! I bake it for about 20 minutes until it’s just set but still fudgy. That’s when I know the brownie base is ready. (See the next page below to continue steps…)
Next, I prepare the cheesecake layer. In a separate bowl, I mix the softened cream cheese and granulated sugar until smooth and creamy. This is where the magic truly begins! I add in the vanilla extract, followed by the eggs, one at a time, making sure each is fully incorporated before adding the next. The resultant mixture should be silky and free of lumps. I gently fold in the sour cream and a pinch of salt to enhance the flavors.
Once the brownie layer has cooled slightly, I pour the cheesecake mixture over the brownies, spreading it evenly. I then swirl a generous amount of caramel sauce into the cheesecake for that beautiful marbled effect—it’s too tempting to resist! After that, I bake it all together for about 40-45 minutes. It’s essential to keep an eye on it; I look for the edges to be set, while the center still has a little jiggle to it.
After baking, I let the cheesecake cool in the pan for about an hour before transferring it to the fridge. I often make this dessert a day ahead to allow it to set perfectly. When I’m ready to serve, I drizzle some more caramel sauce over the top for an extra touch of indulgence that creates a beautiful finish.
Pro Tips for Best Results
I learned that letting the cream cheese come to room temperature is key for a smooth texture. I tried mixing the cream cheese straight from the fridge once, and the lumps made a noticeable difference. Patience pays off here!
Also, don’t skip the sour cream; it adds an incredible richness that enhances the cheesecake’s overall flavor, making it creamy without being overly sweet. I experimented with different ratios, and trust me, this balance is just perfect.
Lastly, for an added crunch, I like to sprinkle chocolate chips or nuts on top of the caramel drizzle. It gives the dessert that satisfying contrast in texture, which is a delightful surprise when you bite into a slice.
Common Mistakes to Avoid
One mistake I often made early on was overbaking the cheesecake. This can lead to a dry texture, which is the opposite of what we want! A tip I picked up is to check for doneness a few minutes before the indicated time; it helps ensure a creamy outcome. Remember, it will continue to set while cooling.
Another thing I learned is not to rush the cooling process. I used to plop the cheesecake directly into the fridge after baking, thinking it would cool faster. Instead, allowing it to cool at room temperature for about an hour prevents condensation from forming and keeps the texture just right. (See the next page below to continue…)
When it comes to slicing the cheesecake, don’t use a hot knife if you want clean edges. I would often dip my knife in hot water, but it can create a messy presentation. Instead, I have found that simply wiping the knife with a damp cloth between cuts works wonders for getting those beautiful slices.
Serving Suggestions
When it’s time to serve my Caramel Brownie Cheesecake Bliss, I love pairing it with a scoop of vanilla ice cream. The creaminess of the ice cream complements the rich layers beautifully and adds a refreshing contrast. You can even toast some walnuts or pecans to sprinkle on top for an extra crunch.
Another fun way to serve it is in individual portions. I often take muffin liners and cut the cheesecake into squares, placing them in the liners for a gorgeous presentation. This makes for a great dessert at parties or potlucks, where everyone can grab their own slice.
Lastly, don’t forget the coffee! This dessert pairs perfectly with a rich brewed coffee or a latte. The bitterness of the coffee enhances the sweetness of the cheesecake, creating a delightful balance that keeps me coming back for more.
Variations & Customizations
One of the best things about this recipe is how adaptable it is! If you’re a fan of chocolate, consider adding a cocoa powder layer to the cheesecake to really amp up that chocolate flavor. I often experiment by mixing in chocolate chips or even chunks of caramel to the cheesecake layer for an added surprise.
For those who prefer a fruitier twist, you can top the cheesecake with a layer of fresh fruit or a fruit compote. Raspberries or strawberries pair wonderfully with the chocolate and caramel, bringing a refreshing touch that cuts through the richness.
If you’re looking to reduce sugar or make it gluten-free, you can substitute alternative sweeteners and use gluten-free brownie mix. I’ve tried various substitutions, and with a bit of adjustment to the recipe, the result was just as satisfying!
How to Store, Freeze & Reheat
Once I have a few slices left over, I store them in an airtight container in the fridge, where they last for about 5-7 days. The flavors actually meld together beautifully over time, making each bite even more delightful as the days pass.
If I want to prepare some for later, I freeze the whole cheesecake. I wrap it tightly in plastic wrap, followed by aluminum foil, to protect it from freezer burn. It can stay in the freezer for up to three months. When I’m ready to enjoy it again, I let it thaw slowly in the fridge overnight for the best texture.
Reheating isn’t necessary for this dessert, but if you prefer a warm bite, I recommend popping a slice in the microwave for just a few seconds. This creates a tempting melty effect that enhances the caramel and brownie flavors perfectly.
Conclusion
I hope you find joy in making this Caramel Brownie Cheesecake Bliss as much as I do! It’s a showstopper dessert that always garners compliments and admiration. Whether you’re sharing it with family or indulging in a little self-care, there’s nothing better than sinking your fork into this luxurious treat. Happy baking, everyone!