
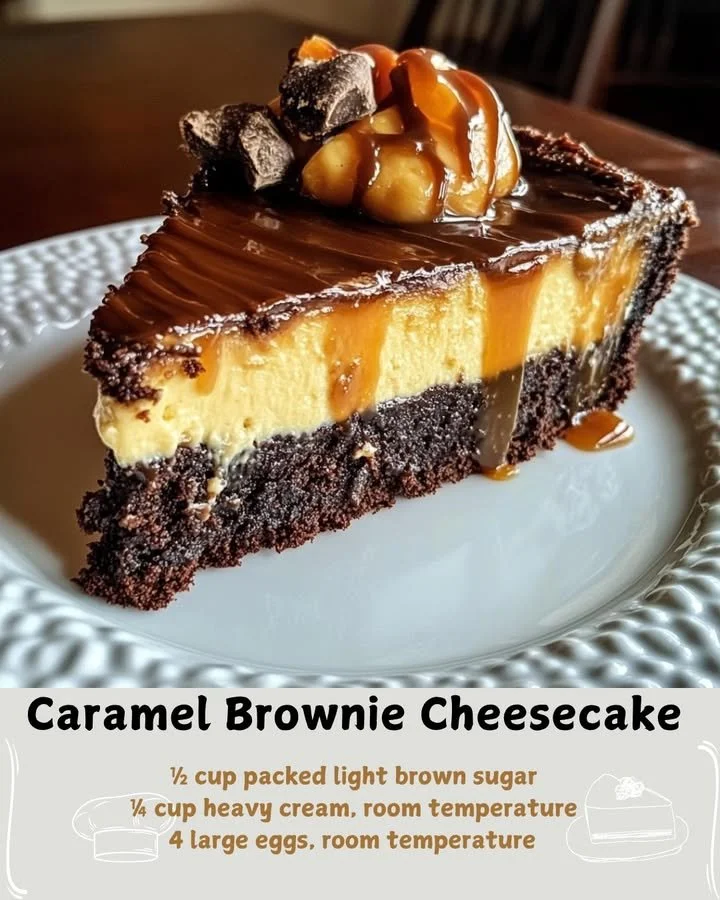
Caramel Brownie Cheesecake. Picture this: a rich, fudgy brownie bottom, a creamy cheesecake layer, and a luscious caramel topping that drizzles down in the most tempting way. It’s a dessert that’s sure to charm anyone lucky enough to take a bite, and it’s perfect for any occasion—from cozy family gatherings to fancy dinner parties. I can’t wait for you to try this delectable treat!
Why You’ll Love This Recipe
This Caramel Brownie Cheesecake has everything you could want in a dessert: it’s indulgent, incredibly flavorful, and combines some of my favorite elements—brownies, cheesecake, and caramel—in one delightful dish. Every slice is a perfect blend of textures and tastes that leave your taste buds dancing with joy. Trust me, once you make this, it’ll become a staple in your dessert repertoire! (See the ingredients in the next page below…)
Ingredients
– 1 box of your favorite brownie mix (plus ingredients needed as per the box)
– 1 package (8 oz) cream cheese, softened
– 1 cup granulated sugar
– 2 large eggs
– 1 teaspoon vanilla extract
– 1 cup sour cream
– 1 cup caramel sauce (store-bought or homemade)
– 1/2 cup chocolate chips (optional)
– Whipped cream for garnish (optional)
– Sea salt (optional, for sprinkling)
Equipment Needed
– 9-inch springform pan
– Mixing bowls
– Electric mixer or whisk
– Rubber spatula
– Measuring cups and spoons
– Baking pan for water bath (optional)
– Parchment paper
Step-by-Step Instructions
Let’s get started with the brownie base! First, prepare your brownie mix according to the package instructions, and then pour it into your greased springform pan. I like to line the bottom with parchment paper for easy removal later. Bake the brownies as directed but remove them from the oven when they’re slightly underbaked; this ensures they remain fudgy. Allow them to cool while we whip up the cheesecake mixture. (See the next page below to continue steps…)
Next, in a mixing bowl, beat together the softened cream cheese and granulated sugar until it’s silky smooth. Add in the eggs one at a time, mixing well after each addition, followed by the vanilla extract and sour cream. I love how this smells—so rich and creamy! Once everything is mixed well, pour the cheesecake batter over the cooled brownie layer. Now here’s my little twist: sprinkle some chocolate chips on top for that extra chocolatey goodness!
Now it’s time to bake! Place the prepared springform pan in a water bath by putting it inside a larger baking dish filled with water. This method helps the cheesecake cook evenly and prevents cracks. Bake for about 50-60 minutes or until the center is set and slightly jiggly but not liquid. Once it’s done, turn off the oven and leave the cheesecake inside for about an hour to let it cool gradually. This process really helps with texture—trust me! After it cools, let it chill in the refrigerator for at least four hours or overnight for the best results.
Before serving, drizzle the top with that luscious caramel sauce and, if you’re feeling fancy, add some whipped cream and a sprinkle of sea salt for that sweet and salty combo. It’s a show-stopper!
Pro Tips for Best Results
I tested this cheesecake three ways when I was perfecting the recipe. The best was definitely letting it chill overnight. It firms up beautifully and flavors meld perfectly, making it even more delicious the next day. I also experimented with different brownie mixes. While homemade is always an option, box mixes work just as well and save time without sacrificing flavor.
Another tip I can share is to set out your cream cheese well ahead of time to ensure it softens perfectly. If it’s too cold, it can lead to lumps in your cheesecake, and nobody wants that. I also recommend using a rubber spatula to help scrape down the sides of the bowl for a super smooth batter. Every bit of that cream cheese needs to blend in!
Lastly, don’t skip the water bath! It might seem like an extra step, but it’s essential for providing a moist environment that prevents cracking and results in a perfectly creamy cheesecake. I promise the effort is worth it!
Common Mistakes to Avoid
One mistake I made on my first attempt was not letting the brownies cool enough before pouring the cheesecake mixture on top. This lead to a slightly melted brownie layer, which was not as pretty as I had hoped. It’s crucial to let each layer set properly. (See the next page below to continue…)
Another mishap I encountered was when I didn’t have enough water in the water bath. It’s easy to forget this step, but insufficient water can lead to uneven baking. So make sure to fill your baking pan with enough water to reach about halfway up the sides of the springform pan.
I also learned the hard way that rushing the chilling time can ruin your dessert. You really want the cheesecake to set completely before cutting into it. If you slice it too early, you might end up with a soupy mess rather than beautiful, clean slices. It’s difficult, but patience is definitely a virtue in this case!
Lastly, be cautious with the amount of caramel sauce you drizzle on top—while it’s tempting to smother it, a little goes a long way. You want to enhance the flavor without overpowering the cheesecake. A drizzle is perfect for both taste and presentation!
Serving Suggestions
When it comes to serving this Caramel Brownie Cheesecake, I recommend presenting it on a beautiful cake stand or platter to showcase its lovely layers. For an extra special touch, why not serve it with a scoop of vanilla ice cream on the side? The creaminess of the ice cream combines beautifully with the richness of the cheesecake.
Additionally, a sprinkle of crushed nuts, like pecans or walnuts, can add a nice crunch that contrasts nicely with the smooth cheesecake. You can even toast the nuts lightly for an added depth of flavor.
For those who enjoy a little whimsy, consider decorating the plate with swirls of chocolate or caramel sauce. This not only enhances the presentation but also invites guests to enjoy a little extra flavor with each bite!
Variations & Customizations
If you’re feeling adventurous, one fun variation I love is adding a layer of raspberries or strawberries between the brownie and cheesecake layers. The fruity brightness works wonderfully with the rich flavors and adds a pop of color to your dessert. Just be sure to pat the berries dry to avoid excess moisture that could soggy the brownie base.
For those who prefer a different flavor, you can use flavored cream cheese—like pumpkin or strawberry. This adds a unique twist and can customize the dessert for various occasions. I try this during different seasons; pumpkin cheesecake for fall brings a cozy vibe to gatherings!
Lastly, if you want to make it truly decadent, consider swirling in some peanut butter into your cheesecake batter before baking. It’s a delightful surprise that elevates the experience and creates a new classic in my kitchen.
How to Store, Freeze & Reheat
This Caramel Brownie Cheesecake can be stored in the refrigerator for up to five days if it lasts that long! Just make sure to cover it tightly with plastic wrap or store it in an airtight container to keep it fresh. It’s great to take out for a quick dessert after dinner or to impress unexpected guests.
If you want to prepare it ahead of time, you can freeze it for up to three months. To freeze, make sure the cheesecake is fully chilled. Wrap it well in plastic wrap and then in aluminum foil. When you need it, simply thaw it overnight in the refrigerator before serving.
To reheat, I suggest letting it come to room temperature before slicing. However, if you prefer it warm, you can pop it in a microwave for about 10-15 seconds to slightly warm the cheesecake. Just be careful not to overdo it, as you want to maintain that creamy texture!
Conclusion
I hope you feel inspired to whip up this Caramel Brownie Cheesecake in your own kitchen! It brings joy, comfort, and a touch of indulgence to any table. I truly believe desserts are best enjoyed with loved ones, and this one is sure to create sweet memories that will last a lifetime. So grab your ingredients, get baking, and enjoy every delicious bite! Happy baking!