
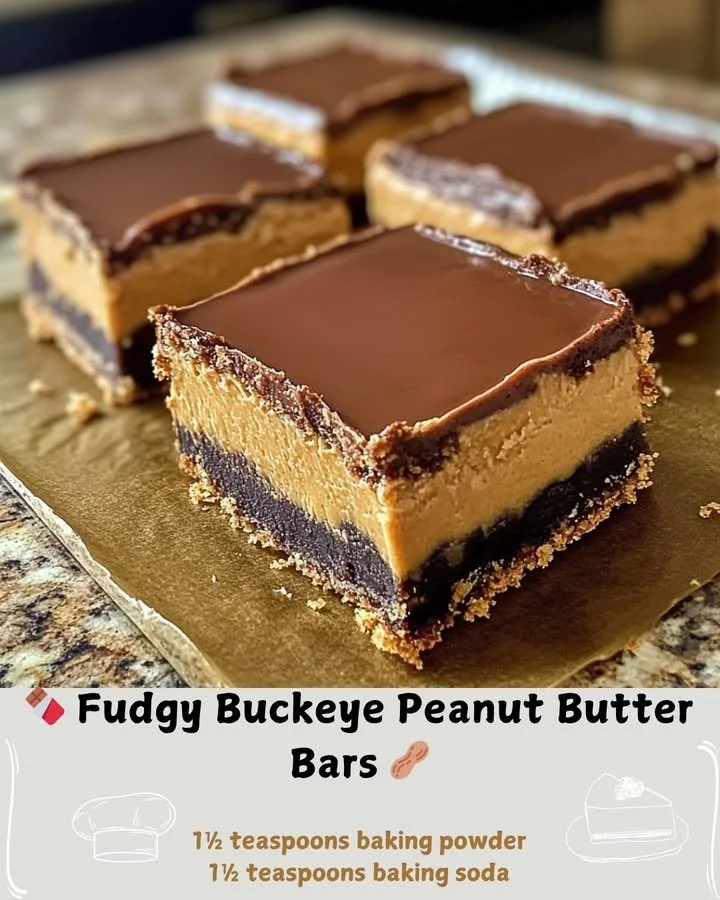
There’s something magical that happens when you combine chocolate and peanut butter, and these Fudgy Buckeye Peanut Butter Bars are a testament to that sweetness. As I stand in my kitchen, the aroma of melting chocolate wafts through the air, promising a delicious indulgence. Perfect for a cozy gathering or a simple treat for myself, these bars are always a crowd-pleaser and a staple in my dessert repertoire.
Why You’ll Love This Recipe
You’ll love this recipe because it brings together the rich creaminess of peanut butter with a thick, fudgy chocolate layer that is simply irresistible. They are easy to make and can be sliced into bite-sized pieces, making them perfect for sharing—or not! Trust me, they won’t stick around for long, and you’ll find yourself going back for just one more, over and over again. (See the ingredients in the next page below…)
Ingredients
– 1 cup creamy peanut butter
– 1/2 cup unsalted butter, softened
– 1 cup powdered sugar
– 1 teaspoon vanilla extract
– 1 cup graham cracker crumbs
– 1 cup semi-sweet chocolate chips
– 2 tablespoons vegetable oil
Equipment Needed
– 9×9 inch baking dish
– Mixing bowls
– Electric mixer (optional)
– Rubber spatula
– Double boiler or microwave-safe bowl
Step-by-Step Instructions
Start by greasing a 9×9 inch baking dish with a bit of butter or lining it with parchment paper for easy removal later. In a large mixing bowl, combine the creamy peanut butter, softened unsalted butter, powdered sugar, and vanilla extract. Using an electric mixer, beat the mixture until it’s smooth and well combined. At this point, it should look like a golden, velvety frosting that you can’t help but taste! (See the next page below to continue steps…)
Next, gently fold in the graham cracker crumbs until everything is mixed through, resulting in a thick, sweet batter. Spoon this mixture into the prepared baking dish and spread it evenly. I like to use a rubber spatula to pack it down firmly, ensuring the base gets a nice, even layer. Now, let’s make that rich chocolate topping! In a double boiler or a microwave-safe bowl, melt the chocolate chips with the vegetable oil until smooth. Stir constantly to avoid any scorching.
Once the chocolate is melted, pour it evenly over the peanut butter layer. Use the spatula to smooth it to the edges, creating a beautiful glossy finish. Place the dish in the refrigerator and let it chill for at least 2 hours. This cooling time is crucial for the bars to set up nicely, ensuring that each slice is perfect when you’re ready to serve!
Pro Tips for Best Results
During my initial attempts, I realized that the texture is key; don’t skip on the mixing! I tested this recipe with natural peanut butter versus conventional, and I found that the creamy variety holds up better in texture and taste. The natural kind can make the bars crumbly, which is not ideal.
Also, if you want an even more indulgent treat, consider adding a sprinkle of sea salt on top of the melted chocolate before it sets. The salt balances the sweetness perfectly and enhances the flavors in an unexpected way. Lastly, be patient while waiting for the bars to chill completely. I once couldn’t resist cutting into them too soon, and let me tell you, the result was a beautiful, delicious mess!
Common Mistakes to Avoid
One mistake I made early on was not properly measuring the peanut butter. Too much or too little can greatly affect the consistency of the mixture. Make sure to use a standard measuring cup, and if your peanut butter is hard to scoop, just give it a quick stir to loosen it up before measuring. (See the next page below to continue…)
Another pitfall is not allowing enough cooling time. If you’re in a hurry, you might think you can cut them sooner, but this will lead to melted layers and uneven bars. Trust me; patience is a virtue with these! Also, be sure to check your chocolate chips for quality; cheaper brands can sometimes get grainy when melted, and I’ve learned the hard way that this makes a massive difference in the final flavor and texture.
Lastly, don’t skimp on the oil when melting the chocolate. It helps the chocolate become smooth and shiny, making for a prettier finish. Forgetting this step can lead to clumpy or thick chocolate, which is not what we want!
Serving Suggestions
When it comes to serving these Fudgy Buckeye Peanut Butter Bars, they pair wonderfully with a glass of cold milk or a creamy cup of coffee, enhancing their delightful flavors. I often present them on a cute platter, sprinkled with a bit of cocoa powder or drizzled with a tiny bit more melted chocolate for that extra touch.
For gatherings, I like to cut them into small squares and place them in mini cupcake liners—this way, they’re easy to grab and eat while mingling. It elevates the presentation and makes them feel a bit more special. If I’m feeling adventurous, I might offer them alongside some fresh strawberries or raspberries; the tartness of the berries complements the rich sweetness beautifully.
Another fun idea? Package them up in a decorative box as gifts! Friends and family adore receiving homemade treats, and these bars are no exception. Just make sure to keep a few for yourself!
Variations & Customizations
If you’re looking to shake things up, consider using crunchy peanut butter instead of creamy for an added texture that enhances the overall experience. I’ve experimented with this and enjoyed the pleasant crunch among the fudgy layers. For more flavor, try adding a sprinkle of cinnamon or drizzle caramel sauce on top before the chocolate layer sets.
You can also customize the chocolate coating! While I love semi-sweet chocolate, dark or white chocolate can bring a new twist to these bars. Just remember to adjust the sweetness of the peanut butter layer if you’re using dark chocolate, as it might require less sugar due to the bitter notes in the chocolate.
If you’re feeling particularly adventurous, adding a layer of crushed pretzels between the peanut butter and chocolate could give you an exciting salty-sweet combination. It’s a great way to introduce a different flavor profile!
How to Store, Freeze & Reheat
These bars can be stored in an airtight container in the fridge for up to one week—though I’ll warn you, they’ll likely be gone much faster! Just make sure to layer them with parchment paper to avoid sticky situations. I love pulling one out for a late-night treat while binge-watching my favorite show.
If you want to make them ahead of time, freeze them! Simply cut them into bars and wrap each piece tightly in plastic wrap, then place them in a freezer-safe bag. They can last up to 2 months in the freezer. When you’re ready to enjoy, let them thaw in the fridge for a few hours or at room temperature for about 30 minutes.
Reheating isn’t necessary; the bars are delightful served cold. However, if you prefer a warm dessert experience, you can microwave a slice for about 10-15 seconds for that melty magic!
Conclusion
I truly hope you find joy in making these Fudgy Buckeye Peanut Butter Bars as much as I do! They’re not just a dessert; they’re a delightful experience meant to be savored with good company (or just on the couch while you indulge yourself). So give this recipe a try and enjoy the rich, sweet flavors that come together in every bite! Happy baking!