
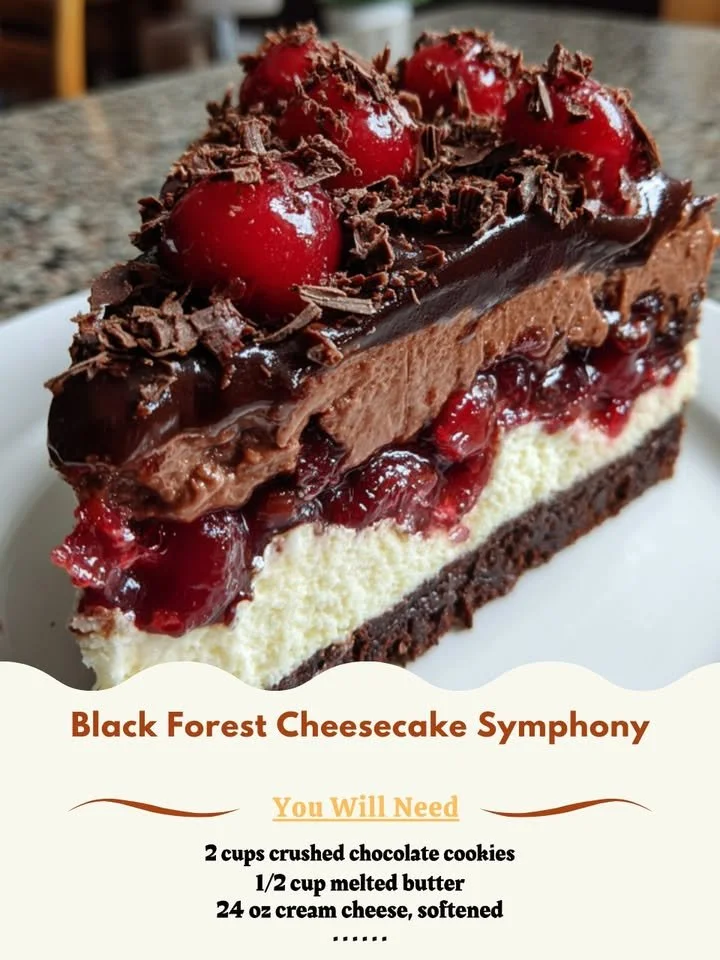
There’s something truly magical about combining rich, creamy cheesecake with the beloved flavors of a classic Black Forest cake. Today, I’m excited to share my variation of this delightful dessert: the Black Forest Cheesecake Symphony. In my kitchen, this recipe has become a go-to for gatherings and celebrations. It’s an indulgent treat that brings smiles and satisfaction to all who take a bite!
Why You’ll Love This Recipe
Believe me when I say that this Black Forest Cheesecake Symphony is an absolute crowd-pleaser. The luscious cream cheese is perfectly balanced with a hint of chocolate and cherries, creating a symphony of flavors that dances on your palate. It’s visually stunning too, with its layers and vibrant cherries topping it off. Plus, it’s surprisingly easy to make! You’ll be amazed at how quickly you can whip this up in your own kitchen. (See the ingredients in the next page below…)
Ingredients
– 1 cup chocolate cookie crumbs
– 1/2 cup unsalted butter, melted
– 2 (8 oz) packages cream cheese, softened
– 1 cup granulated sugar
– 1 teaspoon vanilla extract
– 2 large eggs
– 1 cup sour cream
– 1 cup heavy whipping cream
– 1/4 cup powdered sugar
– 1 cup cherries, pitted and chopped
– Chocolate shavings, for garnish
Equipment Needed
– 9-inch springform pan
– Mixing bowls
– Electric mixer
– Rubber spatula
– Measuring cups and spoons
– Whisk
– Paring knife
Step-by-Step Instructions
To kick things off, I preheat my oven to 325°F (163°C) and get my springform pan ready. I mix the chocolate cookie crumbs with the melted butter until well combined—this crust is what makes the cheesecake so decadent! Pressing the mixture firmly into the bottom of the springform pan creates a solid foundation for the filling that will soon follow. You can even use the back of a measuring cup for an even surface. It smells divine already! (See the next page below to continue steps…)
Next, I whisk the cream cheese and granulated sugar in a large mixing bowl until it’s nice and smooth. The addition of vanilla gives it that comforting warmth. One by one, I add in the eggs, making sure to mix well after each addition; this helps to incorporate air and create that light texture we all love. For an extra zing, I fold in the sour cream, which brings a beautiful richness.
Now comes the fun part! I pour the cream cheese mixture over the prepared crust and spread it evenly. It’s tempting to dive right in, but patience is a virtue! I carefully place it in the oven and bake for about 55 minutes or until the center is just set. The aroma wafting through my kitchen is pure bliss, and I can barely wait for it to cool completely.
Once it’s cooled, I take it out of the springform pan and start the decoration process. Whipping the heavy cream with powdered sugar creates a fluffy topping that I spread generously over the cheesecake. Finally, I scatter the chopped cherries on top and finish it off with some delightful chocolate shavings. The visual is so tempting—I can’t resist taking a moment to admire my masterpiece before serving!
Pro Tips for Best Results
I tested this recipe three ways and found that letting the cheesecake cool in the oven after baking works wonders. I turn off the oven and prop the door open slightly, which prevents any drastic temperature changes that could lead to cracks. Nobody wants a cracked cheesecake, right?
When it comes to cherries, fresh is always best, but frozen ones also do the trick. If you go the frozen route, just make sure to let them thaw (and drain) before using them in your cheesecake. It means no excess moisture—keeping my layers intact and my cheesecake perfect!
Lastly, I discovered that using a water bath while baking can make a significant difference. By wrapping the outside of the springform pan in aluminum foil and placing it in a larger pan filled with water, I can ensure even baking and a creamy texture. This little trick has turned my cheesecakes from good to wow!
Common Mistakes to Avoid
One of the biggest mistakes I made when I first started baking this cheesecake was not allowing the cream cheese to come to room temperature. When I tried to mix cold cream cheese straight from the fridge, I ended up with lumps, which made the final product less than perfect. Now, I always plan ahead and let it sit for about an hour before I begin mixing. (See the next page below to continue…)
Another pitfall is overbaking the cheesecake. The edges should be set, but the center should still have a slight jiggle when you take it out of the oven. I used to think that a firm center was a sign of success, but I’ve learned that a little wobble means creamy goodness!
Lastly, I once made the mistake of skipping the chilling time after baking. I was too eager to slice into my creation, and the result was a messy, pie-like disaster. Now, I make it a rule to chill the cheesecake for at least four hours (or preferably overnight). After all, great things come to those who wait!
Serving Suggestions
When it comes to serving this cheesecake magic, I love to pair it with a cup of rich coffee or a lovely cup of Earl Grey tea. The warmth of the drink complements the cool, creamy cheesecake beautifully, creating a soothing balance of flavors.
For extra pizazz, I often serve it with a side of fresh whipped cream or a drizzle of chocolate sauce. It adds that little extra touch that makes it feel like a dessert from a fancy restaurant.
Sometimes, I even prepare thin slices of dark chocolate bark or a handful of chocolate-covered espresso beans as a crunchy topping on the side. It’s a crowd favorite and brings an unexpected element that guests just adore!
Variations & Customizations
If you’re feeling adventurous, why not switch things up with different flavor variations? I’ve experimented with replacing the cherries with raspberries and even strawberries—they all create fabulous results and offer a little twist while maintaining that delectable cheesecake base.
For the chocolate lovers in my life, adding a layer of fudge sauce between the crust and the cheesecake filling has been a real hit. Not only does it elevate the chocolate flavor, but it also adds a delightful gooeyness that is simply irresistible!
And then there’s the crust; while I love the traditional chocolate cookie base, I’ve tried using crushed graham crackers for a lighter option. This gives it a completely different texture and taste, and it pairs beautifully with the fruity topping. You can get as creative as you like here!
How to Store, Freeze & Reheat
If by chance you have leftovers (which rarely happens in my house!), storing the cheesecake is a breeze. I simply cover it snugly with plastic wrap and pop it in the refrigerator. It lasts for about 5-7 days, and the flavors only seem to deepen over time—an added bonus!
As for freezing, I recommend slicing the cheesecake and wrapping each piece individually in plastic wrap before placing them in a freezer-safe container. They stay fresh for up to 2 months. When I’m ready to enjoy a slice again, I take it out and let it thaw in the fridge overnight before indulging.
Reheating isn’t necessary, as I love enjoying it cold, but if you prefer it slightly warm, you can pop a slice in the microwave for just 10-15 seconds. Just be careful not to overdo it, as the texture can change if heated too long.
Conclusion
I hope you feel inspired to try making this Black Forest Cheesecake Symphony at home. It’s a delightful dessert that brings joy to any occasion and is surprisingly simple to prepare. So, roll up your sleeves and let the creamy, chocolatey magic take over in your kitchen. I just know you and your loved ones will adore every luscious bite! Happy baking!