
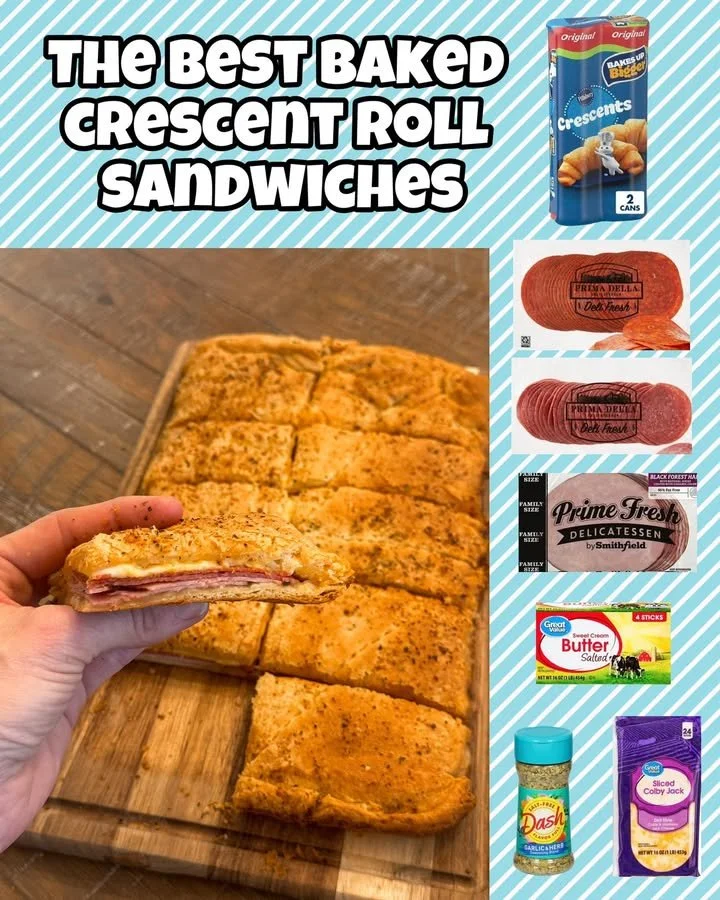
I stumbled upon baked crescent roll sandwiches one evening while searching for a quick dinner idea that wouldn’t take too much effort but still felt special. As I rolled out the crescent dough, my kitchen filled with that iconic buttery aroma. It immediately transported me back to my childhood, where my mom used to whip up similar quick treats when I came home from school. The combination of savory fillings enveloped in soft, flaky dough is just irresistible! What I love most about this recipe is how it effortlessly brings warmth and comfort to the dinner table, making even the busiest weeknights feel a bit more special.
Why You’ll Love This Recipe
This recipe is not only easy but also completely customizable, which means you can tailor it to whatever you have on hand in your fridge. Imagine biting into a warm, flaky crescent roll filled with your favorite meats, cheeses, or veggies. Trust me, you’re going to love how quick it comes together, especially on a busy night. Plus, the kids can get involved—who doesn’t love rolling up their own sandwiches? I promise, these baked crescent roll sandwiches will quickly become a go-to favorite in your kitchen!
Ingredients
- 2 cans of crescent roll dough
- 1 cup of cooked, shredded chicken (or turkey)
- 1 cup of shredded cheese (cheddar or mozzarella works great) (See the next page below to continue…)
- 1/2 cup of ranch dressing (or your favorite sauce)
- 1/2 teaspoon of garlic powder
- 1/4 teaspoon of black pepper
- 1 egg (for egg wash)
- Optional: sliced bell peppers or spinach
Equipment Needed
- Baking sheet
- Parchment paper (optional, but great for easy cleanup)
- Mixing bowl
- Whisk (for the egg wash)
- Rolling pin (if you want to flatten the dough a bit)
Step-by-Step Instructions
When I first decided to make these baked crescent roll sandwiches, the excitement began with preheating my oven to 375°F. I wanted everything to be ready by the time I finished prepping the filling. I love how the crescent roll dough puffs up beautifully in the oven, giving the sandwiches that flaky texture that is just impossible to resist. So, I started unrolling the dough, making sure none of the triangles tore apart too much—because trust me, a torn dough can lead to some tricky folding!
In a mixing bowl, I combined the shredded chicken, cheese, ranch dressing, garlic powder, and black pepper. As I mixed it, the ooey-gooey filling came together nicely, and I couldn’t help but steal a little taste. That tangy ranch flavor was a game-changer! Once my mixture was ready, I lined a baking sheet with parchment paper, which made for easy cleanup later. Then came the fun part: assembling the sandwiches!
I took a small spoonful of the filling and placed it at the wide end of each crescent triangle. After I carefully rolled the triangles up, I made sure to tuck in the edges so none of the filling would ooze out during baking. I whipped up an egg wash by whisking the egg with a splash of water, which I brushed on top of each roll to give them that lovely golden hue. At this stage, I felt like I was crafting delicious little bundles of joy! (See the next page below to continue…)
Finally, I popped the baking sheet in the oven and set a timer for 12-15 minutes. During this time, my kitchen filled with that wonderful aroma of baking dough and melted cheese, which always makes me feel so cozy. When the timer went off, I could hardly wait to dig in. These baked crescent roll sandwiches were golden brown and absolutely irresistible!
Pro Tips for Best Results
In my early attempts at this recipe, I made a rookie mistake by overstuffing the rolls. I learned the hard way that less is more here! You want to have enough filling to create that satisfying bite without the risk of spills. Trust me; you’ll want to maintain those beautiful crescent shapes.
I’ve also experimented with the type of cheese used. I found that a mix of sharp cheddar and mozzarella gives a fantastic flavor and texture. The cheddar provides just the right kick, while the mozzarella keeps things gooey. So don’t skip on the cheese variety; it makes a world of difference!
Finally, for an extra crunch, consider sprinkling some seasonings like Italian herbs or everything bagel seasoning on top before baking. I tested this three different ways, and trust me, the added flavor elevation makes it worth the extra step!
Common Mistakes to Avoid
I made this mistake the first time—don’t skip the egg wash. It’s what gives those scrumptious crescent roll sandwiches that beautiful, shiny finish. I thought I could go without it, and although they were still delicious, they didn’t have that appealing golden color. (See the next page below to continue…)
Another pitfall I’ve encountered is not letting the baked crescent roll sandwiches cool slightly before diving in. I was too eager, and I burned the roof of my mouth on that delicious filling! Allow them to rest for about five minutes; you’ll still get all the delightful warmth without the singed tongue!
Overmixing the filling can lead to a dry texture as well. I learned that a gentle folding method keeps the chicken moist and ensures a creamy consistency. Instead of stirring vigorously, I learned to gently combine ingredients for the best result.
Finally, when rolling up your sandwiches, be mindful of the corners. If you don’t roll them tightly, they can unravel in the oven. Keep those edges tucked in, and you’ll avoid a messy situation!
Serving Suggestions
I like serving these baked crescent roll sandwiches with a side of crispy veggie sticks and a tangy dip. The cold crunch of cucumbers or carrots is a great contrast to the warm, gooey goodness of the sandwiches. Sometimes, I whip up a quick salad with mixed greens and a lemon vinaigrette to cut through the richness.
Another favorite way to enjoy these treats is with homemade soup. Whether it’s a classic tomato soup or a hearty chicken noodle, dipping these wraps into soup creates a cozy, comforting meal option. It reminds me of chilly nights curled up on the couch!
For game day or gatherings, I often prepare a platter of these sandwiches cut into bite-sized pieces. They make for a crowd-pleasing appetizer that everyone can enjoy while mingling. A side of marinara sauce for dipping works wonders here!
Variations & Customizations
One of the things I truly love about these baked crescent roll sandwiches is how customizable they are. For a Mediterranean twist, I’ve swapped out the chicken for cooked spinach and feta cheese, along with a dash of oregano. The flavors meld beautifully, and it’s a fantastic vegetarian option for those who prefer it.
Another variation I’ve tried is using deli meats like ham or turkey, paired with Swiss cheese and a drizzle of honey mustard. The sweetness from the mustard complements the savory filling, making for a delightful combination.
If you’re a fan of breakfast flavors, try filling the crescent rolls with scrambled eggs, cheese, and crumbled bacon or sausage. I tested this one on a lazy Sunday morning, and it became an instant hit!
How to Store, Freeze & Reheat
Storing these baked crescent roll sandwiches is easy! If you have leftovers, let them cool completely before placing them in an airtight container in the fridge. They stay fresh for about 3-4 days, though I doubt they’ll last that long!
For long-term storage, I’ve found freezing them before baking works beautifully. Just prepare the sandwiches, then freeze them in a single layer on a baking sheet. Once frozen, transfer them to a freezer bag. When you’re ready to enjoy, bake them straight from the freezer; you may need to add a few extra minutes to the cooking time.
Reheating is straightforward as well. I recommend using the oven to maintain that flaky texture. Just preheat your oven to 350°F and bake them for about 10 minutes to warm thoroughly. You can microwave them, but you’ll lose some of that perfect crispiness!
Conclusion
These baked crescent roll sandwiches are a staple in my kitchen for good reason. They are easy to prepare, are absolutely delightful to eat, and offer endless possibilities for customization. Whether you’re feeding the family or hosting a gathering, these sandwiches bring comfort and joy to the table. I hope you find as much joy in making and sharing them as I do! Enjoy cooking!