
Into the oven it goes! I bake it for 35-45 minutes. The exact time depends on your dish; you’re looking for the edges to be a deep golden brown and the center to be set with no liquid jiggle. A knife inserted in the center should come out clean (aside from possibly blueberry juice!). When it’s done, I pull it from the oven and let it cool in the pan for at least 15-20 minutes. This rest is crucial—it allows the cake to firm up so you can cut neat squares. The smell of cinnamon, toasted oats, and warm blueberries is absolutely irresistible.
Pro Tips for Best Results
Letting the batter rest for that 10 minutes before baking is a step I never skip. I tested baking it immediately versus letting it rest, and the difference in texture is dramatic. The rested batter bakes up creamy and uniform, with perfectly tender oats. The immediate-bake version was more separate and a bit watery. Those few minutes of patience make all the difference.
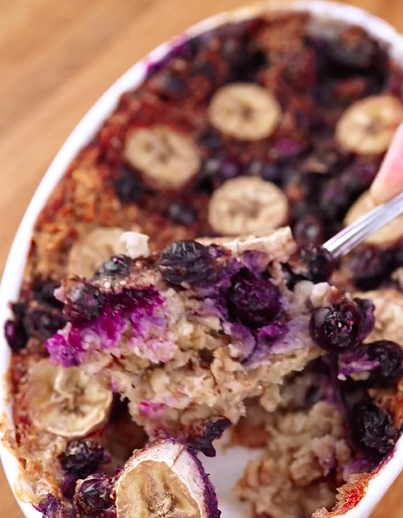
Using frozen blueberries directly from the freezer is my number one tip for a beautiful presentation. I learned the hard way that thawed frozen berries turn everything a purple-gray color. Frozen berries hold their shape, don’t bleed as much, and stay intact as lovely little bursts of flavor in every bite. They also help keep the bake time consistent.
For the best texture, use a metal or ceramic baking dish, not glass, if you can. Glass tends to insulate and can lead to a longer bake time and a softer bottom. A metal pan promotes better browning on the edges and bottom, giving you a wonderful contrast between the soft interior and slightly crisp top and edges.
Common Mistakes to Avoid
My first batch was disappointingly soggy because I used quick (instant) oats. They absorb liquid too quickly and break down, creating a mushy, porridge-like texture instead of a cake with distinct oat pieces. Trust me, old-fashioned rolled oats are the only way to go for the perfect hearty-yet-tender bite.(See the next page below to continue…)
Overmixing the batter after adding the wet ingredients is a common error. You want to just fold until combined. Vigorous or prolonged mixing can break down the oats and lead to a gummy texture. A few dry streaks are okay; they’ll hydrate in the oven. Gentle handling is key.
Under-baking is easy to do because the top will look set before the center is fully cooked. If you remove it too early, the center will be wet and custard-like (which some might enjoy, but it won’t hold a square shape). Use the knife test in the very center, and make sure it comes out clean, not coated in wet batter.
Skipping the cooling time before cutting is a recipe for a crumbled mess. The baked oatmeal needs time to set as it cools. If you try to scoop it out right from the oven, it will fall apart. Those 15-20 minutes of waiting allow the starches to set, so you can cut perfect, neat squares that hold their shape.
Serving Suggestions
I love serving this warm, straight from the pan on a chilly morning. I’ll cut a big square and place it in a bowl, then drizzle it with a little extra warm milk or a splash of cream. The way the milk pools around the warm cake is so comforting. A dollop of Greek yogurt on the side adds a lovely tang.
For a more decadent brunch or dessert, I serve it with a scoop of vanilla ice cream or a generous pour of cold, heavy cream. The contrast of the warm, spiced cake and the cold, creamy topping is absolutely divine. It turns a simple breakfast bake into a truly special treat.
This is also my go-to for meal prep. I’ll bake a pan on Sunday, let it cool completely, then cut it into individual squares. I store them in containers in the fridge, and all week long I have a ready-to-go breakfast. I eat it cold like a snack bar, or I’ll warm a square in the microwave for 30 seconds.
Variations & Customizations
You can easily change up the fruit. I’ve made this with diced apples (sautéed with a little cinnamon first), raspberries, blackberries, or a mix of berries. Chopped peaches or nectarines are fantastic in the summer. Just keep the total fruit amount to about 1 ½ cups.
For a different flavor profile, try replacing the cinnamon with a teaspoon of pumpkin pie spice in the fall, and add ½ cup of pumpkin puree to the wet ingredients. You can also add ½ cup of chopped nuts like walnuts or pecans to the batter for extra crunch. A handful of chocolate chips is a kid-approved addition, though it ventures firmly into dessert territory!
To make it dairy-free, use your favorite plant-based milk and coconut oil. To make it lower in sugar, you can reduce the brown sugar to ¼ cup and rely more on the natural sweetness of the fruit. You can also replace the maple syrup with a mashed ripe banana for a different kind of sweetness and even more moisture.
How to Store, Freeze & Reheat
Once cooled, I cover the baking dish tightly with plastic wrap or transfer squares to an airtight container. It will keep in the refrigerator for up to 5 days. The texture actually improves after a day, as the oats continue to absorb moisture, making it even more cohesive and flavorful.
This baked oatmeal freezes beautifully. I wrap individual squares in plastic wrap and place them in a freezer bag. They will keep for up to 3 months. You can thaw them overnight in the fridge or reheat them directly from frozen.
To reheat, place a square on a microwave-safe plate and heat for 45-60 seconds until warm throughout. For a crispier top, reheat in a toaster oven or conventional oven at 350°F for about 10 minutes. I find reheating restores that lovely fresh-baked texture perfectly.
Conclusion
This Baked Blueberry Oatmeal Cake is the ultimate cozy, versatile recipe that has earned a permanent spot in my kitchen rotation. It’s nourishing, delicious, and brings a sense of homemade comfort to any day. I hope it finds its way to your table and becomes a beloved, easy tradition for you, too. Now, go grab that bag of oats and get ready for the simplest, most satisfying breakfast bake.