
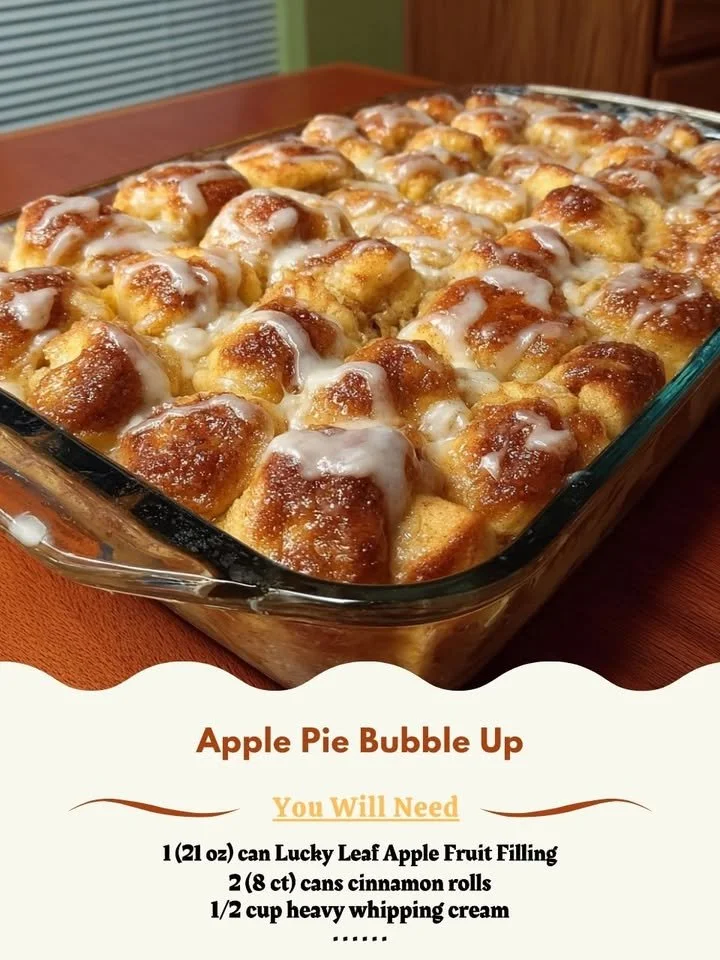
Welcome to my kitchen, where the aroma of freshly baked goods fills the air and sweet memories are created! Today, I’m excited to share one of my all-time favorite dessert recipes: Apple Pie Bubble Up. This delightful twist on traditional apple pie comes together quickly and offers that wonderful, cozy comfort we all crave. But trust me, once you take a bite, you’ll feel like you’re indulging in a warm hug wrapped in flaky crust and spiced apples.
Why You’ll Love This Recipe
There’s something undeniably soothing about the combination of tender apples, warm spices, and buttery dough. Apple Pie Bubble Up is incredibly easy to make—perfect for those busy weeknights when you want to treat your family or friends to something special without spending hours in the kitchen. Plus, the bubbling, golden top is a sight to behold! It’s not just about taste; it’s about creating moments together over a delicious dessert. I can’t wait for you to try it! (See the ingredients in the next page below…)
Ingredients
- 2 cans of refrigerated biscuit dough
- 4 medium apples, peeled, cored, and sliced
- 1 cup brown sugar
- 1 tbsp cinnamon
- 1/2 tsp nutmeg
- 1 cup apple pie filling (optional for extra apple goodness)
- 1/2 cup butter, melted
- 1 tsp vanilla extract
- Vanilla ice cream for serving (optional)
Equipment Needed
- 9×13 inch baking dish
- Large mixing bowl
- Whisk
- Cutting board
- Sharp knife
- Oven mitts
Step-by-Step Instructions
Let’s get started! First, preheat your oven to 350°F (175°C). While that’s heating up, I like to prepare my apples. I take my time peeling and slicing them; I really think the texture of the apples makes a big difference in the final dish. You want them to be evenly sized so they cook properly. In a large mixing bowl, combine the sliced apples, brown sugar, cinnamon, nutmeg, and apple pie filling if you’re using it. Stir until everything is well-coated and deliciously fragrant. The smell of those spices mixed with apples is absolutely divine! (See the next page below to continue steps…)
Next, take your biscuit dough and cut each biscuit into quarters. This is the fun part! Toss them gently in a separate bowl with melted butter and vanilla extract until they’re coated. It’s okay if they stick together a little; they’ll come apart during cooking and create those delightful bubbles we’re aiming for. Now, in your baking dish, layer the coated biscuit pieces evenly over the apple mixture. Every bite will have that perfect blend of gooey apples and fluffy dough.
Once everything is layered, pop your dish into the preheated oven for about 40–45 minutes. You’ll want to check on it halfway through; the top should be golden brown and bubbly. When it starts to look like edible perfection, you can be sure it’s ready! Let it cool for a few minutes before diving in; I know it’s tempting, but trust me, it’s worth the wait.
Pro Tips for Best Results
I tested this recipe three ways—using different types of apples, and I have to say, my favorites were Granny Smith for the tartness and Honeycrisp for their sweetness! You can mix and match according to your preference, and it can completely change the flavor profile.
Another tip is to really sprinkle those spices evenly over the apples; it makes a huge difference in flavor. I once skipped that step, and the apples at the bottom came out bland! Mix everything well to distribute those lovely spices throughout, and you won’t regret it.
Lastly, don’t skimp on the time it sits before serving. I know it’s hard to wait, but letting it cool allows the flavors to meld nicely. Plus, if you can resist the urge to dive right in, you’ll avoid burning your tongue!
Common Mistakes to Avoid
One mistake I made the first time was not preheating the oven properly—it resulted in a soggy bottom instead of that crispy, golden goodness we all want. Preheating is crucial for any baking endeavor, so don’t skip that step! (See the next page below to continue…)
Another misstep is overcrowding the dish. If you’re tempted to double the recipe and fit it all in one pan, resist! This dessert needs some space for the biscuit bubbles to rise and get that delicious texture, so stick to the recommended sizes.
Also, keep an eye on baking times. This dish can go from perfect to overbaked pretty quickly, especially depending on your oven type. If you notice the top getting too dark before the inside is bubbling, you can cover it with foil to prevent burning while the center finishes cooking.
Serving Suggestions
Now for the best part: serving! I love to serve my Apple Pie Bubble Up warm, straight from the oven, topped with a generous scoop of vanilla ice cream. The contrast of the hot dessert with cold ice cream creates a heavenly experience and perfectly balances the flavors.
You can also sprinkle a little extra cinnamon on top for that lovely finishing touch, and if you have any fresh apples available, feel free to add a few slices as garnish. It makes the dish look even more inviting!
For a twist, consider drizzling a bit of caramel sauce over each bowl before serving. This adds an extra layer of sweetness that complements the apples beautifully. Trust me; your guests will be raving about it!
Variations & Customizations
I love getting creative with this recipe! One of my favorite variations is to add in some chopped nuts, like pecans or walnuts, to the apple mixture for added crunch and flavor. The nuts absorb some of the juices and elevate the overall texture profile beautifully!
If you want to play with spices, try adding in a hint of cardamom or ginger alongside the cinnamon and nutmeg. This subtle change gives the dish a warm, exotic twist that will surprise your taste buds. It’s a wonderful way to experiment and keep things fresh.
And let’s not forget about the biscuit dough itself! You can use flavored biscuits, like cinnamon rolls or buttermilk, to add a unique twist. Just remember to adjust your sugar accordingly if the dough is already sweetened.
How to Store, Freeze & Reheat
If you have leftovers (which is rare in my house because everyone loves this dish), let it cool completely and store it in an airtight container in the fridge. It usually lasts about three days before the biscuits start to lose their charm.
For longer storage, you can freeze it before baking or after, but I recommend freezing it before baking so it retains its texture better when baked fresh. Just wrap it tightly in foil and store it in a freezer-safe container. It will keep for up to three months.
When you’re ready to enjoy it again, simply bake it straight from the freezer, adding an extra 10–15 minutes to the cooking time. You’ll end up with a warm, bubbly dessert that feels as good as freshly made!
Conclusion
I hope you’re inspired to bring this Apple Pie Bubble Up into your own kitchen! There’s something truly special about gathering your loved ones around a warm dessert that fills your home with incredible aromas. Whether you’re sharing it at a big family gathering or enjoying a quiet evening at home, this recipe is sure to please and create beautiful memories. Happy baking!