
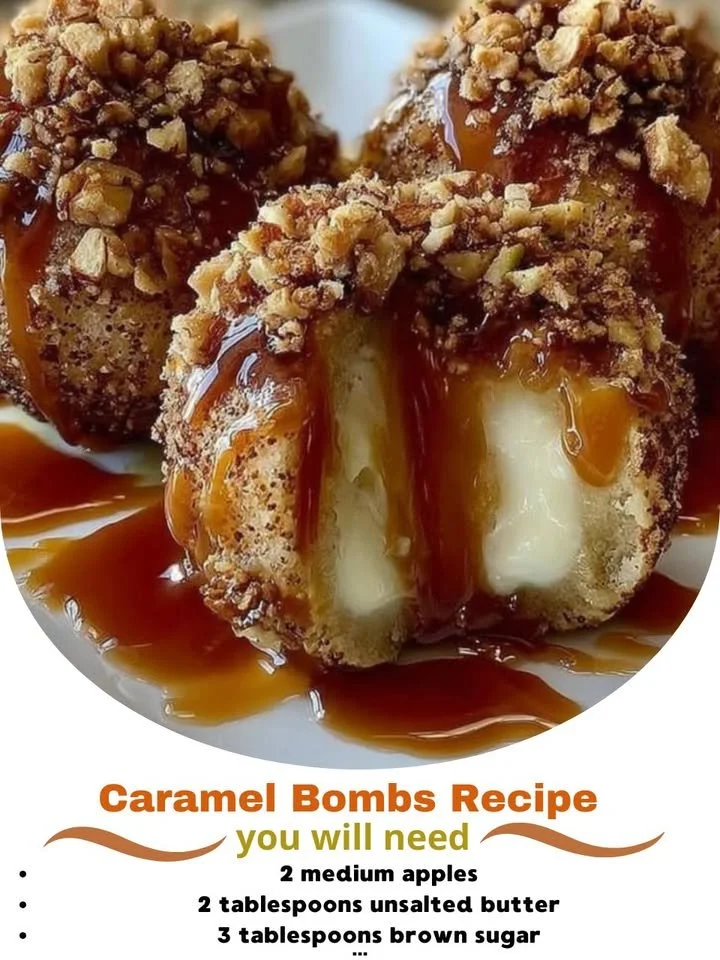
There’s something so delightfully nostalgic about apple desserts, isn’t there? From warm apple pie to cinnamon-spiced sauces, the scent of apples baking always brings me back to my grandma’s kitchen. But when I decided to create my own spin on this classic, I stumbled upon a recipe gem: Apple Caramel Bombs. Imagine juicy, tender apple pieces enrobed in gooey caramel and topped with crunchy crumbs. Sound tempting? Join me in my kitchen as we whip up this delicious treat!
Why You’ll Love This Recipe
One of the things I adore about these Apple Caramel Bombs is how they balance sweetness and tartness perfectly, making them an ideal dessert for any occasion. They’re easy to make, require minimal ingredients, and can be prepped in advance. Plus, there’s something satisfying about taking a bite and experiencing that warm caramel oozing out. It’s a true crowd-pleaser! This recipe guarantees smiles all around. (See the ingredients in the next page below…)
Ingredients
– 4 medium-sized tart apples (like Granny Smith)
– 1 cup caramel sauce (store-bought or homemade)
– 1 cup crushed graham crackers
– 1 teaspoon cinnamon
– 2 tablespoons butter, melted
– Optional: whipped cream for serving
Equipment Needed
– Parchment paper
– Baking sheet
– Mixing bowl
– Baking dish
– Apple corer or knife
– Microwave-safe bowl (if warming caramel)
Step-by-Step Instructions
To start, preheat your oven to 350°F (175°C). While that’s heating up, grab your apples and begin coring them. You want to remove the seeds and create a nice little well in the center where all that delicious caramel will go. Once you’ve cored all your apples, set them aside. Making sure to not let those lovely fragrant apples sit too long is key since they often start browning quickly. (See the next page below to continue steps…)
Next, take your caramel sauce and warm it slightly in the microwave if it’s too thick. You want it pourable but not too hot to handle. I usually pop mine in for about 15-20 seconds, just enough to loosen it up. In a mixing bowl, combine your crushed graham crackers with melted butter and cinnamon until crumbly. This mixture will form a delightful crust atop your apples, adding a lovely crunch to the overall gooey experience.
Now comes the fun part! Place each apple upright on your baking sheet lined with parchment paper, then fill each core with the lovely warm caramel sauce until it starts to overflow ever so slightly. After that, sprinkle your graham cracker mixture generously over the top of each apple, gently pressing it into the caramel. This is truly the icing on the cake—or should I say, the crunch on the caramel? Once topped, pop the baking sheet into your preheated oven and bake for about 25-30 minutes, until the apples are tender but still hold their shape.
By the time those little treats come out of the oven, your kitchen will smell heavenly. It’s a warm, inviting aroma that makes it hard to resist diving right in! Allow them to cool for a few minutes before serving, and for an extra treat, add a dollop of whipped cream on top. Trust me, it’s worth the wait!
Pro Tips for Best Results
I tested these Apple Caramel Bombs three ways before settling on the perfect combination. First, I tried using different types of apples. While Honeycrisp is deliciously sweet, the tartness of Granny Smith truly complements the caramel and keeps the dish balanced. Next, I played around with the graham cracker topping. Mixing in some oats gives a lovely texture and makes it more filling, which I found really satisfying.
Don’t forget about presentation! To make these treats even more special, use decorative dishes or ramekins to serve them in. Trust me—your friends and family will appreciate the extra touch, and it makes a gorgeous centerpiece at any gathering. Lastly, I recommend topping them off with a drizzle of warm caramel right before serving. The extra gooeyness just pulls everything together!
Lastly, timing is everything when it comes to baking. Make sure you keep an eye on the apples during the last few minutes in the oven. You want them tender but not mushy. I can tell you from experience that checking them a couple of minutes early can save you from a less-than-perfect dessert.
Common Mistakes to Avoid
One mistake I’ve made is using apples that are too soft. While it may be tempting to use whatever apples you have on hand, choosing firmer varieties like Granny Smith or Fuji is critical in creating that perfect balance of tender yet intact. Soft apples will break down and lose that lovely shape we’re aiming for.
Another pitfall is the caramel sauce. If it’s too thick when you pour it into the apples, it’ll just sit there and won’t ooze out properly. I learned this the hard way! A gently warmed, pourable caramel works best to ensure an oozy, delightful treat.
Also, make sure you’re filling the apples sufficiently. The first time I made these, I was too conservative and left them half-filled. What a wasted opportunity! Let that caramel overflow for maximum indulgence.
Lastly, one of my favorite baking tips is to remember to let the Apple Caramel Bombs cool slightly before diving in. Fresh out of the oven, that caramel is oozy hot, and you don’t want to burn your tongue on what should be a delicious experience! (See the next page below to continue…)
Serving Suggestions
These Apple Caramel Bombs are perfect on their own, but I always love to serve them alongside a scoop of vanilla ice cream. The creamy texture contrasts beautifully with the warm apples and gooey caramel. It’s a classic combo that never fails to impress!
For a festive touch, you can sprinkle some chopped pecans or walnuts on top right before serving. This adds a crunchy contrast that elevates the whole experience. Plus, it gives a lovely nutty flavor that complements the sweetness of the apples.
If you’re hosting a gathering, consider setting up a dessert bar with whipped cream, sauces, and maybe even some chopped fruits or sprinkles. Guests can customize their Apple Caramel Bombs to their liking, turning a simple dessert into an interactive experience—they’ll love it!
Variations & Customizations
One of the great things about this recipe is how customizable it is! If you want to change things up, try adding a touch of mulling spices or nutmeg to the graham cracker mixture. This will infuse the bombs with a delightful holiday flair, making them perfect for winter gatherings!
If you’re feeling adventurous, consider stuffing the apples with chocolate chips or mini marshmallows along with the caramel. Imagine that chocolate melting down into the warm apple… I tested it once and was in dessert paradise! The combination of flavors and textures takes this dessert to a whole new level.
Lastly, if you’re looking to cater to dietary restrictions, try using a sugar-free caramel sauce or alternative sweeteners. I’ve experimented with coconut sugar in the graham cracker crust, and it turned out to be a delicious twist that still satisfies the sweet tooth.
How to Store, Freeze & Reheat
If you happen to have some leftover Apple Caramel Bombs (which is rare in my kitchen!), they can be stored in an airtight container in the fridge for up to three days. Just remember they are best enjoyed fresh from the oven, so I recommend reheating them to restore that lovely warm caramel.
To freeze, I wrap each individual bomb in plastic wrap and then place them in a freezer-safe bag. When you’re ready to enjoy them again, let them thaw in the fridge overnight, and then reheat gently in the oven or microwave to bring back their gooey goodness.
For reheating, I’ve found that the oven method is preferable to the microwave if you want to maintain that slight crispness of the graham cracker topping. Just pop them in at 300°F (150°C) for about 10-15 minutes, and they’ll be just like new!
Conclusion
I hope you’re inspired to whip up these delightful Apple Caramel Bombs in your kitchen. They’re a treat that not only pleases the palates of everyone who tries them, but also fills the air with that comforting aroma of apples and caramel—pure magic! So roll up your sleeves and get ready to bake! Enjoy every gooey bite!