
I first made these melting snowballs cookies during a cold afternoon when I wanted something playful, soft, and comforting, the kind of recipe that feels joyful from the very first step. As I mixed the butter and sugar, my kitchen smelled rich and sweet, and shaping the dough into little balls instantly brought back childhood memories of baking with my hands. When I pulled them from the oven and rolled them in coconut, I knew this recipe was special. These cookies truly live up to their name, melting gently with every bite.
Why You’ll Love This Recipe
You’ll love this recipe because it combines simplicity with pure comfort, and I say that as someone who has baked these cookies countless times for family gatherings and quiet evenings alike. The texture is unbelievably soft, the coconut coating adds just the right contrast, and the hidden jam center feels like a small surprise. When you make these, you’ll enjoy how forgiving the dough is and how impressive the final result looks, even though the process feels relaxed and almost therapeutic.
Ingredients
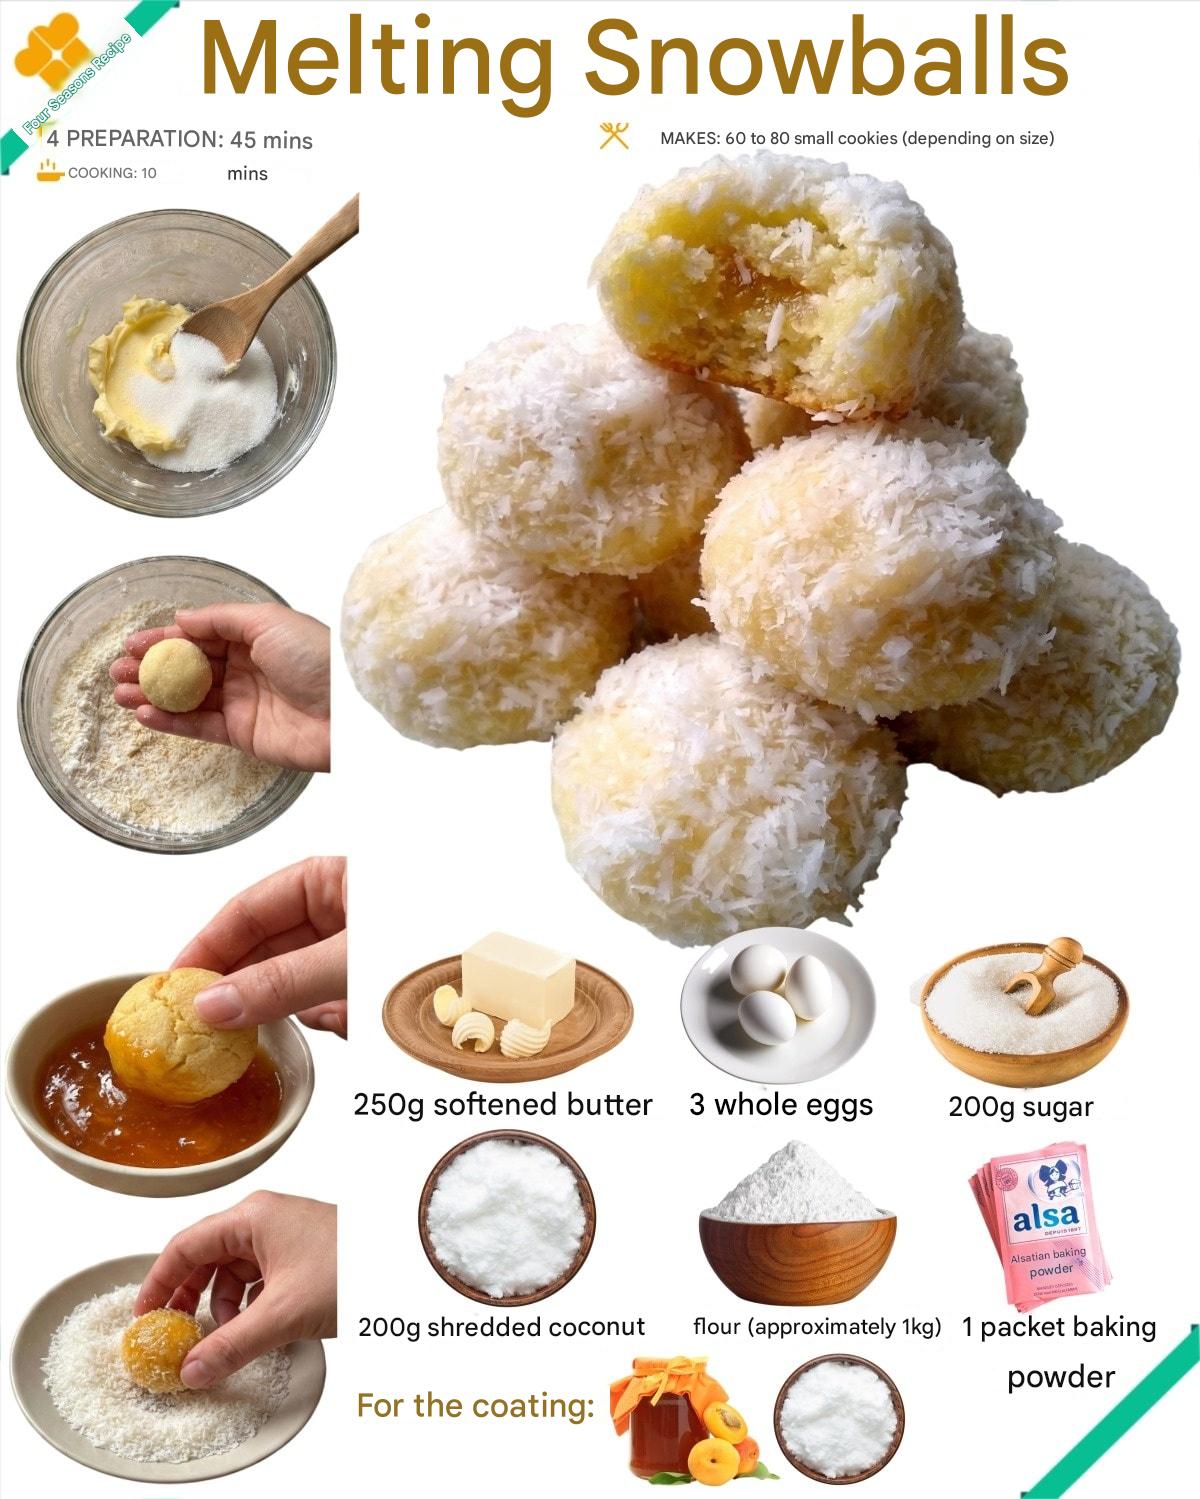
- 250 g softened butter
- 200 g granulated sugar
- 3 whole eggs
- 1 packet baking powder
- Approximately 1 kg all-purpose flour
- 200 g shredded coconut
- Apricot jam, for filling
These ingredients are simple, but each one plays an important role in achieving the signature melt-in-your-mouth texture. I always recommend using real butter, not margarine, because it makes a huge difference in flavor and softness. The flour amount may vary slightly depending on humidity, so I add it gradually until the dough feels soft but not sticky. As for the jam, apricot is my favorite because it balances sweetness and acidity perfectly, but you can adjust it to your taste.
Equipment Needed
- Large mixing bowl
- Wooden spoon or spatula
- Baking sheet
- Parchment paper
- Small bowl for jam
- Cooling rack
I love that this recipe doesn’t require any fancy equipment, which makes it perfect for spontaneous baking sessions. A large bowl and a wooden spoon are honestly all you need, and I prefer mixing by hand because it helps me feel when the dough is ready. Parchment paper prevents sticking, while a cooling rack ensures the cookies cool evenly without becoming soggy. Simple tools, reliable results, and very little cleanup afterward.
Step-by-Step Instructions
I start by creaming the softened butter and sugar together until the mixture looks pale and fluffy, which usually takes a few minutes of steady stirring. This step sets the foundation for the cookie’s soft texture, and I’ve learned not to rush it. Once the mixture feels smooth, I add the eggs one at a time, mixing well after each addition until everything looks glossy and cohesive.
Next, I stir in the baking powder and begin adding the flour gradually, mixing gently until a soft dough forms. I’ve tried dumping all the flour in at once before, and trust me, that makes the dough heavy and harder to work with. The dough should be soft and pliable, easy to roll without sticking too much to your hands.
Once the dough is ready, I pinch off small portions and roll them into smooth balls, taking my time to keep them even in size. I press a small indentation into each ball, spoon in a bit of apricot jam, and carefully seal the dough back around it. This step feels almost meditative, and I always remind myself not to overfill, no matter how tempting it is.(See the next page below to continue…)