
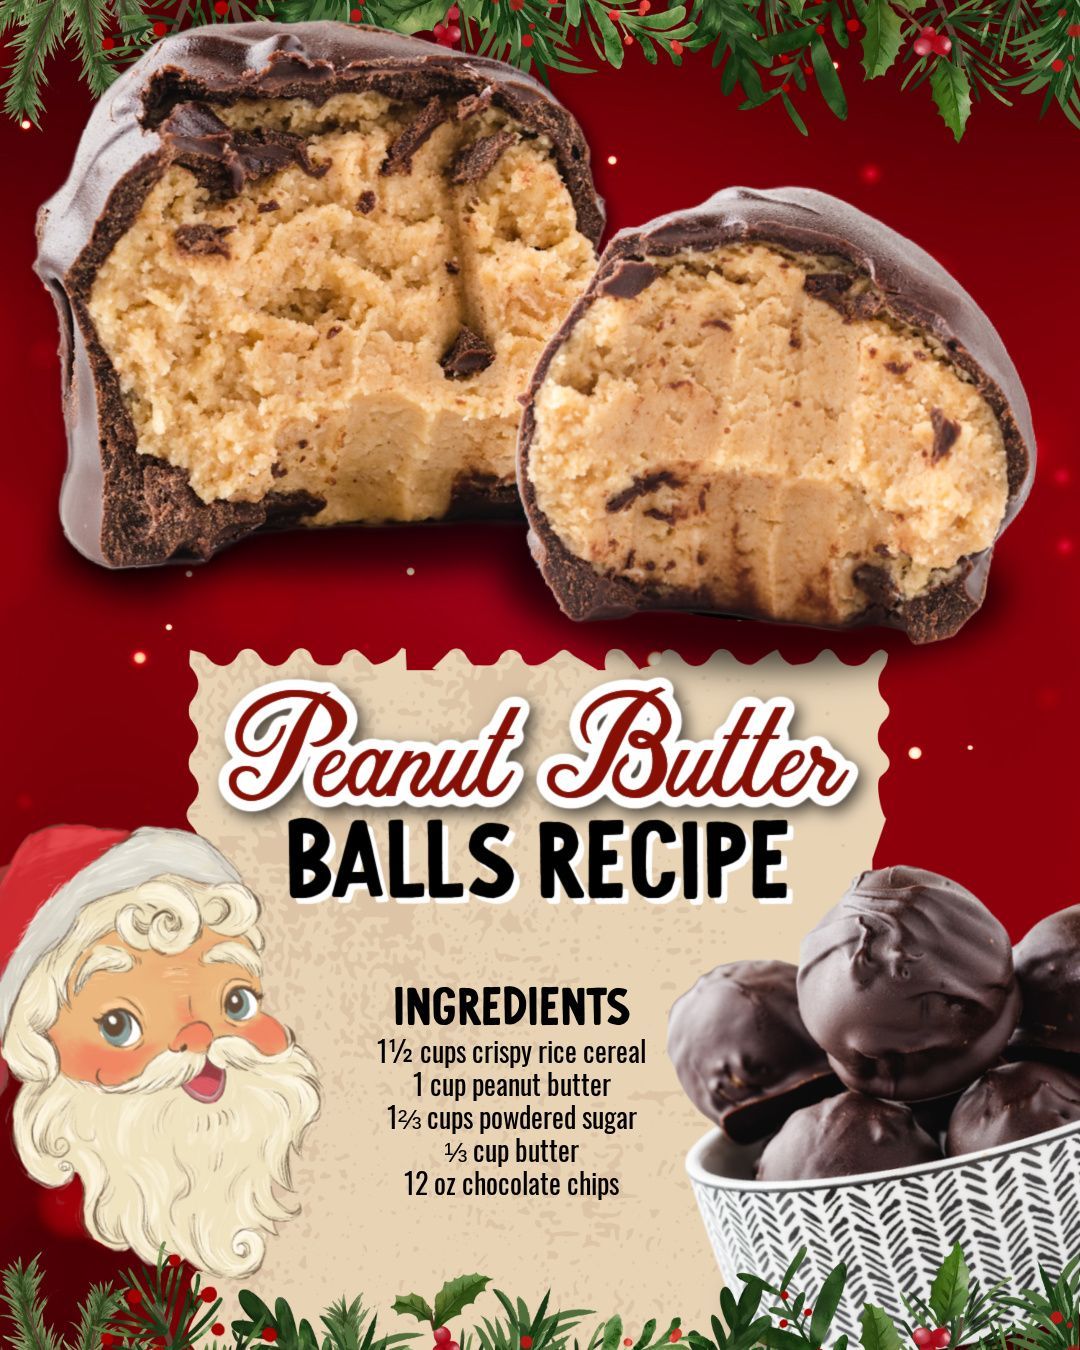
Peanut Butter Balls are classic no‑bake candies made from a sweet, creamy peanut butter mixture rolled into balls and dipped in melted chocolate until fully coated. They taste like bite‑size peanut butter cups—rich, salty‑sweet centers wrapped in a smooth chocolate shell—and are perfect for Christmas trays, parties, or anytime you want an easy make‑ahead treat.
What are Peanut Butter Balls?
Peanut Butter Balls (sometimes called buckeyes when a bit of peanut butter is left peeking out on top) are a simple, old‑fashioned candy made by mixing peanut butter with butter and powdered sugar to form a thick dough, shaping it into balls, chilling, and dipping in chocolate. Many “grandma‑style” recipes also include graham cracker crumbs for a little crunch and structure in the centers.
Unlike baked cookies, these treats are completely no‑bake; the only cooking is melting chocolate on the stove or in the microwave. The result is a candy that holds its shape at room temperature but stays soft and creamy when you bite into it, with flavors very similar to Reese’s peanut butter cups.
Equipment
- Large mixing bowl for the peanut butter filling.
- Hand mixer or stand mixer (optional but helpful) to blend peanut butter, butter, and sugar smoothly.
- Rubber spatula for scraping the bowl and mixing in crumbs.
- Baking sheet lined with parchment or wax paper for chilling and setting the balls.
- Small cookie scoop or tablespoon to portion balls evenly.
- Refrigerator (and optional freezer) for chilling before and after dipping.
- Microwave‑safe bowl or double boiler for melting chocolate.
- Fork, spoon, or toothpick for dipping balls in chocolate.
Ingredients
Classic smooth peanut butter balls:
- 1½ cups creamy peanut butter (no‑stir style like Jif or Skippy; natural peanut butter is too oily for this recipe).
- ½ cup (1 stick) butter, softened to room temperature.
- 2–4 cups powdered sugar (most recipes use 2–4 cups; start with 2 and add more as needed until the dough is firm and not sticky).
- 1 teaspoon vanilla extract.
Graham‑cracker variation (for extra structure and crunch):
Chocolate coating:
- 10–12 ounces chocolate melting wafers, almond bark, or chocolate chips (milk, semi‑sweet, or dark).
- Optional: 1–2 tablespoons shortening or coconut oil to thin chocolate chips for easier dipping (omit if using candy melts or almond bark).
Decorations (optional):
- Sprinkles for topping freshly dipped balls.
- White chocolate for drizzling.
- Flaky sea salt for a sweet‑salty finish.
Step-by-step instructions
Start by making the peanut butter filling. In a large bowl, combine creamy no-stir peanut butter and softened butter, then beat them together until completely smooth and creamy with no streaks. This step is important because it evenly distributes the fat and keeps the filling from separating later.
Vanilla extract is mixed in at this point to add flavor. Next, powdered sugar is added gradually. Many recipes begin with about two cups of powdered sugar, mixed in on low speed so it doesn’t puff everywhere, and then more is added as needed until the mixture forms a thick, moldable dough.
The texture should change from loose and sticky to firm and dough-like; when you pinch some between your fingers, it should hold its shape instead of smearing. If the recipe includes graham cracker crumbs, those are mixed in with or just after some of the sugar so they have a chance to hydrate and help firm the dough.
Once the dough reaches the right consistency, it’s time to shape. The mixture is scooped with a small cookie scoop or a spoon and rolled between the palms into smooth balls about 1 inch in diameter. Keeping the size consistent helps them chill and coat evenly and also makes the final tray look more professional.
The balls are arranged in a single layer on a baking sheet lined with parchment or wax paper so they don’t stick. If the mixture starts to feel soft or greasy as you work, the tray can be popped into the fridge for a few minutes so the butter firms up again before continuing to roll.
Chilling is a key step. The tray of peanut butter balls is placed in the refrigerator for at least 30–60 minutes, or into the freezer for about 20–30 minutes, until the balls are fully chilled and quite firm. This makes them much easier to dip, because cold centers hold their shape when they hit warm chocolate and are less likely to crumble or slide off the dipping tool. Skipping or shortening this step is one of the main reasons fillings fall apart in the chocolate.
While the balls chill, the chocolate coating is prepared. Chocolate chips, melting wafers, or almond bark are placed in a microwave-safe bowl and heated in short bursts of about 20–30 seconds, with thorough stirring after each round, until smooth and fluid.
If using regular chocolate chips, a spoonful or two of shortening or coconut oil can be added to thin the chocolate so it flows more easily and coats in a thinner, smoother layer. Alternatively, the chocolate can be melted in a bowl set over barely simmering water, which keeps it warm and workable for longer, but it is important to keep water from splashing into the chocolate because moisture can cause it to seize.
Once the chocolate is ready and the centers are firm, dipping begins. Working with a few balls at a time while leaving the rest in the refrigerator, each chilled ball is lifted on a fork or speared with a toothpick and lowered into the melted chocolate.
The ball is turned to coat completely, then lifted up and held over the bowl while the utensil is tapped gently against the edge to let excess chocolate drip off in a thin stream. The coated ball is slid off onto the parchment-lined baking sheet.
For buckeye-style candies, only the bottom and sides are dipped, leaving a circle of peanut butter visible on top, and the toothpick hole is smoothed once the chocolate starts to set. For fully coated Peanut Butter Balls, the entire surface is covered. If decorations like sprinkles or a pinch of flaky salt are used, they are added immediately, before the chocolate firms.
The dipped candies are then set aside to firm up. The tray can be left at cool room temperature or returned to the refrigerator so the chocolate sets quickly and becomes dry to the touch. This usually takes about 20–30 minutes in the fridge. After the coating has fully hardened, the Peanut Butter Balls can be transferred to containers for storage or arranged on serving trays.
Variations
Peanut Butter Balls are very flexible, and small ingredient changes create noticeably different textures and flavors. One common variation uses graham cracker crumbs in the filling. The crumbs can replace part of the powdered sugar or be added in addition to it, which makes the centers less dense and gives a subtle, pleasant crunch. This version tastes more like a candy bar and is especially popular in recipes that label themselves as old-fashioned or grandma’s peanut butter balls.
Another variation swaps smooth peanut butter for crunchy peanut butter. Using crunchy peanut butter adds nutty bits throughout the filling and gives a slightly more rustic texture while keeping the same overall flavor. Some bakers also stir in crisp rice cereal for an airy crunch or a small amount of toffee bits for extra caramelized sweetness.
On the chocolate side, the type of coating can shift the character of the candy. Milk chocolate makes the balls sweeter and gives them a flavor that closely mimics commercial peanut butter cups.
Dark chocolate adds a more intense cocoa flavor and reins in the sweetness, which works well for adults or those who like a richer dessert, while white chocolate creates a very sweet, visually striking version that can be tinted or drizzled with contrasting colors for holidays.
Buckeye-style candies are another popular twist. Instead of fully coating each ball, only the bottom and sides are dipped, leaving a circle of peanut butter exposed on top, which looks like the nut from an Ohio buckeye tree.
This style traditionally uses a very smooth, crumb-free filling and is especially identified with Midwestern holiday baking. For a shortcut version, the same mixture can be pressed into a parchment-lined pan, chilled until firm, topped with a layer of melted chocolate, and sliced into bars or squares, which gives all the flavors with no rolling and dipping.
Storage
Peanut Butter Balls store very well, which is part of what makes them such a holiday workhorse. Once the chocolate coating has set completely, they can be placed in an airtight container and kept in the refrigerator for about one to two weeks. Stacking them in layers separated by parchment or wax paper helps keep the shells from sticking together or getting scuffed. The cooler temperature keeps the chocolate firm and the centers fresh, especially in warm kitchens.
In a cool, dry environment, they can sit at room temperature for a few days, which is convenient for party platters or gift tins that will be eaten quickly. Many bakers, however, still prefer refrigerating them and then letting them sit at room temperature for 10–15 minutes before serving so the centers soften slightly while the chocolate remains crisp.
These candies also freeze extremely well. After the balls are dipped and set, they can be placed on a tray to freeze briefly, then transferred to a freezer-safe container or bag, again with parchment between layers. In the freezer, Peanut Butter Balls keep their quality for several months.
When ready to serve, they can be thawed in the refrigerator overnight or at cool room temperature until the centers are no longer icy. If thawed slowly and kept well wrapped, the chocolate usually stays smooth without developing a white bloom, and the texture of the filling remains creamy. This makes them ideal for making far in advance of busy holidays.
Tips and tricks
A few practical tips help Peanut Butter Balls turn out smooth, neat, and easy to handle. The most important is controlling the consistency of the filling. Starting with room-temperature butter and peanut butter ensures they blend smoothly; if either component is cold, the mixture can be lumpy and harder to bring together.
Powdered sugar should be added gradually, and the dough should be checked frequently by rolling a small test ball. If it sticks heavily to your hands, more sugar or crumbs are needed; if it cracks or feels dry, you may have added too much and can correct slightly with a spoonful of extra peanut butter.
Choosing the right peanut butter also matters. Recipes consistently recommend no-stir, commercial creamy peanut butter rather than natural styles because the oil in natural peanut butter tends to separate, making the filling greasy or causing it to weep oil over time. Using a brand like Jif or Skippy helps the dough stay stable and smooth. If using salted butter, it’s usually not necessary to add extra salt; if using unsalted butter, a small pinch of salt in the filling can sharpen the peanut flavor.
Chilling at two stages is another big success factor. Chilling the dough briefly before rolling can make it easier to shape; chilling the finished balls thoroughly before dipping is what really keeps them from falling apart in the chocolate. If you notice balls starting to soften on the tray as you dip, it helps to rotate trays so one is always waiting in the fridge while the other is being dipped.
When melting chocolate, gentle heat and frequent stirring are key. Using a microwave, short bursts at medium or 50–70% power, with plenty of stirring, prevents scorching. With a double boiler, keeping the water at a bare simmer and making sure the bottom of the bowl does not touch the water helps keep the chocolate smooth.
A small amount of shortening or coconut oil thins chocolate chips and gives a nicer flow; candy melts and almond bark usually do not need this extra fat and are designed to set with a nice sheen. It’s also important to keep water away; even a few drops can seize the chocolate into a thick, grainy paste.
For a clean, professional look, tapping the dipping tool against the side of the bowl after coating each ball helps knock off excess chocolate so there are no big puddles around the base. If using toothpicks, twisting them gently as you pull out and then smoothing the hole with a fingertip or the back of a spoon once the chocolate is partially set hides the mark. Adding drizzles of contrasting chocolate or a few sprinkles while the coating is wet gives them a bakery-style finish that’s easy to theme for holidays or events.
Put together, these steps and small tricks turn a very simple ingredient list into polished, reliable Peanut Butter Balls: creamy centers, crisp chocolate shells, and a candy that holds up beautifully for serving, gifting, and freezing.