
Most Red Velvet Cheesecake Bite recipes use clever shortcuts so you get maximum flavor with minimal effort. A boxed red velvet cake mix is heat-treated (microwaved or baked briefly to make it safe to eat raw), then mixed straight with softened cream cheese to form a thick, smooth dough that tastes like red velvet cheesecake batter. The dough is chilled, scooped, and rolled into balls, then coated in melted white almond bark or white chocolate, which sets into a crisp shell that contrasts beautifully with the soft, creamy center.
Some versions start with a fully baked red velvet cake, crumbled and mixed with cream cheese, then rolled and dipped like cake pops without sticks. Others build a baked red velvet brownie or bar base and swirl or layer cheesecake on top, then cut into bite-size squares. However you arrive at the base, the idea is the same: red velvet plus cream cheese plus chocolate coating, sized into rich, pretty bites that look impressive on a platter but are easy to make ahead.
Equipment
- Large mixing bowl for combining cake mix (or crumbs) and cream cheese
- Hand mixer or stand mixer to beat cream cheese and incorporate cake mix until smooth
- Baking sheet lined with parchment or wax paper for chilling and setting the bites
- Small cookie scoop (about 1 tablespoon) or measuring spoon for portioning dough
- Microwave-safe bowls for melting white almond bark, white chocolate, and red candy melts
- Forks or dipping tools for coating bites and letting excess chocolate drip off
- Piping bag or small zip-top bag for drizzling red melts over set white-coated bites
- Refrigerator and/or freezer space to chill the cheesecake dough and set the coating
Ingredients
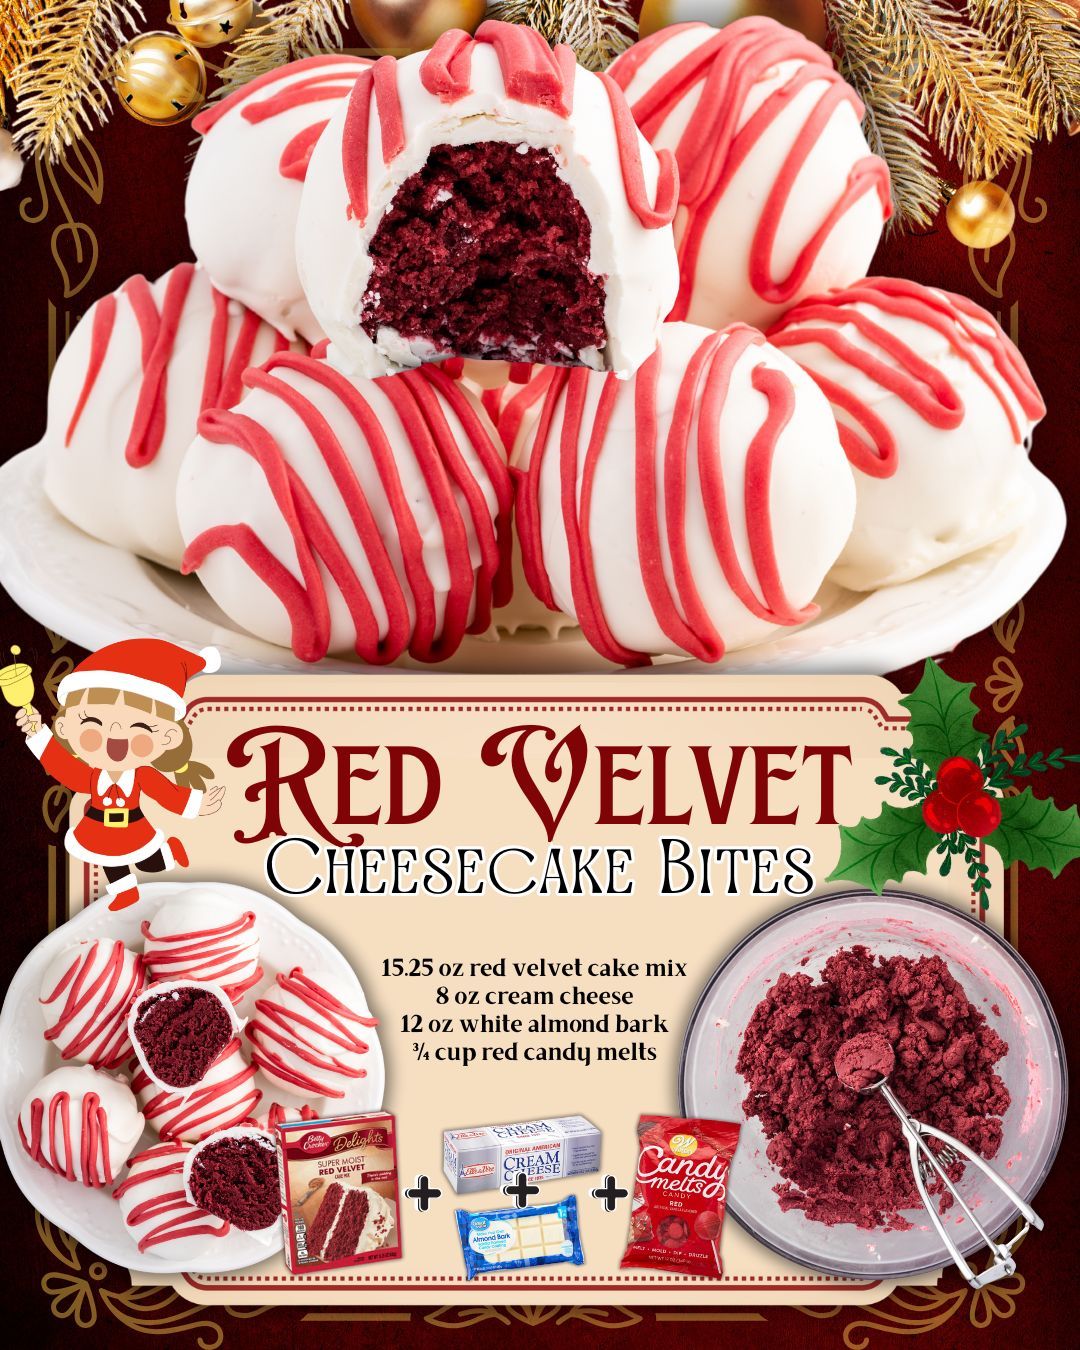
The easiest Red Velvet Cheesecake Bites use just cake mix, cream cheese, and coating chocolate, with red melts for garnish.
Base no-bake cheesecake bites (cake-mix method):
- 15.25 oz red velvet cake mix, dry and heat-treated before mixing
- 8 oz (226 g) cream cheese, softened to room temperature
Coating and decoration:
- 12 oz white almond bark or white chocolate melting wafers (vanilla candy coating also works)
- ¾ cup red candy melts, for drizzling or partial dipping (optional but highly recommended for the red-on-white look)
Baked-cake variation (truffle style):
- 1 box red velvet cake mix, plus water, oil, and eggs as called for on the box
- 8–16 oz cream cheese, softened (recipes vary on richness; more cream cheese gives a softer, more cheesecake-like center)
- White chocolate, dark chocolate, or candy melts for dipping
Optional additions:
- ¼–½ cup powdered sugar mixed into the cream cheese for extra sweetness, especially in baked-cake versions
- ½–1 teaspoon vanilla extract in the cream cheese mixture to enhance flavor
- Sprinkles, mini heart sprinkles, or white chocolate shavings for topping
Step-by-step instructions
The Princess Pinky Girl–style no-bake version is very popular because it skips baking entirely. You start by heat-treating the cake mix to make it safe to eat uncooked. The dry red velvet cake mix is spread in an even layer on a baking sheet and baked briefly at a moderate temperature (often around 300°F/150°C for 5–10 minutes), or microwaved in short bursts, then cooled completely.
This step reduces potential pathogens in the raw flour and mix, so the finished bites can be enjoyed safely without baking.
Once the mix is cool, softened cream cheese is beaten in a large mixing bowl with a hand mixer until smooth and creamy. The cooled, dry cake mix is sprinkled over the top and mixed in on low speed until a thick, uniform dough forms with no streaks of cream cheese or powdery mix. The mixture should come together like cookie dough—soft, a bit sticky, but stiff enough to scoop and roll. If it’s very soft, some recipes suggest chilling briefly or adding a spoonful more cake mix.
The bowl of red velvet cheesecake dough is then tightly covered and chilled in the refrigerator for about 2 hours. This chilling step firms up the mixture, making it much easier to roll into balls and helping the bites hold their shape when dipped in warm coating. While the dough chills, a baking sheet is lined with parchment or wax paper and set aside.
When the dough is thoroughly chilled, a small cookie scoop (about 1 tablespoon) is used to portion out mounds of dough. Each portion is rolled quickly between the palms into a smooth ball and placed on the prepared baking sheet. Working in batches keeps the dough from warming up too much. Once all the balls are rolled, the tray can go back into the fridge or even into the freezer for 15–30 minutes to make them extra firm for dipping.
Next, the coating is prepared. White almond bark or white chocolate melts are chopped if necessary and added to a microwave-safe bowl. The chocolate is microwaved in 20–30 second intervals at 50% power, stirring between each run, until completely melted and smooth. If using white chocolate chips instead of professional candy melts, some bakers add a teaspoon or two of coconut oil or vegetable shortening to help smooth and thin the melted chocolate.
Only a few chilled cheesecake balls are removed from the fridge at a time, so they stay cold and easy to handle. Using a fork or dipping tool, each ball is lowered into the melted white chocolate, rolled to coat completely, then lifted and allowed to drip for a few seconds.
The fork is gently tapped against the side of the bowl to knock off excess coating, leaving a thin, even shell. The dipped ball is then slid onto the parchment-lined baking sheet. This process is repeated with all the bites, reheating the chocolate briefly if it starts to thicken.
Once all the bites are coated in white chocolate, they’re left to set at room temperature or placed in the refrigerator to set more quickly. When the white layer is firm and dry to the touch, red candy melts are melted in a separate bowl using the same gentle microwave method.
The melted red coating is transferred to a piping bag or small zip-top bag with a tiny corner snipped off, and thin zigzag drizzles are piped over the top of each bite to create a pretty red-on-white pattern. Alternatively, some recipes dip just the tops in red melts or sprinkle on heart-shaped sprinkles or white chocolate shavings while the drizzle is still wet.
After the red drizzle sets, the Red Velvet Cheesecake Bites are ready for serving or storage. They’re usually stored in the refrigerator in an airtight container, with parchment between layers to prevent sticking. The bites can be enjoyed chilled (for a firmer texture) or allowed to sit at room temperature for 10–15 minutes to soften slightly for a creamier center.
Texture and flavor tips
The goal with this recipe style is a center that feels like red velvet cheesecake—not dry cake and not runny batter. That’s why the proportions of cream cheese to cake mix (or cake crumbs) and the chilling step are so important. Using fully softened cream cheese ensures it blends smoothly with the dry mix and avoids little lumps in the center.
Heat-treating the cake mix gives the dough a slightly par-baked flavor and makes the final texture closer to a very dense, fudgy cake than pure raw flour.
In baked-cake versions, crumbling the cake as finely as possible and mixing thoroughly with cream cheese is key; any large, dry chunks can create grainy pockets instead of a uniform truffle. Many bakers add a small amount of powdered sugar and vanilla to the cream cheese in those versions to boost the cheesecake flavor.
For the coating, using candy melts or almond bark generally leads to smoother dipping and a stronger shell than regular chocolate chips, which can seize or streak if overheated. Working with cold centers and warm (not scorching hot) coating helps avoid cracking or excessive pooling of chocolate at the base.
Variations and presentation
Red Velvet Cheesecake Bites can be adapted in several ways while keeping the core idea intact. Instead of all white chocolate, some bakers dip in milk or dark chocolate, then drizzle with white, creating a more intense chocolate flavor that plays off the tangy center. You can also roll the coated bites in red velvet crumbs, shredded coconut, or sprinkles instead of drizzling, giving a different texture and look.
For a more “cheesecake-forward” version, some recipes form balls of sweetened cream cheese mixture first, chill them, and then roll them in red velvet cake crumbs instead of mixing the crumbs into the cream cheese.
This inverts the structure—cheesecake center, red velvet outside—and yields a lighter, creamier interior. Another approach bakes mini red velvet brownie or cake bases in mini muffin pans, then pipes cheesecake filling into the center and bakes briefly, cutting them into bites once cooled.
Color and decor can shift to match different holidays. For Valentine’s Day, adding heart sprinkles or pink drizzle alongside the red makes the bites extra romantic. For Christmas, red drizzle plus green sprinkles or holly-shaped sprinkles reinforces the Christmas palette. Even without seasonal decor, the bright red interior revealed when you bite into the white shell is eye-catching on any dessert platter.
Make-ahead and serving ideas
Red Velvet Cheesecake Bites are ideal make-ahead desserts. The cheesecake dough can be mixed and chilled a day in advance before rolling and dipping, or the rolled balls can be chilled or frozen before coating. Once fully dipped and decorated, the bites keep well in the refrigerator for several days; many recipes note that the flavor and texture actually improve after resting as the flavors meld.
For longer storage, the undipped or dipped bites can be frozen; letting them thaw in the refrigerator helps prevent condensation from forming on the chocolate. On a dessert table, they look polished when arranged in mini paper candy cups or lined up on a tray with alternating directions and colors of drizzle. Because they’re rich, their small size is a plus—they complement other desserts like brownies, cookies, and cupcakes without overwhelming the plate.
As a recipe style, Red Velvet Cheesecake Bites tick all the boxes for modern party treats: minimal ingredients, no-fuss method, easy portion control, and high visual impact thanks to the red, white, and chocolate contrast.