
Instead of assembling the whole pie and baking everything together, blind baking separates the crust and the filling steps. The rolled and crimped pie dough is chilled until firm, then lined with parchment or foil and filled with pie weights (or dried beans or rice) to hold its shape.
That shell goes into a hot oven so the fat in the crust melts and the flour sets, but the weights keep the pastry from puffing up or sliding down the sides. After a first bake, the weights and lining are removed and the bare crust goes back into the oven to dry and brown.
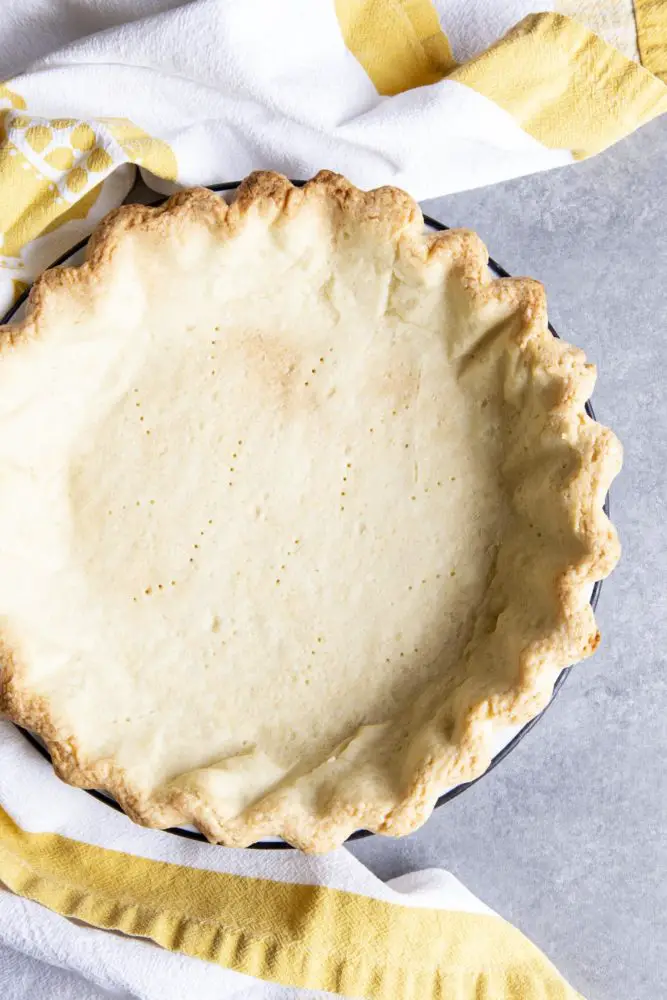
For par‑baking, you stop when it’s just turning golden and then add a filling that will bake again; for a fully blind‑baked crust, you keep baking until the entire crust is deeply golden and crisp, ready for a no‑bake or stovetop filling.
Equipment
9‑inch pie plate lined with unbaked pie dough.
Parchment paper or heavy‑duty aluminum foil to line the crust.
Pie weights, dried beans, or uncooked rice to weigh down the crust.
Baking sheet to support the pie plate and help the bottom brown evenly.
Fork for docking (pricking) the crust if you’re using that method.
When To Blind Bake And Why
You blind bake whenever your filling won’t cook the crust enough, or when the filling is so wet that it tends to soak into raw pastry. Cream pies, pudding pies, mousse pies, fresh fruit tarts, and many icebox pies all rely on a fully baked crust that’s cooled before a chilled filling goes in.
Quiches, pumpkin pies, and other custard pies often benefit from a par‑baked crust so the base is mostly set before the liquid custard is added; this helps prevent soggy bottoms and ensures the crust doesn’t still taste raw when the custard is done.
The science is simple: blind baking drives off moisture from the dough, sets the gluten, and starts browning the flour and sugars, building a crisp, flavorful surface. When filling is added afterward, that dried, baked layer resists soaking, especially if you add extra barriers like a quick egg white wash or a thin layer of melted chocolate for sweet pies. Without blind baking, delicate fillings can turn the bottom into gummy, pale dough instead of flaky pastry.
Ingredients (For The Crust You’re Blind Baking)
You can blind bake almost any standard pie crust recipe, whether it’s an all‑butter pastry, a butter‑shortening mix, or a “grandma” egg‑and‑vinegar dough. A typical single‑crust pie shell looks like this:
1¼–1½ cups all‑purpose flour, depending on your recipe.
½ cup (1 stick / 115 g) cold butter, or a mix of butter and shortening.
½ teaspoon salt and, for sweet pies, 1–2 teaspoons sugar.
3–6 tablespoons ice‑cold water, added gradually.
Optional egg and vinegar in “grandma” style crusts for easier handling and extra tenderness.
The exact crust formula isn’t as important here as the shaping and baking method that follow.
Instructions And Steps
Start by preparing and chilling the pie shell. Roll your pie dough out on a lightly floured surface into a circle about 2 inches wider than your pie plate and roughly ⅛‑inch thick. Gently transfer the dough to the plate by rolling it loosely around the rolling pin and unrolling over the dish or by folding it into quarters and unfolding into the pan.
Ease the dough down into the bottom and up the sides with your fingers without stretching it; stretching is one of the main causes of shrinkage in the oven. Trim the overhang to about 1 inch beyond the rim, tuck it under itself to create a thicker edge, and crimp or flute as desired.
Place the shaped shell in the refrigerator for at least 30–60 minutes (or into the freezer for 10–20 minutes) until the dough is very firm and cold. This chill firms the fat and relaxes gluten, making the crust hold its shape much better during baking.
While the crust chills, preheat your oven to around 375°F (190°C). Many blind‑baking tutorials land between 375°F and 400°F; 375°F is a good balance that promotes browning without too much shrinking or burning.
Position an oven rack in the lower or lower‑middle third of the oven so the heat hits the bottom of the crust more directly, helping it brown.
Once the shell is chilled and the oven is hot, line and weight the crust. Remove the pie plate from the fridge or freezer. If you like the docking method, use a fork to prick the bottom of the dough lightly in several places to allow steam to escape; some bakers skip this when using plenty of weights, but it can help reduce bubbling.
Cut a large piece of parchment paper or heavy‑duty foil big enough to cover the crust and hang over the edges. Press it gently into the bottom and up the sides so it fits closely against the dough and covers the rim. Pour pie weights, dried beans, or uncooked rice into the lined crust until it is well filled—ideally reaching almost to the top of the crust on the sides. The more evenly and fully the weights are distributed, especially up the sides, the less the pastry will slump.
Now bake with the weights in place. Put the pie plate on a baking sheet to make it easier to move and to encourage even browning on the bottom. Slide the tray into the preheated oven and bake the crust, still lined and filled with weights, for about 15–20 minutes.
Keep an eye on the edges: you’re looking for them to turn from raw and shiny to opaque and slightly set, maybe just barely beginning to color. The sides should be holding their shape against the weights. The bottom will still be pale because it’s covered, but it will have started to firm up. If your oven runs hot, start checking around 12 minutes; if it runs cool, it might need closer to 20 minutes.
After this first bake, remove the weights and lining. Carefully take the baking sheet out of the oven and set it on a heat‑safe surface. Using oven mitts, lift the parchment or foil by the overhanging edges and remove it along with the hot weights in one go.
Transfer the weights to a bowl or tray to cool. At this point, the pie crust should still look fairly pale on the bottom, though it will be dry rather than wet; the edges will be more solid but not fully browned.
From here, you decide whether you need a par‑baked crust or a fully blind‑baked crust. For a par‑baked crust, suitable for pies that will go back into the oven with their fillings (like custard pies and quiches), return the bare crust to the oven and bake for another 5–10 minutes.
Watch for the bottom to turn from pale to a light golden or matte color; it should look dry and set but not deeply browned. The edges will pick up a bit more color as well. Once it reaches this stage, remove the crust from the oven and let it cool for a few minutes.
You can add your filling while it’s still slightly warm if your recipe calls for that, then continue baking the filled pie as directed.
For a fully blind‑baked crust, needed for no‑bake fillings, leave the crust in the oven longer. After removing the weights, bake the crust for an additional 15–20 minutes, or until the entire shell is an even, deep golden brown and feels crisp when gently tapped. Rotate the pie halfway through this second bake if your oven tends to brown unevenly.
If the edges start to brown too quickly while the bottom is still pale, shield the rim with a pie crust shield or strips of foil and continue baking until the bottom catches up. When it looks and feels thoroughly baked, remove the crust from the oven and let it cool completely before adding any chilled or room‑temperature filling. Filling a warm crust with cold custard or cream can cause condensation and soften the pastry.
Tips And Tricks
Keeping the dough cold at every stage—mixing, rolling, shaping, and chilling before baking—helps control shrinkage and maximize flakiness. Cold fat stays in distinct pieces that steam and puff when they hit heat, forming layers; warm fat blends too much into the flour, leading to a denser crust that slumps.
Avoid stretching the dough into the pan; instead, gently lift and ease it into corners, which significantly reduces the tendency to pull back while baking.
Use plenty of pie weights and make sure they reach right up the sides of the crust; this is one of the most common tips across blind‑baking guides and one of the most common mistakes when not followed. Too few weights allow the sides to slump and the bottom to puff.
If the bottom does puff slightly after you remove the weights, you can quickly prick it with a fork or press it down with the back of a spoon while the crust is still hot and pliable.
Watch the crust, not just the timer. Ovens vary, and pie plates (glass, metal, ceramic) conduct heat differently, so the visual cues—edges set and just beginning to brown after the first bake, bottom dry and lightly golden for par‑baked, deep golden all over for fully baked—are more reliable than exact minutes.
Baking the crust on a preheated baking sheet or pizza stone can also help produce a nicely browned, crisp bottom, especially in ovens that tend to run cool on the lower rack.
Once you understand how to blind bake, you can mix and match crusts and fillings with confidence, knowing your pastry will stay crisp and flaky beneath even the creamiest or juiciest fillings. It turns basic pies and tarts into desserts that look refined and slice cleanly, with that satisfying contrast between crunchy crust and silky filling that defines a truly great pie.