
Festive Christmas Cookie Bars are the kind of cheerful, colorful, impossibly delightful holiday treat that brings instant joy to every table. Soft, chewy, buttery, and packed with chocolate chips, M&M’s, sprinkles, and seasonal flavor, these bars feel like Christmas wrapped in dessert form. They bake into golden perfection with crackly tops and gooey centers, offering that perfect cookie texture without having to scoop individual cookies.
They’re ideal for busy December days when you want something homemade, impressive, and absolutely irresistible with minimal effort. Whether you’re hosting a cookie exchange, bringing treats to a party, or stocking up on sweets for family celebrations, these cookie bars deliver consistent holiday magic. One pan makes plenty—and they disappear unbelievably fast.
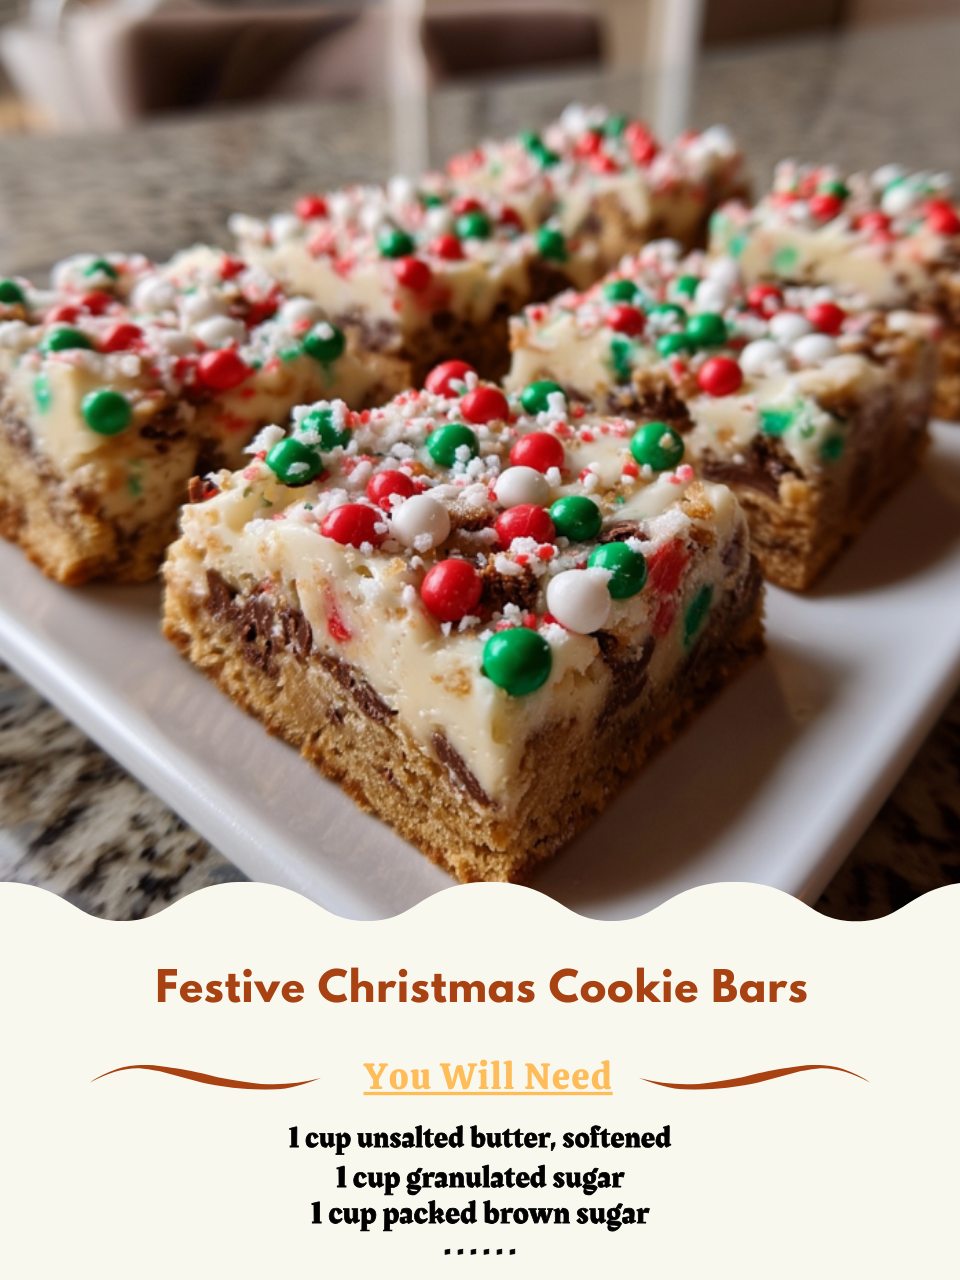
Equipment You Will Need
- 9×13-inch baking dish
- Parchment paper
- Mixing bowls
- Whisk
- Electric mixer or hand mixer
- Rubber spatula
- Measuring cups and spoons
- Cooling rack
Ingredients List
- 1 cup unsalted butter, melted
- 1 cup brown sugar
- ½ cup granulated sugar
- 2 large eggs
- 2 tsp vanilla extract
- 2 ½ cups all-purpose flour
- 1 tsp baking soda
- ½ tsp salt
- 1 cup red and green M&M’s
- 1 cup chocolate chips
- ½ cup holiday sprinkles
- Optional add-ins: white chocolate chips, chopped nuts, crushed peppermint
Step-by-Step Instructions
Start by preheating your oven to 350°F (175°C) and lining your 9×13-inch baking dish with parchment paper. Allow some parchment to hang over the edges for easy lifting later. In a large mixing bowl, whisk the melted butter with brown sugar and granulated sugar until smooth and glossy.
Add the eggs and vanilla extract, whisking again until the mixture becomes creamy and thick. This step lays the foundation for chewy, flavorful bars.
In a separate bowl, whisk together flour, baking soda, and salt. Add the dry ingredients gradually into the wet mixture, stirring with a spatula until combined. Fold gently—overmixing can make the bars dense instead of soft. Stir in the chocolate chips, M&M’s, and sprinkles.
Make sure each mix-in is evenly distributed throughout the dough. The dough will be thick and heavy, but that creates a beautifully chewy cookie bar texture once baked.
Transfer the dough into your lined baking dish. Press it evenly into the pan using your spatula or lightly greased fingertips. Add a handful of extra M&M’s and sprinkles across the top for festive color.
Bake for 22–28 minutes, depending on your oven, until the edges turn golden and the top looks slightly crackled. The center should still appear soft—cookie bars firm up significantly as they cool.
Remove the pan from the oven and allow the cookie bars to cool completely on a rack before slicing. If you want ultra-clean slices, refrigerate the bars for 20 minutes before cutting.
Lift the slab out using the parchment and slice into squares or rectangles. Serve as dessert, wrap for gifting, or stack on a holiday platter to share with friends and family.
Expert Tips for Success
Melting the butter instead of creaming it creates the signature chewy texture these cookie bars are known for. It also helps blend the sugars smoothly for a caramel-like flavor. Be sure to whisk the butter and sugars thoroughly to avoid gritty texture.
When adding dry ingredients, fold them gently to keep the dough tender. Overmixing develops too much gluten and leads to dense bars instead of soft and chewy ones.
If you want perfectly even bars, press the dough into the corners firmly but not too tightly. A smooth surface ensures the bars bake uniformly. Adding extra chocolate chips or M&M’s on top makes the bars look vibrant and bakery-style once baked.
When checking for doneness, remember that slightly underbaked is the goal—the bars continue cooking from residual heat after coming out of the oven.
Cooling is essential. Cutting too soon causes crumbling and messy edges. Letting the bars cool fully gives them time to set into picture-perfect squares. If you love gooier centers, bake closer to 22 minutes; for firmer bars, aim toward the longer bake time.
Use parchment paper instead of greasing the pan—it guarantees easy removal without breaking or sticking.
To keep your bars soft for days, store them with a slice of bread or marshmallows in the container. They absorb moisture and stay irresistibly chewy. If your bars brown too quickly on top, tent with foil for the last few minutes of baking. These little tricks help you achieve bakery-quality cookie bars every single time.
Variations and Substitutions
Make peppermint bark cookie bars by adding white chocolate chips and crushed candy canes. The sweetness pairs beautifully with the buttery dough and adds a refreshing holiday crunch.
For a gingerbread twist, add a teaspoon of cinnamon, a pinch of nutmeg, and swap half the chocolate chips for white chocolate. These warm spices blend perfectly with Christmas flavors and transform the bars into something cozy and fragrant.
If you love red and green swirls, gently fold in a small amount of food coloring into separate sections of the dough before combining. This creates marbled holiday magic without affecting the flavor.
For nut lovers, add chopped walnuts or pecans—they add an amazing crunch to the soft cookie texture. You can also mix in dried cranberries for a fruity, festive pop of sweet-tart flavor.
For those who enjoy ultra-indulgent desserts, drizzle melted white chocolate or caramel over the cooled bars. You can even add a frosting layer by spreading cream cheese icing across the top and finishing with more sprinkles.
Gluten-free variations are simple: use a 1:1 gluten-free flour blend and ensure your mix-ins are gluten-free. The bars turn out nearly identical in flavor and texture.
Want a cookie bar with extra height? Use an 8×8-inch baking dish and increase the bake time slightly. This creates thick, bakery-style bars with a denser chew.
For chocolate lovers, make triple-chocolate holiday bars using dark chocolate chips, white chocolate chips, and cocoa powder mixed directly into the dough. The possibilities are endless with a base this flexible and delicious.
Serving Suggestions and Pairings
Serve Christmas Cookie Bars stacked on a holiday dessert board alongside fudge, truffles, and peppermint bark. Their colorful tops and chewy centers make them standout treats. For gatherings, cut into small squares and place them in decorative liners to make grabbing easy.
Add a dusting of powdered sugar on top for a snowy finish that makes them feel even more festive.
Pair these bars with classic Christmas beverages such as hot cocoa, peppermint mochas, chai lattes, or mulled cider. The rich sweetness of the bars goes perfectly with warm seasonal flavors. For kids, serve with glasses of cold milk or strawberry milk for a fun twist.
Adults may enjoy them with coffee-based cocktails, dessert wines, or holiday punch.
Package cookie bars in cellophane bags tied with ribbon for adorable edible gifts. They hold their shape beautifully and stay fresh long enough to make great treats for teachers, coworkers, or party hosts.
For cookie exchanges, these bars are ideal—they stand out from traditional cookies and require much less effort than rolling and baking dozens of individual pieces.
Serve warm cookie bars with vanilla ice cream or eggnog ice cream for an irresistible Christmas sundae. Add caramel or hot fudge for extra decadence.
For a brunch treat, include them alongside pastries, fruit platters, and cinnamon rolls. Their festive appearance and soft, chewy texture make them a hit anywhere you share them.
Storage, Freezing, and Reheating
Store your cookie bars in an airtight container at room temperature for up to five days. To keep them extra soft, add a slice of bread or a couple of marshmallows into the container—they help maintain moisture.
If stacking bars, place parchment paper between layers to prevent sticking and preserve their colorful tops. Keep the container sealed when not serving to maintain freshness.
For longer storage, freeze the bars individually wrapped in plastic wrap, then place them in a freezer-safe bag. They stay fresh for up to two months. Freezing them separately prevents sticking and allows you to thaw only what you need.
To thaw, leave them at room temperature for about 30 minutes. They return to their soft, chewy texture perfectly after thawing.
If you prefer warm cookie bars, reheat them gently in the microwave for 8–10 seconds. This softens the chocolate chips and brings back that fresh-from-the-oven feel. Be careful not to overheat—they soften quickly and can crumble if heated too long.
For crispier edges, warm them briefly in a low oven for a few minutes.
When freezing large batches for parties, freeze the entire slab before cutting. This makes cleaner slices and prevents crumbling.
Once thawed, the bars hold their shape beautifully and taste just as fresh. With proper storage and reheating techniques, your festive cookie bars stay delicious from the first bite to the very last crumb.
Frequently Asked Questions
Can I use different candies instead of M&M’s?
Yes—try Reese’s pieces, mini chocolate chips, or holiday candy melts.
Can I double the recipe?
Absolutely! Use two 9×13 pans or a large sheet pan.
Why are my bars dry?
They were overbaked—remove when the center still looks soft.
Can I make them gluten-free?
Yes, just use a 1:1 gluten-free flour blend.
Can I add frosting on top?
Definitely—cream cheese or vanilla frosting adds extra holiday charm.