
Overmixing after adding the eggs is a silent killer. When you see that smooth, beautiful batter, it’s so tempting to give it one more whirl. Resist! Once the eggs are in, mix on low and stop the second the yellow streaks disappear. Overbeating incorporates air bubbles that expand in the heat and then collapse, leading to cracks and a less dense, almost spongy texture. I learned this lesson with a cheesecake that looked more like a cratered moon.
Don’t judge doneness by a clean toothpick like you would with a cake. If you insert a toothpick and it comes out clean, you have already overbaked your cheesecake. It will continue to set as it cools. The goal is that confident, wobbly center. It will look underdone to a cake-baker’s eye, but to a cheesecake maker, it’s perfect. I pulled my first one too late, and while edible, it was firmer and drier than the dreamy, creamy version I get now.
Skipping the gradual cool-down is the final, heartbreaking misstep. Pulling a hot cheesecake straight from the oven and plopping it on a cold counter shocks it, almost guaranteeing a major crack across the top. That slow cool in the oven, followed by the counter, is like a cozy blanket for your dessert, letting it settle peacefully into its final, flawless form. I’ve shed a tear over a cracked top before, and I don’t want that for you.
Serving Suggestions
I love serving this cheesecake absolutely plain, because its pure, clean flavor is such a marvel. A simple dusting of powdered sugar or a light drizzle of honey right before serving looks elegant and adds a touch of extra sweetness. When I have a little more time, I’ll macerate some fresh berries—strawberries or raspberries are my go-to—with a teaspoon of sugar and a squeeze of lemon juice. The bright, juicy berries are the perfect counterpoint to the rich cake.
For a truly decadent experience, a drizzle of warm homemade caramel sauce or a rich chocolate ganache takes it to a whole new level. I’ve found that a fine sprinkle of flaky sea salt on top of either sauce creates a fantastic sweet-and-salty contrast. In the fall, a spoonful of spiced apple compote or a cherry pie filling is just heavenly alongside a slice.
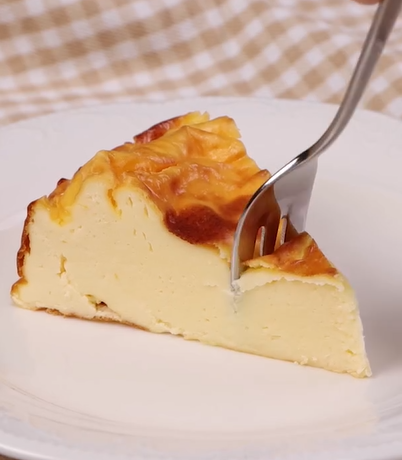
Presentation is part of the fun! Because it’s made in a springform, it has a beautiful, rustic simplicity. I run a thin knife under hot water, wipe it dry, and slice slowly for clean pieces. I always serve it on a simple plate to let the creamy color of the cheesecake itself shine. A single mint leaf or a few edible flowers can add a lovely, professional-looking pop of color.
Variations & Customizations
The beauty of this basic canvas is how easily it welcomes flavors. One of my favorite variations is adding the zest of one whole lemon and a tablespoon of its juice to the batter. It transforms it into a bright, sunny lemon cheesecake that feels incredibly refreshing. I’ve also folded in a teaspoon of real vanilla bean paste or a tablespoon of good bourbon along with the condensed milk for deep, aromatic flavor.
For a chocolate version, I sift in 1/3 cup of unsweetened cocoa powder with the cream cheese at the very beginning. It’s crucial to sift it to avoid lumps. This creates a deeply chocolatey, almost truffle-like dessert. A friend of mine swears by swirling in a few tablespoons of raspberry jam or salted caramel sauce into the batter before baking, and I have to admit, her marbled version is incredible.
If you’re a fan of texture, try a crust! Even though the recipe doesn’t call for one, I’ve pressed a simple mixture of crushed graham crackers, melted butter, and a pinch of sugar into the bottom of the pan before adding the batter. It adds a nice crunch and makes it feel more traditional. Or, bake it as directed and just sprinkle the top with crushed cookies, toffee bits, or even chopped toasted nuts right before serving.
How to Store, Freeze & Reheat
To store, I keep the cheesecake tightly covered with plastic wrap or under a cake dome in the fridge. It stays perfectly fresh and delicious for up to 5 days. In fact, I think it tastes even better on day two or three as the flavors fully meld. Just make sure it’s covered well, as it can pick up other odors from the refrigerator.
Yes, you can freeze this cheesecake beautifully! I learned that it’s best to freeze it whole or in individual slices. I first chill it completely, then wrap the entire pan (or individual slices on a parchment-lined tray) tightly in plastic wrap, followed by a layer of heavy-duty aluminum foil. It will keep in the freezer for up to 2 months. Thaw it overnight in the refrigerator, never at room temperature, to prevent condensation from making the top soggy.
“Reheating” isn’t really necessary, as it’s meant to be served cold. However, if you take a slice straight from the fridge and find it too firm, let it sit on the counter for 10-15 minutes before serving. This allows the richness and flavor to bloom perfectly. Never microwave it, as that will completely destroy the delicate, creamy texture we worked so hard to achieve.
Conclusion
This 3-ingredient cheesecake has become my not-so-secret weapon for effortless entertaining and simple indulgence. It’s a stunning reminder that incredible food doesn’t have to be complicated. It’s about quality ingredients, a few key techniques, and trusting the process. I hope you give it a try and experience that same moment of joyful disbelief that I did. Here’s to simple, spectacular baking that feels like a gift to yourself and everyone you share it with.