
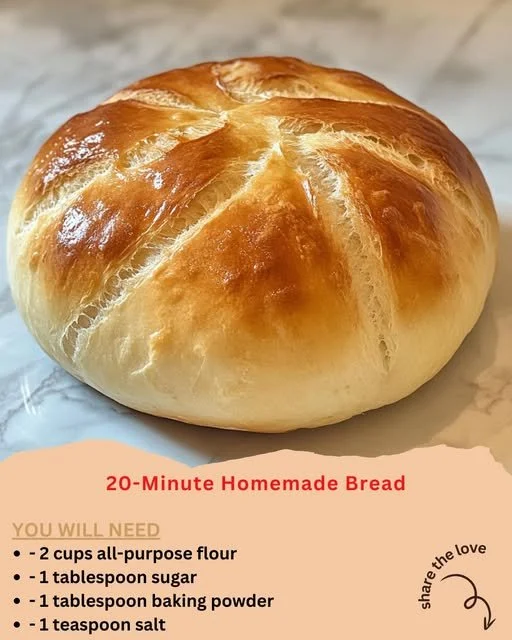
I’m excited to share with you one of my absolute favorite recipes: 20-Minute Homemade Bread! There’s something wonderful about the smell of freshly baked bread wafting through my kitchen that makes my heart sing. It’s quick, easy, and requires minimal ingredients, making it perfect for those moments when you crave the comforting embrace of warm bread but don’t have the time (or patience!) for a more complicated recipe. Trust me—that warm, soft, and fluffy loaf is just minutes away!
Why You’ll Love This Recipe
This recipe is my go-to for homemade bread because it delivers on taste and texture without spending an entire afternoon in the kitchen. I can whip up a loaf from scratch faster than I could run to the store! Plus, it’s incredibly customizable; whether I want it as a side for dinner or a base for my breakfast toast, it never disappoints. The best part? You don’t need any fancy equipment or skills to make it! (See the ingredients in the next page below…)
Ingredients
– 2 cups all-purpose flour
– 1 tablespoon baking powder
– 1 teaspoon salt
– 1 tablespoon sugar (optional)
– 1 cup warm water
– 2 tablespoons olive oil (optional)
Equipment Needed
– Mixing bowl
– Wooden spoon or spatula
– Measuring cups and spoons
– Loaf pan (or cookie sheet if you prefer)
– Clean kitchen towel (for covering dough)
Step-by-Step Instructions
Making this bread is a family-friendly project that even my kids enjoy helping with. Start by preheating your oven to 375°F (190°C). In a mixing bowl, combine the flour, baking powder, salt, and sugar (if using). Stir the dry ingredients until they are well-mixed. Then, slowly add the warm water and olive oil, using a wooden spoon or spatula to bring everything together until a soft dough forms. You want a little stickiness to the dough; that’s key for a nice rise! (See the next page below to continue steps…)
Then, turn the dough out onto a floured surface and knead for about 2-3 minutes. I find this step super satisfying; the dough transitions from a sticky mass to a smooth, elastic ball in your hands. Don’t worry if it still sticks a bit—it’s supposed to! Once kneaded, shape the dough into a loaf and place it into a greased loaf pan or onto a baking sheet if you’re feeling adventurous (round bread is fun, too!). Cover it with a clean kitchen towel and let it rest for about 5-10 minutes while your oven finishes preheating.
Once that timer goes off, pop the bread in for about 20 minutes or until the loaf is golden brown and sounds hollow when tapped on the bottom. I love the moment when the bread cools just enough for me to slice into it. The crust is perfectly golden, and the inside is soft. This is where I often get tempted to slather it with butter right away; the flavor is just incredible! Let it cool on a rack for a few minutes before diving in.
Pro Tips for Best Results
I’ve played around with this recipe several times, tweaking small ingredients to achieve perfection. One of my best discoveries was to add a tablespoon of honey to the mix, giving the bread a slight sweetness that pairs beautifully with savory meals. I also suggest checking the water temperature; it should be warm to the touch but not hot. Too hot, and it could kill the yeast, making the bread dense instead of fluffy!
Another tip I found helpful is to sprinkle a little flour on the countertop before kneading. It keeps the dough from sticking too much but not so much that it dries out. Just remember, the more you knead, the more airy your bread will be—don’t skip this step!
Lastly, if you want a crunchier crust, try placing a baking pan filled with water on the lower rack of your oven during baking. This will create steam, resulting in a crust that’s beautifully crispy. Over the years, I’ve enjoyed experimenting with these small adjustments to ensure my bread comes out perfectly every time.
Common Mistakes to Avoid
I have learned a lot about bread-making through trial and error, and I’d love to help you avoid some common pitfalls that I’ve faced. One of the most important things is measuring your flour correctly. I’ve made the mistake of scooping flour directly from the bag, which ends up compacting it and leads to a denser bread. Instead, spoon it into your measuring cup and level it off for an accurate measure. (See the next page below to continue…)
Another mistake I often made early on was over-kneading. While you do want to knead until the dough is elastic, going too far can lead to a grainy texture. Keep it soft and light! Pay attention to how it feels in your hands; it should bounce back when you poke it.
Finally, don’t rush the baking time! If the bread looks too pale, give it an extra few minutes in the oven. Trust me; I’ve been tempted to take it out too early, only to end up with doughy centers, and nobody wants that! Wait until your loaf is golden and sounds hollow when tapped.
Serving Suggestions
When it comes to serving this homemade bread, I love to keep it simple yet delicious. One of my favorite ways is to slice it warm and serve it with a generous slab of butter that melts right in. It makes for the perfect accompaniment to soups and stews on a chilly evening. I can practically taste it now!
Another delightful serving suggestion is to make sandwiches. The soft crust and fluffy interior create the perfect canvas for anything from a classic turkey and cheese to a veggie-packed delight. My kids love a good peanut butter and jelly on this bread, and I must admit, so do I!
Lastly, if I’m feeling a little indulgent, I enjoy toasting slices and topping them with avocado, a sprinkle of salt, and a drizzle of olive oil for a tasty breakfast or light lunch. The nutty flavor of the freshly baked bread pairs wonderfully with the creamy avocado!
Variations & Customizations
One of the things I adore most about this bread recipe is the versatility it offers. I’ve experimented by adding herbs and spices to the dough, like rosemary or garlic powder, to create a delightful aroma and taste. You could even toss in some grated cheese for a cheesy loaf that pairs perfectly with dinner!
Another fun variation is creating a whole wheat version. I love using half whole wheat flour and half all-purpose flour for a heartier texture and added nutrients. It’s great if you want that rustic feel while still enjoying the quick cooking time.
If you’re a fan of sweet bread, consider mixing in chocolate chips or dried fruit like cranberries or raisins. I once made a cinnamon raisin version during the holidays, and it felt like a warm hug on a cold day!
How to Store, Freeze & Reheat
To store any leftover bread, I simply wrap it in a clean kitchen towel and place it in a bread box or a paper bag. This keeps it fresh while allowing it to breathe. If I notice I won’t finish it within a couple of days, I often slice it up and freeze the remaining pieces.
Freezing the bread is easy: just pop the sliced pieces into a zip-top freezer bag, squeezing out as much air as possible. When I’m ready to enjoy some, I take out a slice, let it thaw at room temperature, and then toast it directly from the freezer for that fresh-baked taste.
Reheating is a breeze! I usually pop it in the oven for a few minutes at around 350°F (175°C) to get that crust crispy again. If I’m in a hurry, microwaving for about 10-15 seconds works too, but it won’t deliver the same crunch.
Conclusion
I hope you take the plunge to try this 20-Minute Homemade Bread recipe! There’s nothing more rewarding than coming home to the warm scent of baked bread, and I promise it’ll become a staple in your kitchen as much as it is in mine. Enjoy every slice, and happy baking!